Picture an education nonprofit at the end of a program cohort. The students have worked through twelve weeks of curriculum. The team needs to issue certificates of completion — branded, personalized, each carrying the student's name, the course title, the date, the cohort number, and the signature of the program director.
Now multiply that by tens of thousands of graduates a year, across multiple programs running concurrently, with four-week turnaround windows after each cohort, and a finance team that needs the certificate IDs reconciled against the student database. We work with a US education nonprofit running exactly this workflow. Before they automated, two staff members spent the back half of every program week manually merging records, exporting PDFs, fixing formatting drift, and emailing certificates one folder at a time. The certificates were already designed beautifully — that wasn't the problem. The problem was bridging the gap between their student database, which lived in a Google Sheet, and the polished Google Docs certificate template they had spent weeks perfecting.
This post walks through how that gap closes. The setup takes an afternoon and the workflow runs forever.
Why the obvious tools don't get you there
If you've tried to do this with the standard toolkit, you know the failure modes.
Mail merge in Word can populate a name field, but it can't pull a dynamic image, can't handle conditional content ("show this paragraph only for honors graduates"), and won't run on a schedule. It also forces you off Google Docs — meaning your design team and the program director who signs the certificate have to learn a tool they don't otherwise use. For a nonprofit running on Google Workspace, that's a step backward.
Google Apps Script technically works. We've seen organizations maintain hundred-line scripts that read a Sheet, duplicate a Doc, find-and-replace placeholders, export to PDF, and email them. The problem isn't whether it works — it's that maintenance falls on whoever wrote it. When that person leaves, the script breaks the next time Google updates an API and nobody knows how to fix it. Nobody's maintaining the rate-limit handling, the retry logic, or the partial-failure recovery. And good luck reproducing it in a new program.
Google Forms is sometimes proposed as a workaround — collect responses, generate a certificate per submission. That fits a self-serve flow (someone passes a quiz, gets a certificate), but it's the wrong primitive when the source of truth is already a structured database of graduates. You shouldn't have to re-enter data into a form just to trigger a document.
Generic "PDF generators" with proprietary editors force you to rebuild your certificate template inside their editor. So now your designer has to re-implement a layout they already perfected in Google Docs, in a tool with weaker typography controls, fewer fonts, and no real-time collaboration. Every change to the certificate becomes a two-place edit.
What's actually needed is boring: keep your Google Doc template exactly as your designer made it, keep your Google Sheet exactly as your student database tracks it, and put a thin automation layer in between that handles the batch generation, rate limiting, retries, PDF export, and folder organization.
That's the gap DocsAutomator fills.
The three-step setup
Setup takes a couple of hours; running the workflow takes seconds per cohort.
1. Build (or pick up) your certificate template in Google Docs
Take whatever certificate template your designer has already built — or pick one from the free Google Docs certificates collection if you're starting fresh. The certificate of completion template is the most common starting point for graduation programs.
Replace the parts that change row-by-row with placeholders. Placeholders are written in double curly braces, and you'll wire each one up to a Sheet column in the next step:
This is to certify that

{{full_name}}

has successfully completed the {{program_name}} program
on {{completion_date}}, in cohort {{cohort_id}}.

{{program_director_signature_image}}
{{program_director_name}}
{{program_director_title}}
A few things worth knowing about how DocsAutomator handles placeholders:
- They can sit anywhere in the document — body, header, footer, table cells, captions. Wherever Google Docs accepts text, a placeholder works.
- They can pull text or images. An image placeholder mapped to a Drive file or URL gets pre-processed (resized to fit, optimized for file size) so a 5,000-certificate batch doesn't bloat into multi-gigabyte territory.
- They support repeating blocks for line-item-style content (transcripts, course lists, etc.) and named conditional sections that show or hide based on rules you set in DocsAutomator's section settings.
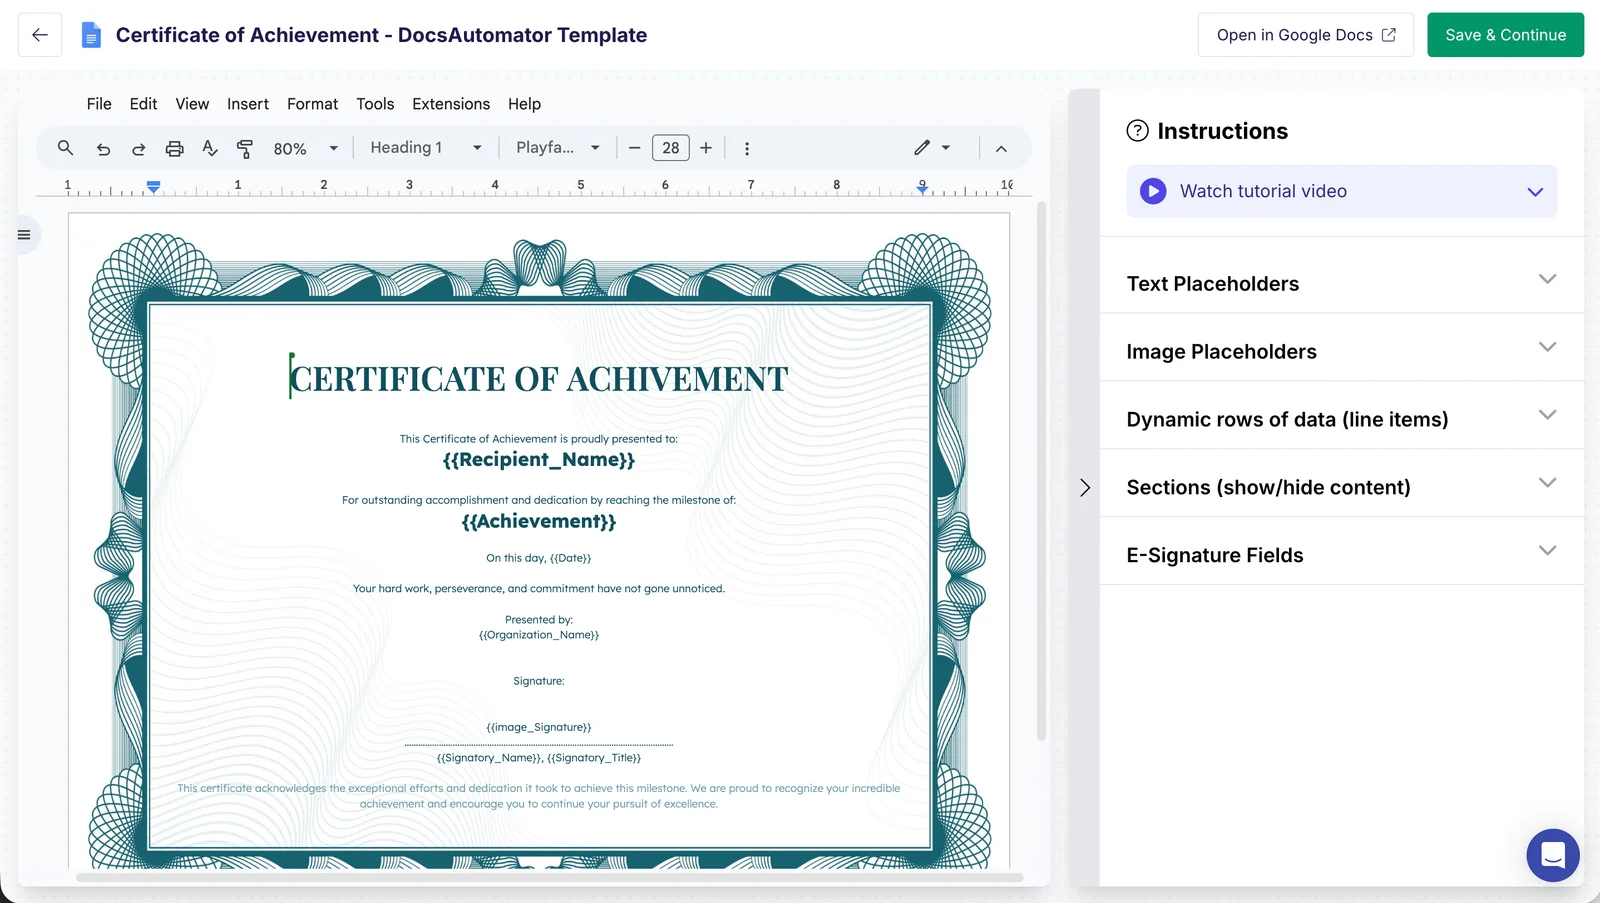
Once the template renders correctly with one placeholder example filled in by hand, you're done with Step 1.
2. Connect your Google Sheet
Each row in your Sheet is one certificate. Column headers can be whatever you already use — they don't need to match the placeholder names in your template. DocsAutomator's mapping interface lets you point any column at any placeholder.
If you already track graduates in a Sheet for finance reconciliation, you can use it as-is. Don't restructure the Sheet. DocsAutomator reads it untouched, which means your existing reporting, conditional formatting, and downstream integrations keep working.
You connect the Sheet to your DocsAutomator automation in a few clicks, then map each column to its placeholder. If your column happens to share the placeholder name (e.g. a full_name column and a {{full_name}} placeholder), the interface auto-detects and pre-fills the mapping for you.
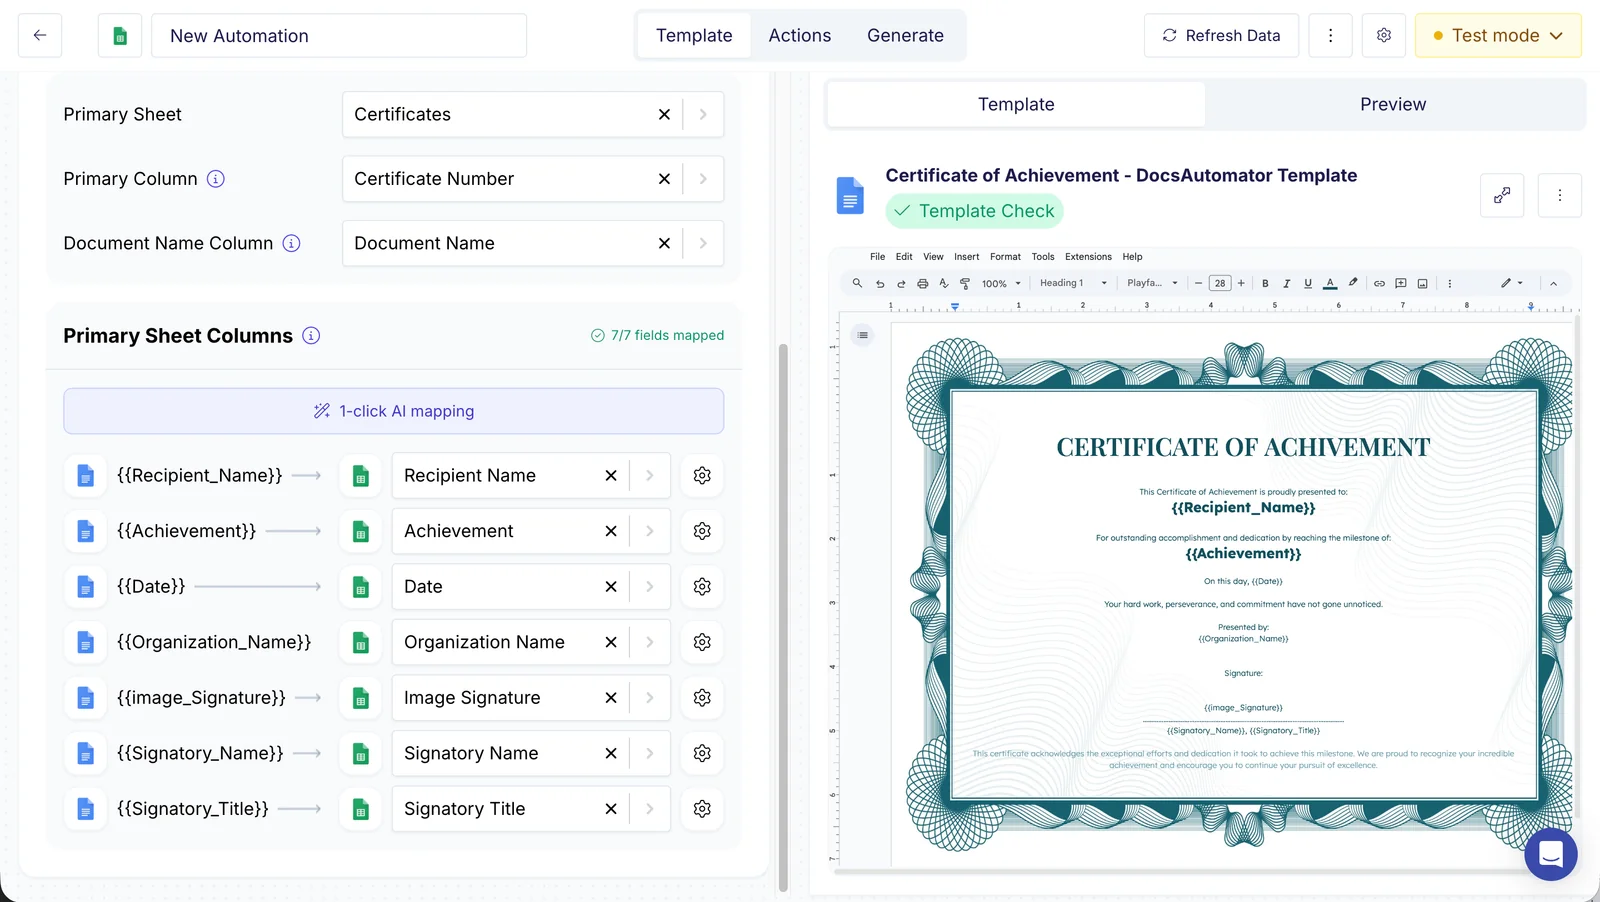
This is also where AI field mapping earns its keep if your Sheet was built by someone who used different naming conventions. The system suggests mappings between, say, a Student Name column and a {{full_name}} placeholder, and you confirm or adjust. For nonprofits inheriting Sheets from previous program directors with their own column-naming opinions, this saves a tedious afternoon.
3. Run the batch
For an end-of-cohort certificate run, you have three trigger options:
- Manual button. Click "Generate" in the DocsAutomator app. Best for cohort-end one-off runs where you want a final review of the source data before kicking off the batch.
- Per-row "Generate" button in the Sheet itself. DocsAutomator gives you a
=HYPERLINK(...)formula you drop into a column — it renders as a clickable "GENERATE DOC" link in each row that issues the certificate for just that row when clicked. Best when graduates are approved on a rolling basis and you want a reviewer to issue each certificate as the name is cleared, without leaving the Sheet. - Automatic polling. DocsAutomator checks the Sheet every five minutes for new rows. Best for self-serve flows where graduates are added programmatically by an upstream system.
For a 5,000-certificate cohort, the batch processing engine handles concurrency for you. DocsAutomator caps each workspace at five active jobs at a time and queues the rest — you don't have to think about Google Docs API rate limits, retry logic, or partial-failure recovery. If a row fails (rare — usually a malformed image URL), it's logged in the run history with the reason, and you can retry that one row alone.
Output options for each certificate:
- A new Google Doc in a Drive folder of your choice (one folder per cohort works well)
- A PDF saved to the same folder, with an optional expiry if you want the certificate's download link to stop working after a set time
- An email to the graduate with the PDF attached, using their email column from the Sheet
You can do all three simultaneously. The Drive folder gives finance and audit a paper trail; the email goes straight to the graduate.
What the customer actually got out of this
The US education nonprofit we work with had two staff covering certificate generation for tens of thousands of graduates a year. After moving to this Sheet → Doc → PDF flow:
- The time to issue a full cohort dropped from roughly two business days to under an hour, most of which is review.
- Formatting drift between certificates went to zero. Every PDF is generated from the exact same template — no row gets a stray font change or misaligned signature because someone bumped a tab stop while editing.
- The two-person manual workflow became a single reviewer who confirms the run, kicks off the batch, and spot-checks samples.
- They've been on DocsAutomator for over two years and have folded the same pattern into other document types — completion letters, donor acknowledgments, program reports — without re-architecting anything.
These aren't extraordinary numbers. They're what should happen when you stop forcing humans to be the bridge between a structured database and a designed template.
A few technical details worth knowing
Conditional sections. If you have certificates that need extra paragraphs for distinction or honors graduates, wrap the optional content in named section tags in your Google Doc — each tag in its own paragraph:
{{section_honors}}
This certificate is awarded with distinction for honors-level achievement.
{{/section_honors}}
You then configure show/hide rules for section_honors in DocsAutomator's section settings — for example, show when honors equals true, or show when gpa contains "honors". Six condition types are available (equals, does not equal, contains, does not contain, exists, does not exist), and a single section can stack multiple conditions. See conditional logic in Google Docs templates for the full pattern.
Line items. Less common for certificates themselves, but if you're generating transcripts or training-record summaries listing every course a graduate completed, line items handle the repeating block — one row per course, expanding dynamically. Useful for any document where a single parent record has many children.
E-signature. If your certificates need a signed acknowledgment back from the graduate (corporate compliance, legal disclaimers), DocsAutomator's built-in e-signing, included in every plan, chains onto the same workflow. The certificate gets generated, the graduate signs, you get the executed PDF back — without leaving the same automation.
Pricing. Plans start at $19 a month billed yearly (Professional, 100 documents a month), then Business at $59 for 1,000 documents a month and Scale at $149 for 5,000. A 5,000-certificate cohort fits inside Scale's monthly allowance, and a bigger month costs $0.06 per extra document up to the plan's overage cap. See pricing for monthly billing and the full breakdown.
Other data sources. Everything in this post applies if your data lives in Airtable or another connected source instead of Sheets — same template, same placeholder syntax, just a different connector. The Google Sheets integration is what we walked through here because it's the most common starting point for education and nonprofit teams already living in Google Workspace. If your team runs on Airtable, the Airtable to Google Docs walkthrough covers the same flow with that connector.
Try it on your next cohort
If you're issuing certificates from a spreadsheet today and feeling the manual-merge pain, the fix is concretely a couple of hours of setup and then it runs forever — every cohort, every program, every year.
Start by browsing the certificate templates and picking one close to what you need, or upload your own Google Doc. Connect your Sheet, map the columns to placeholders, and run a test batch of ten certificates to validate the layout. Once the test looks right, scale to the full cohort.
For more in this series, see the rest of the tutorials on the blog.
Move your design to the tool built for design: Google Docs. Keep your data in the tool built for data: Google Sheets. Use DocsAutomator to seamlessly connect the two.
Try DocsAutomator — every account gets unlimited free testing. Run as many sample certificates as you need in test mode to validate your template, mappings, and output; only live-mode generations count against a paid plan.