Some documents need a signature. Most quotes, offers, and sign-offs do not. They need a clear yes from the right person, on record. Acceptance is the choice for those documents under How it completes. DocsAutomator generates the document from your data and sends it to the recipient. The recipient opens it, reads it, and clicks Accept. There is no account to create and no signature to draw. You get the PDF back with a Certificate of Acceptance on the last page, saved where your signed documents go today.
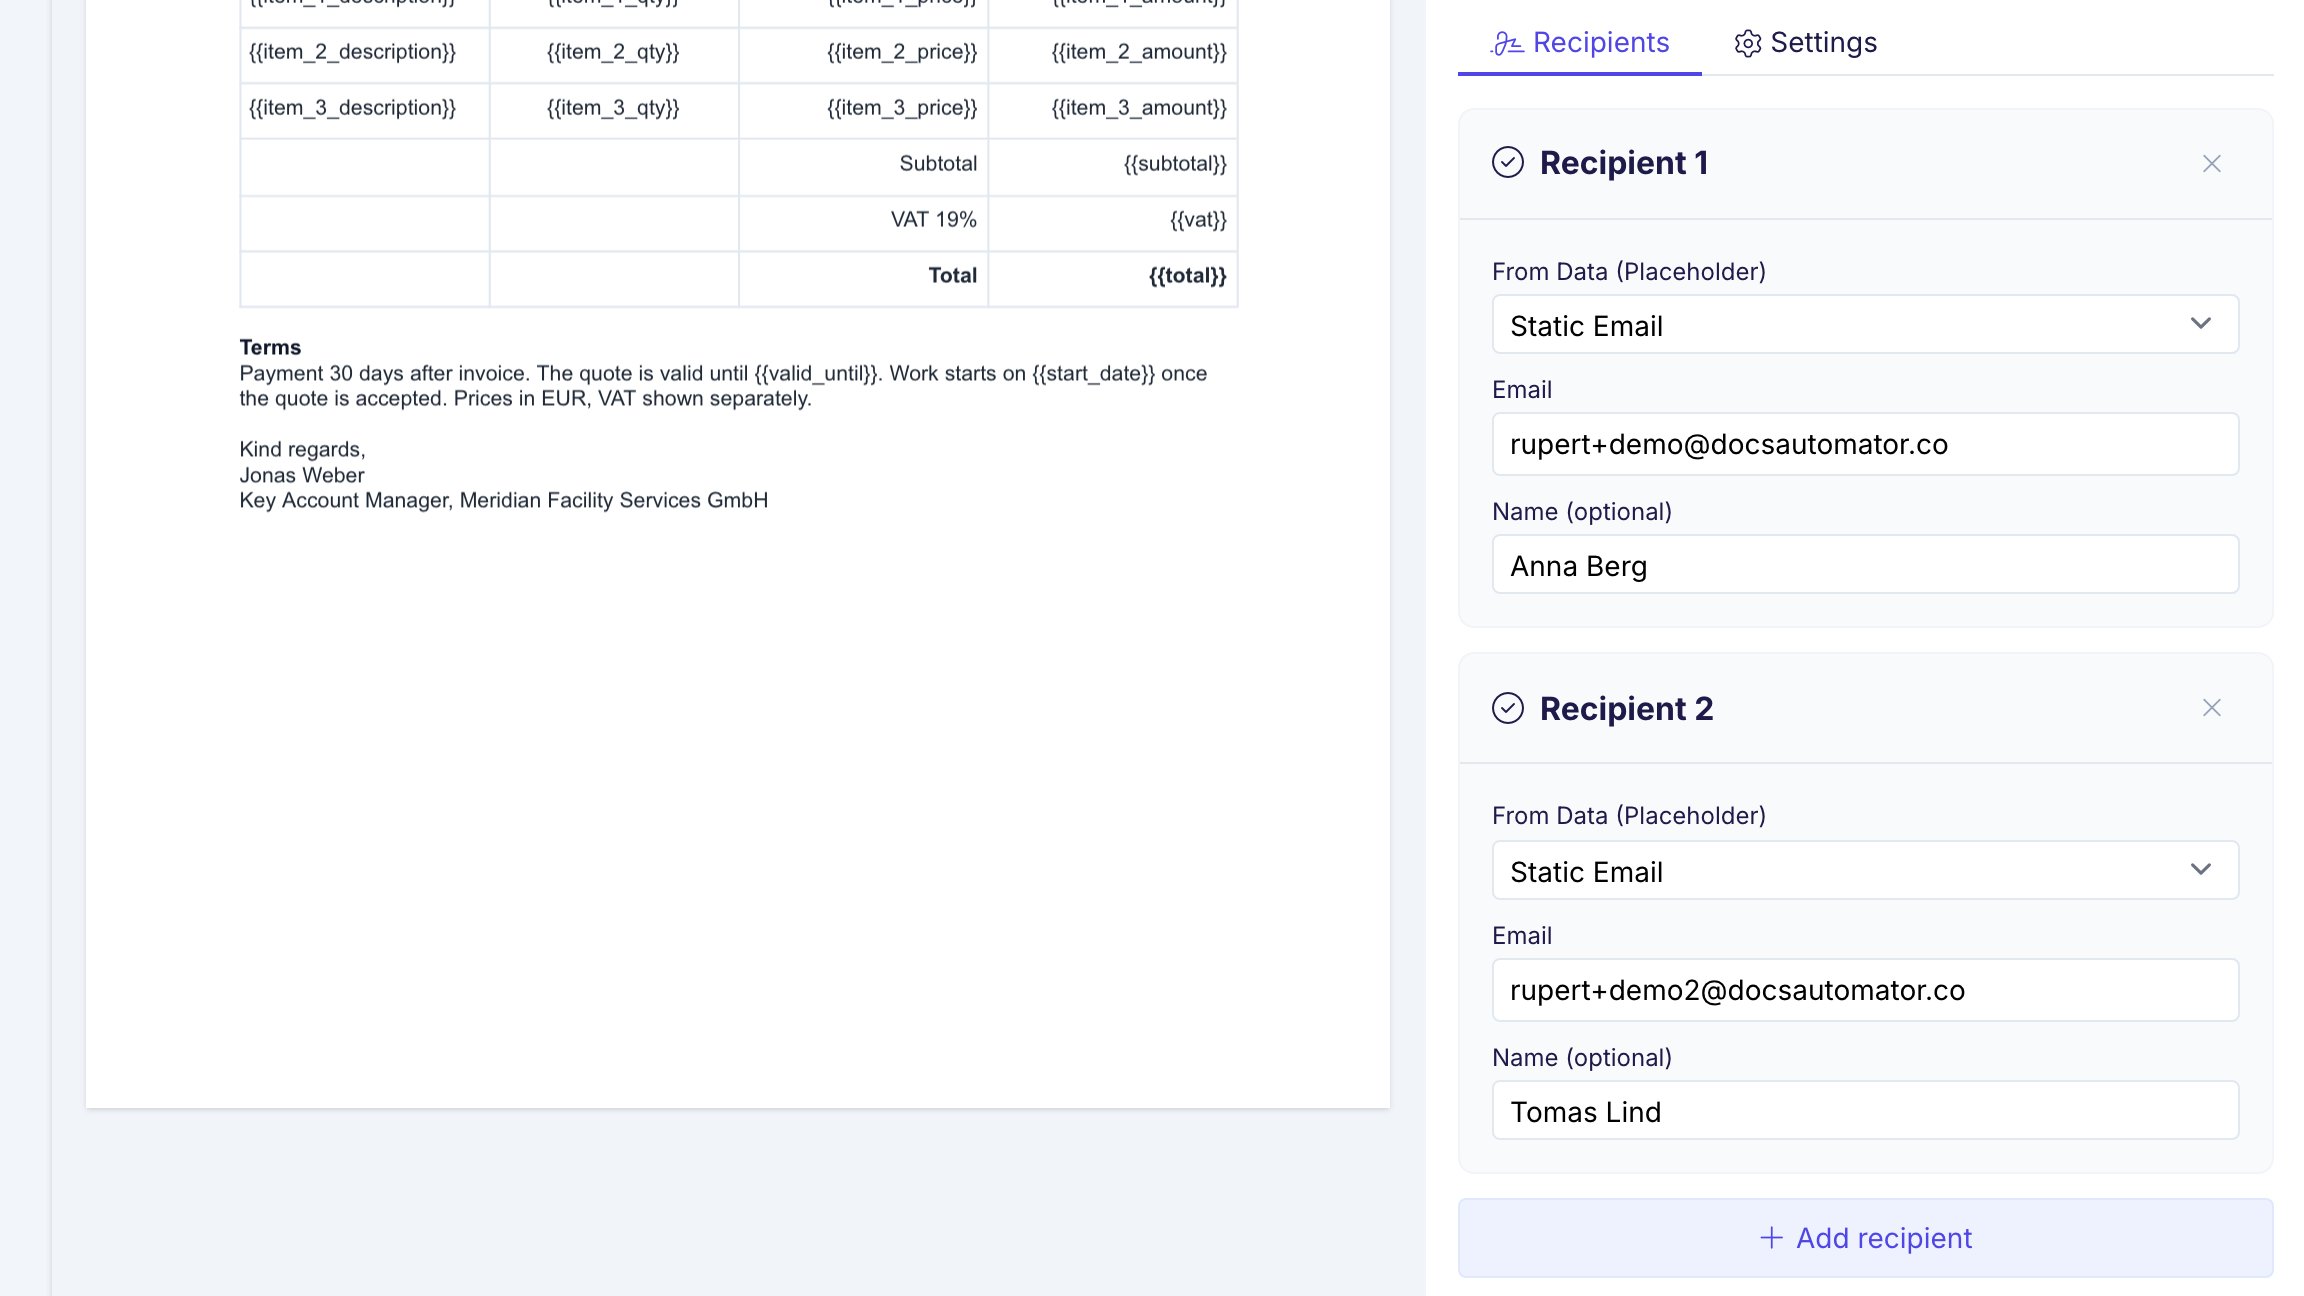
The Signing & Acceptance card of an automation. Under How it completes, the three options Signature required, Acceptance, and None are shown, with Acceptance selected.

The How it completes choice in the Signing & Acceptance card, with Acceptance selected

Signature or acceptance?

If the other side expects to sign, use Signing. If you only need their yes, use Acceptance. If you are not sure whether a yes is enough for your document, read Is acceptance legally binding?.

Set it up in the app

1

Choose Acceptance under How it completes

Open the automation and find the Signing & Acceptance card. Under How it completes, choose Acceptance. The card changes from signing settings to acceptance settings. Your template needs no signature tags. If the template has {{esign.*}} tags, they are left blank in the generated document.
2

Add the recipients

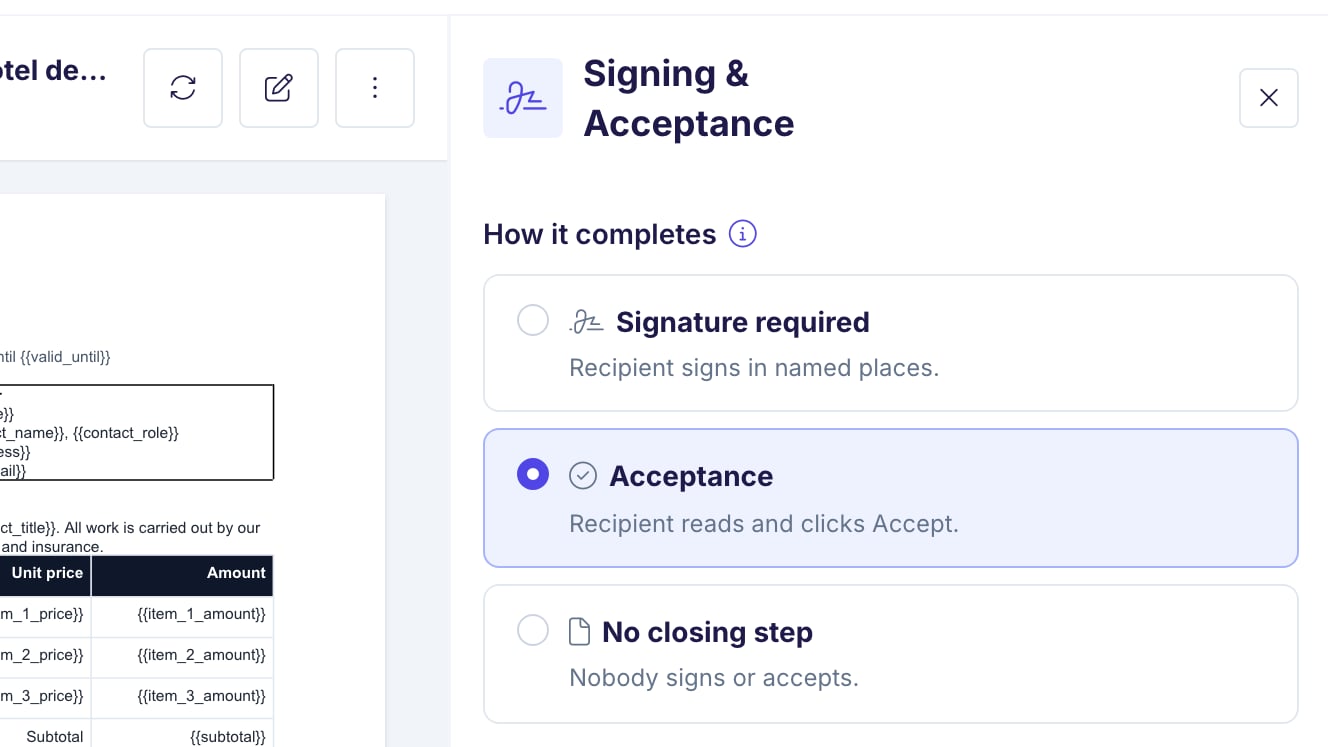
Under Recipients, add each person who must accept. Give each recipient an email address and a name, or map both from your data source. Recipients are a plain list. The document is accepted when every recipient has clicked Accept. Recipients have no fields to fill, so there is nothing else to configure per recipient.
The Recipients tab of an automation in acceptance mode. Two recipients are listed, each with an email address and an optional name, and a button to add a recipient.

The Recipients tab in acceptance mode

3

Decide whether the recipient must type their name

Require Typed Name is on by default. The recipient must type their full name before they can accept. The name goes on the Certificate of Acceptance and into the audit trail. Turn it off when a plain click is enough, for example for an internal policy sign-off.
4

Choose how the request reaches the recipient
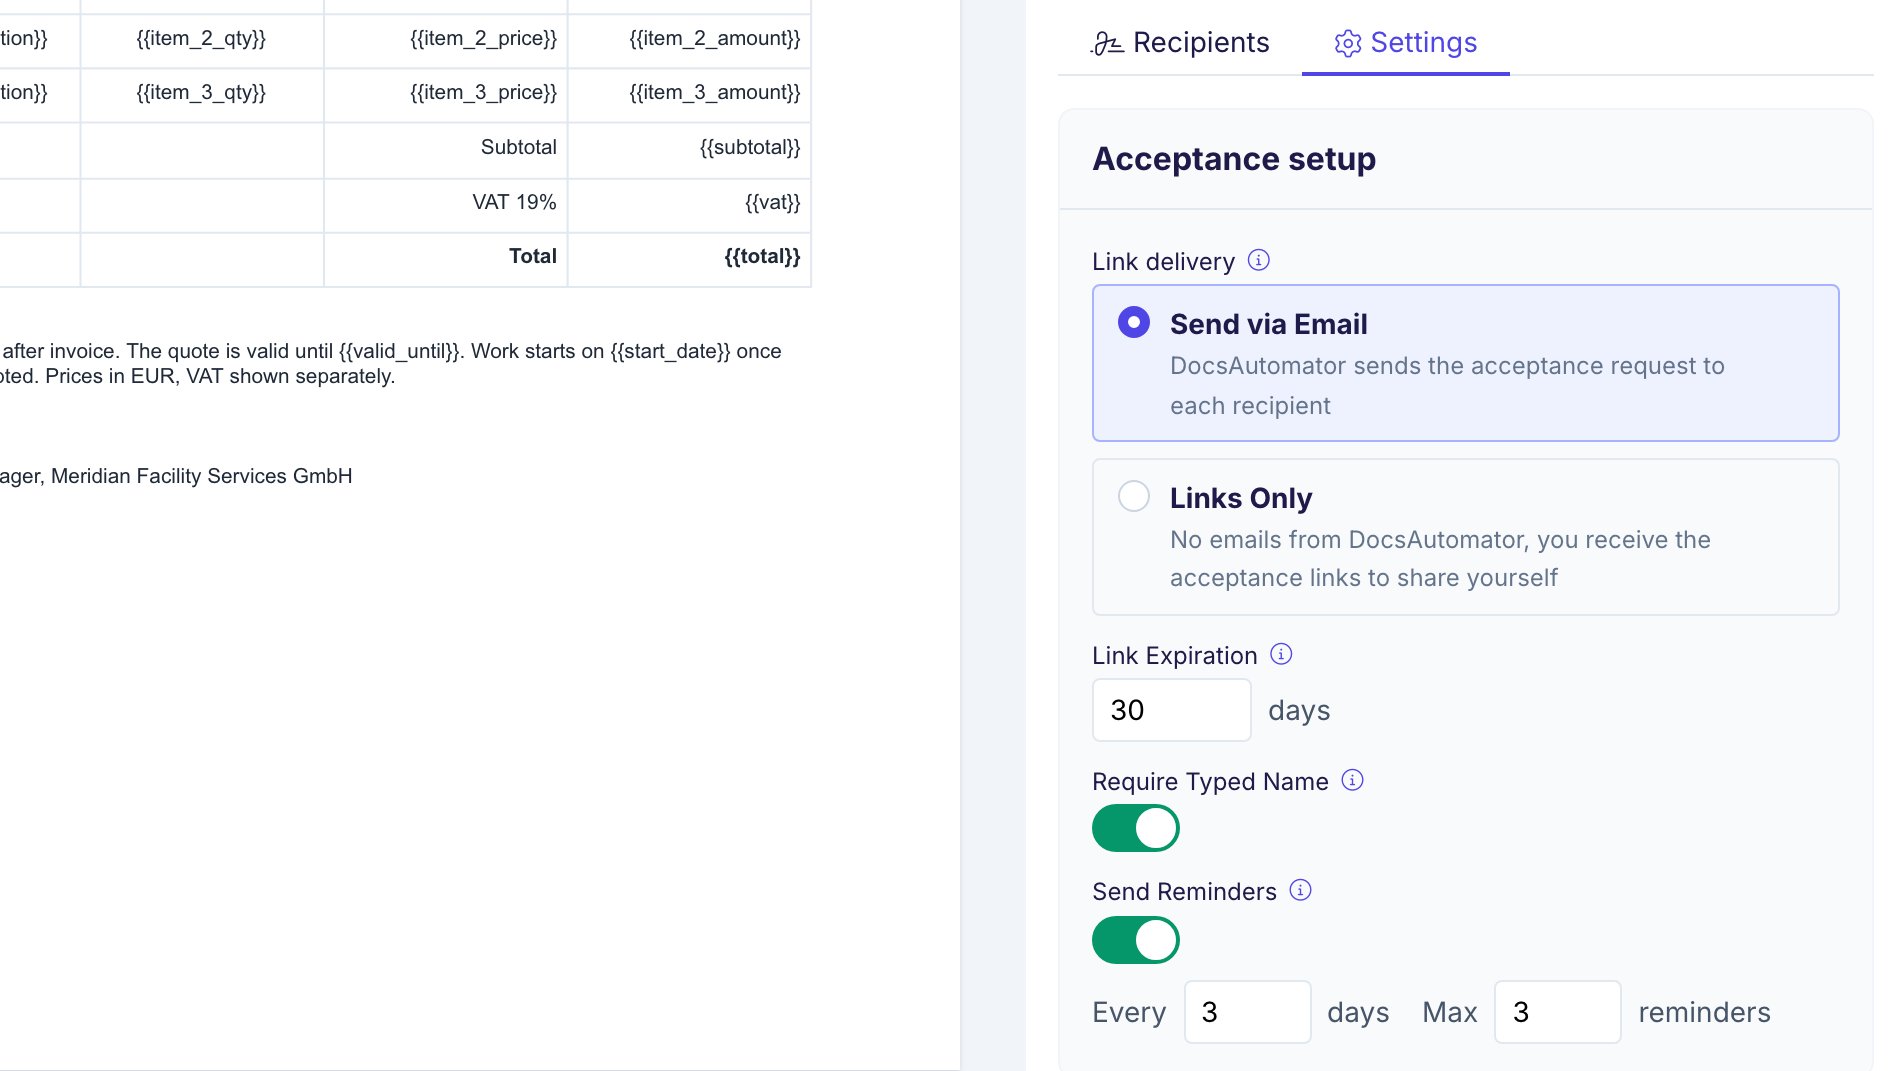
Under Acceptance setup, choose Email or Links Only. With Email, DocsAutomator sends the acceptance request to each recipient, with reminders. With Links Only, DocsAutomator sends no emails. You receive the acceptance links and share them yourself. The email settings (sender, subject, body, button color, language) are the same as for signing. See Email Configuration.
The Acceptance setup card in the Settings tab. Send via Email is selected over Links Only. Link Expiration is 30 days. Require Typed Name is on. Send Reminders is on.

The Acceptance setup card: link delivery, expiration, Require Typed Name, and reminders

5

Set reminders and expiration

Reminders and expiration work as they do for signing. See Reminder Settings and Expiration Settings. A recipient who opened the document but did not accept receives the reminders.
6

Choose where the accepted PDF goes

Under After acceptance, choose whether to save the accepted PDF to a Google Drive folder, to a field in your data source, or both. See Write-back of the accepted PDF.
Set the automation to Test Mode to try the full acceptance flow for free. Test acceptances are marked as not binding on the page and are never charged.

Set it up through the API or MCP

The acceptance settings live in the esignature object of the automation. The same fields are available through the DocsAutomator MCP server and the in-app Agent. The three How it completes choices in the app map to these fields: Signature required is enabled: true with closeType: "signature", Acceptance is enabled: true with closeType: "acceptance", and None is enabled: false.

What the recipient sees

  1. The email. The recipient gets an email from DocsAutomator, or from your Gmail or Outlook account if you set that up, with a button that opens the document. With Links Only, the recipient gets the link from you.
  2. The document. The link opens the full document in the browser, on a phone or a computer. The page title is Review Document. The header shows who is reviewing. The recipient scrolls through the whole document on the same screen.
  3. The typed name. When Require Typed Name is on, a field labeled Type your full name sits above the button.
  4. The consent line. Directly above the button, the recipient reads: ‘By clicking “Accept”, I agree to the terms of the document shown above and sign it electronically. My click counts as my electronic signature, this document may be delivered and kept electronically, and I can download a copy. My name, email address, IP address, device information and the time of acceptance are recorded in a Certificate of Acceptance and shared with the sender.’
  5. The button. The recipient clicks Accept. The recipient can also click Decline and write a reason. A decline closes the request and notifies you.
  6. The confirmation. The recipient sees Thank You! Your acceptance has been recorded. and can download the document. When every recipient has accepted, each one receives a copy of the accepted PDF by email.
The page is available in the same languages as the signing page. See Signer Language.
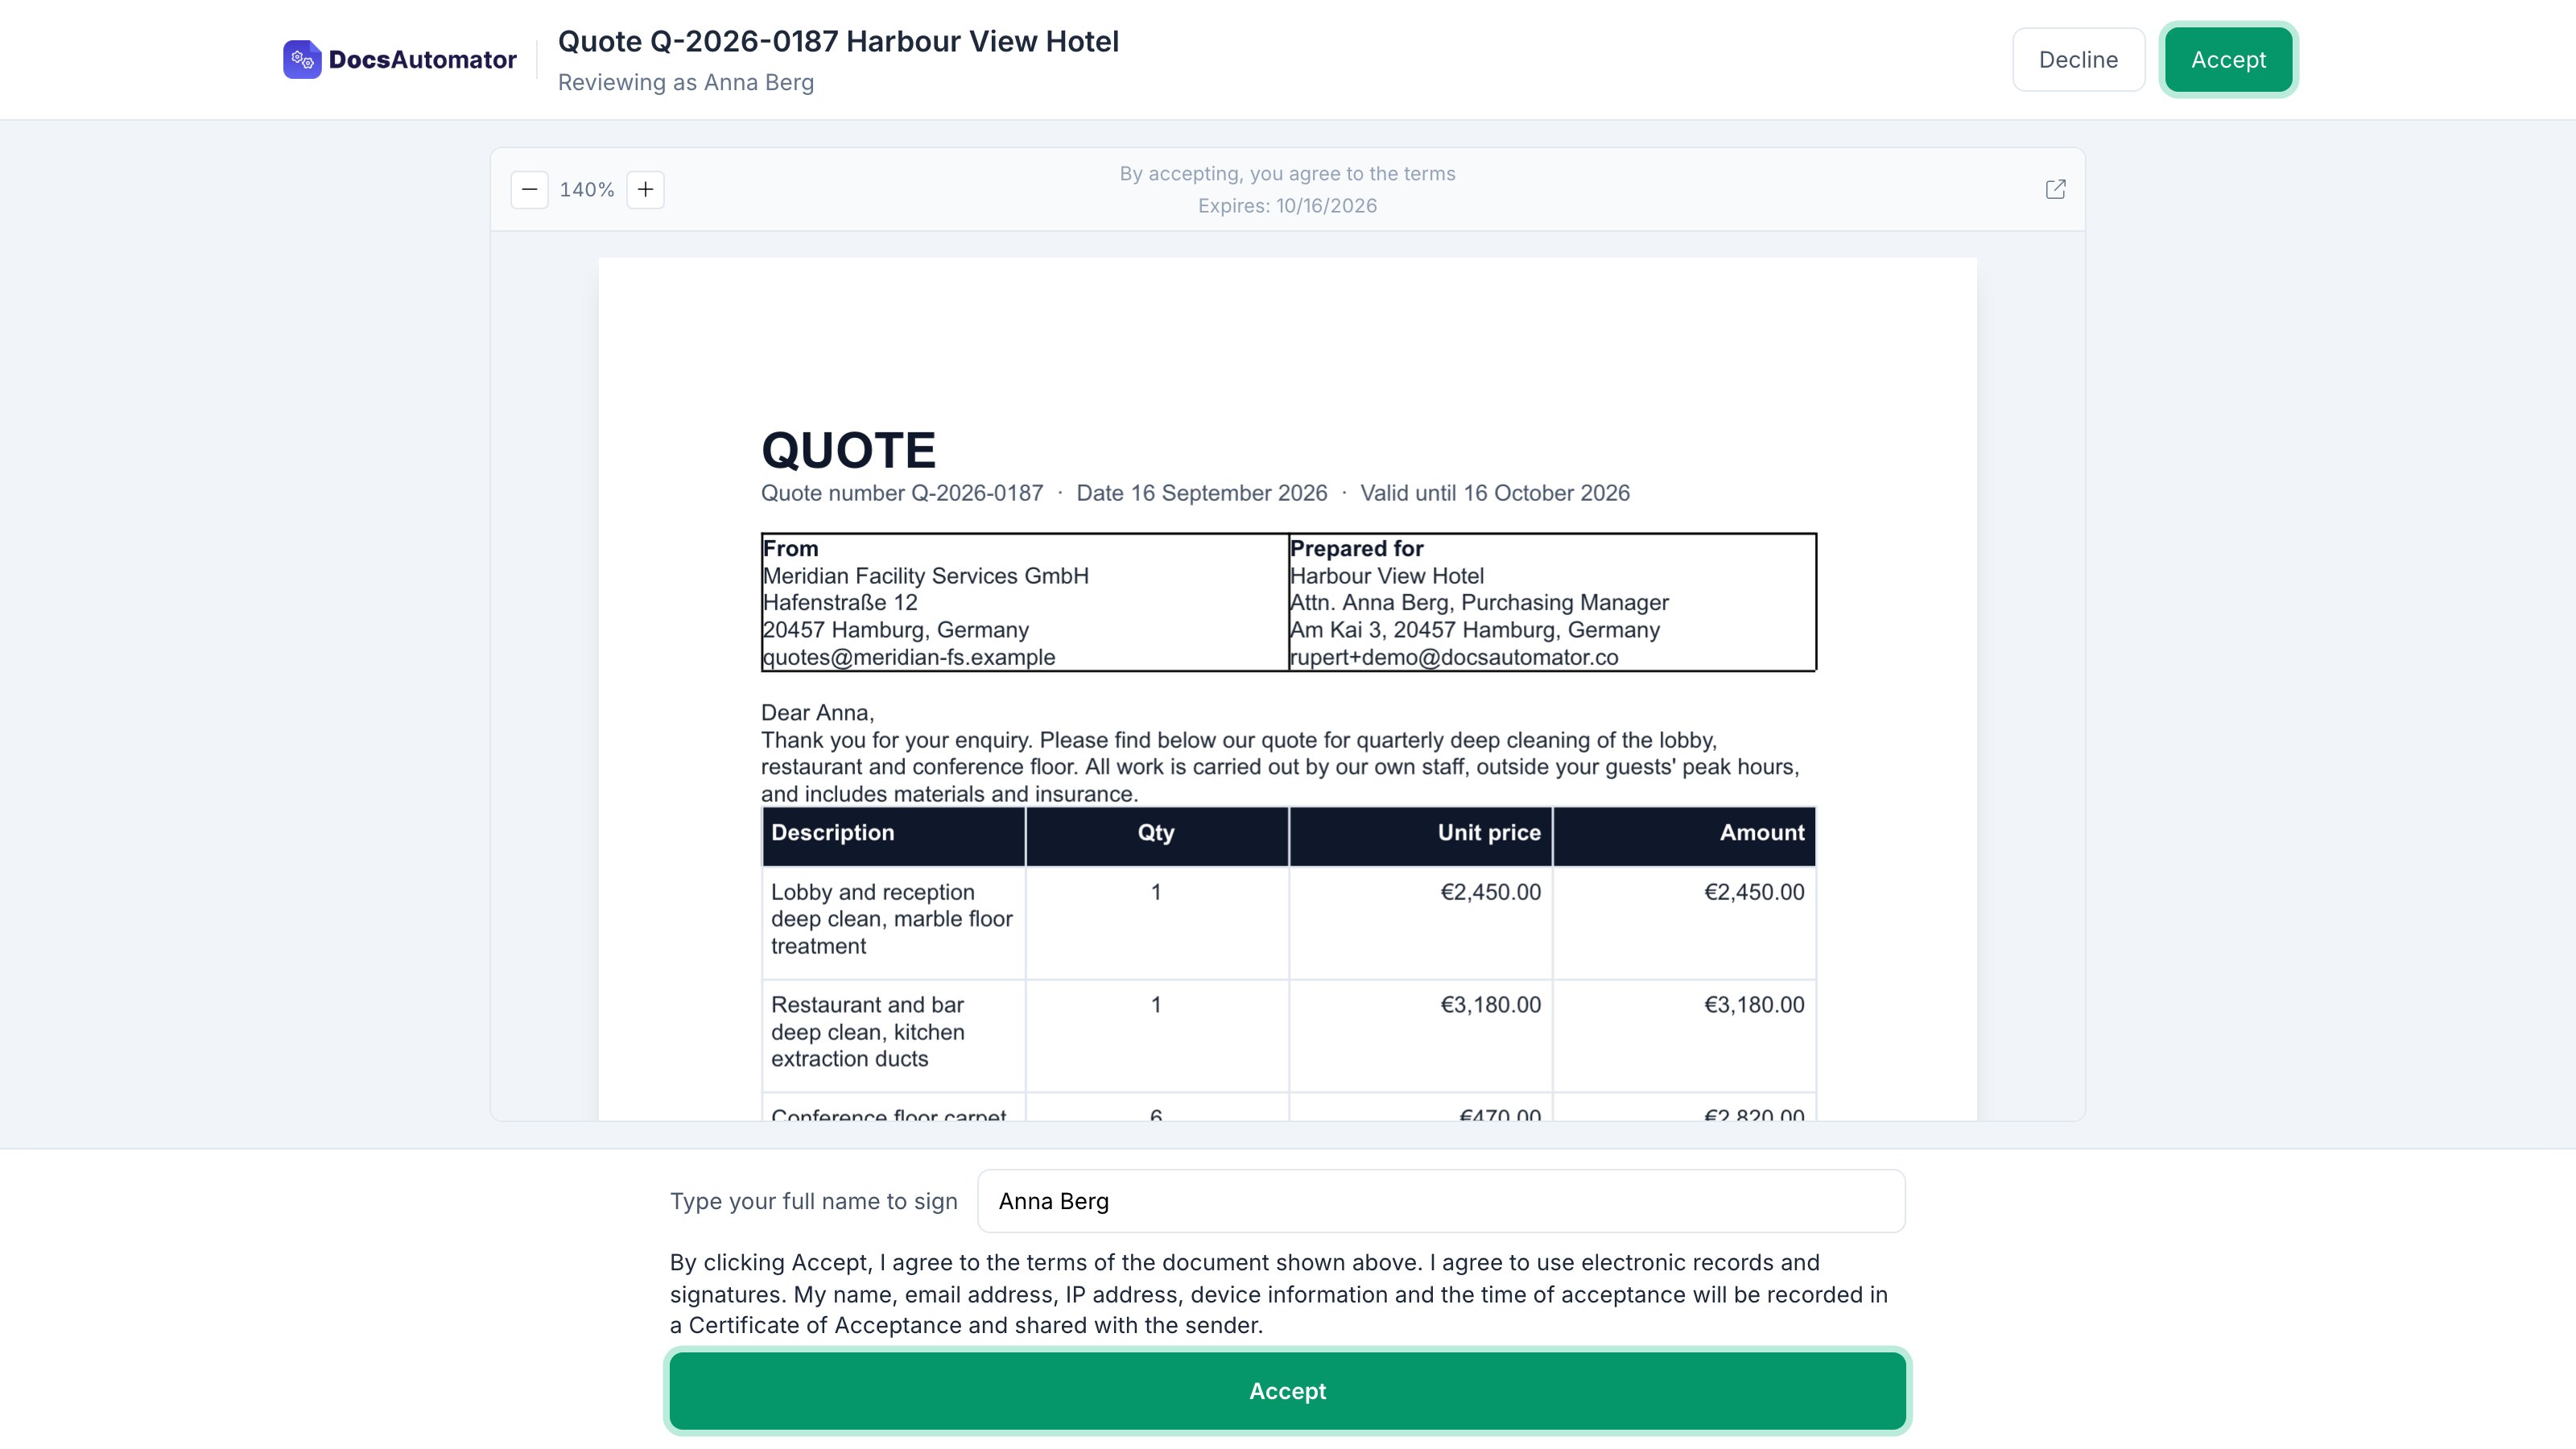
The acceptance page for a quote. The document is shown in the middle. Below it sit the field Type your full name, the consent line, and a green Accept button. Decline and Accept buttons also sit in the header.

The recipient's acceptance page, with the typed-name field, the consent line, and the Accept button

What you get

The completion email

When the last recipient accepts, the automation’s notification recipients get an email that says who accepted the document, with a link to the accepted PDF. If a recipient declines, you get an email with the reason. If a request expires without an acceptance, you get an expiration email.

The Certificate of Acceptance

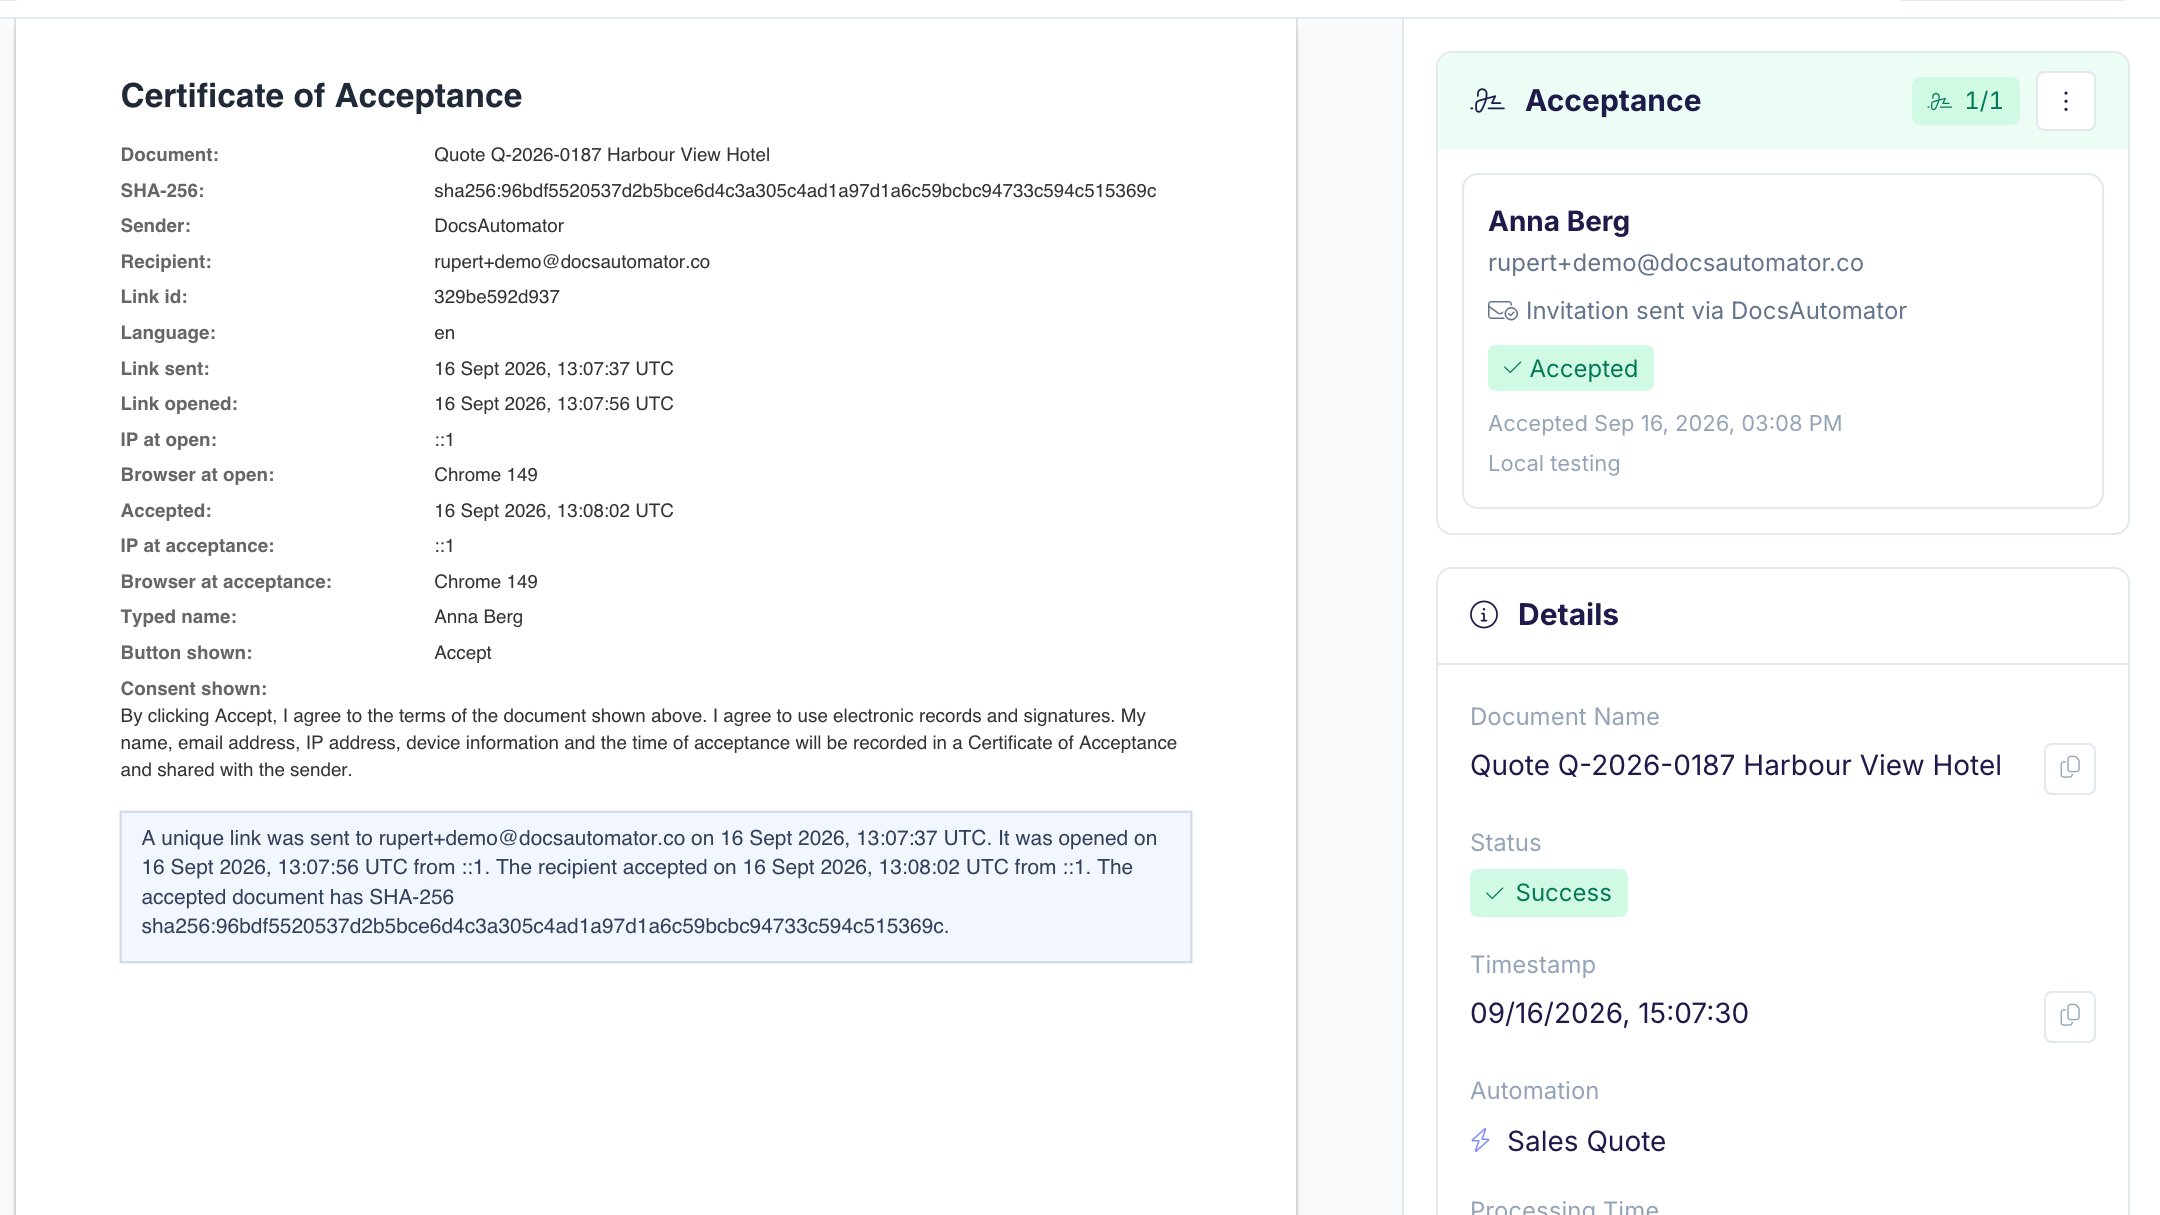
The accepted PDF is the document the recipient saw, unchanged, with a Certificate of Acceptance added as the last page. The certificate records:
  • The name and email address of each recipient, and the name they typed
  • The date and time the request was sent, opened, and accepted
  • The IP address and device of each recipient at the time of acceptance
  • The exact text of the Accept button and the consent line the recipient saw
  • A SHA-256 fingerprint of the document, so any later change to the file shows
  • A short statement of the process, so you can attach the certificate to a declaration without technical help
The PDF is sealed with a digital certificate and an independent timestamp, so it is tamper-evident: a PDF reader shows if the file changed after it was sealed. The full audit trail is also available as a separate download. See Get Audit Trail.
The acceptance record of an accepted quote. It lists the document, its SHA-256 fingerprint, the sender, the recipient, the times the link was sent, opened, and accepted, the IP address and browser at open and at acceptance, the typed name, the button shown, the consent shown, and a plain-language statement of the process. A panel on the right shows the recipient as Accepted.

The acceptance record on the document's page in DocsAutomator. The Certificate of Acceptance on the PDF carries the same data.

Status on the Documents page

Every acceptance request appears on the Documents page and in the Needs attention list on your home page, with the same statuses as signing requests, in acceptance wording:
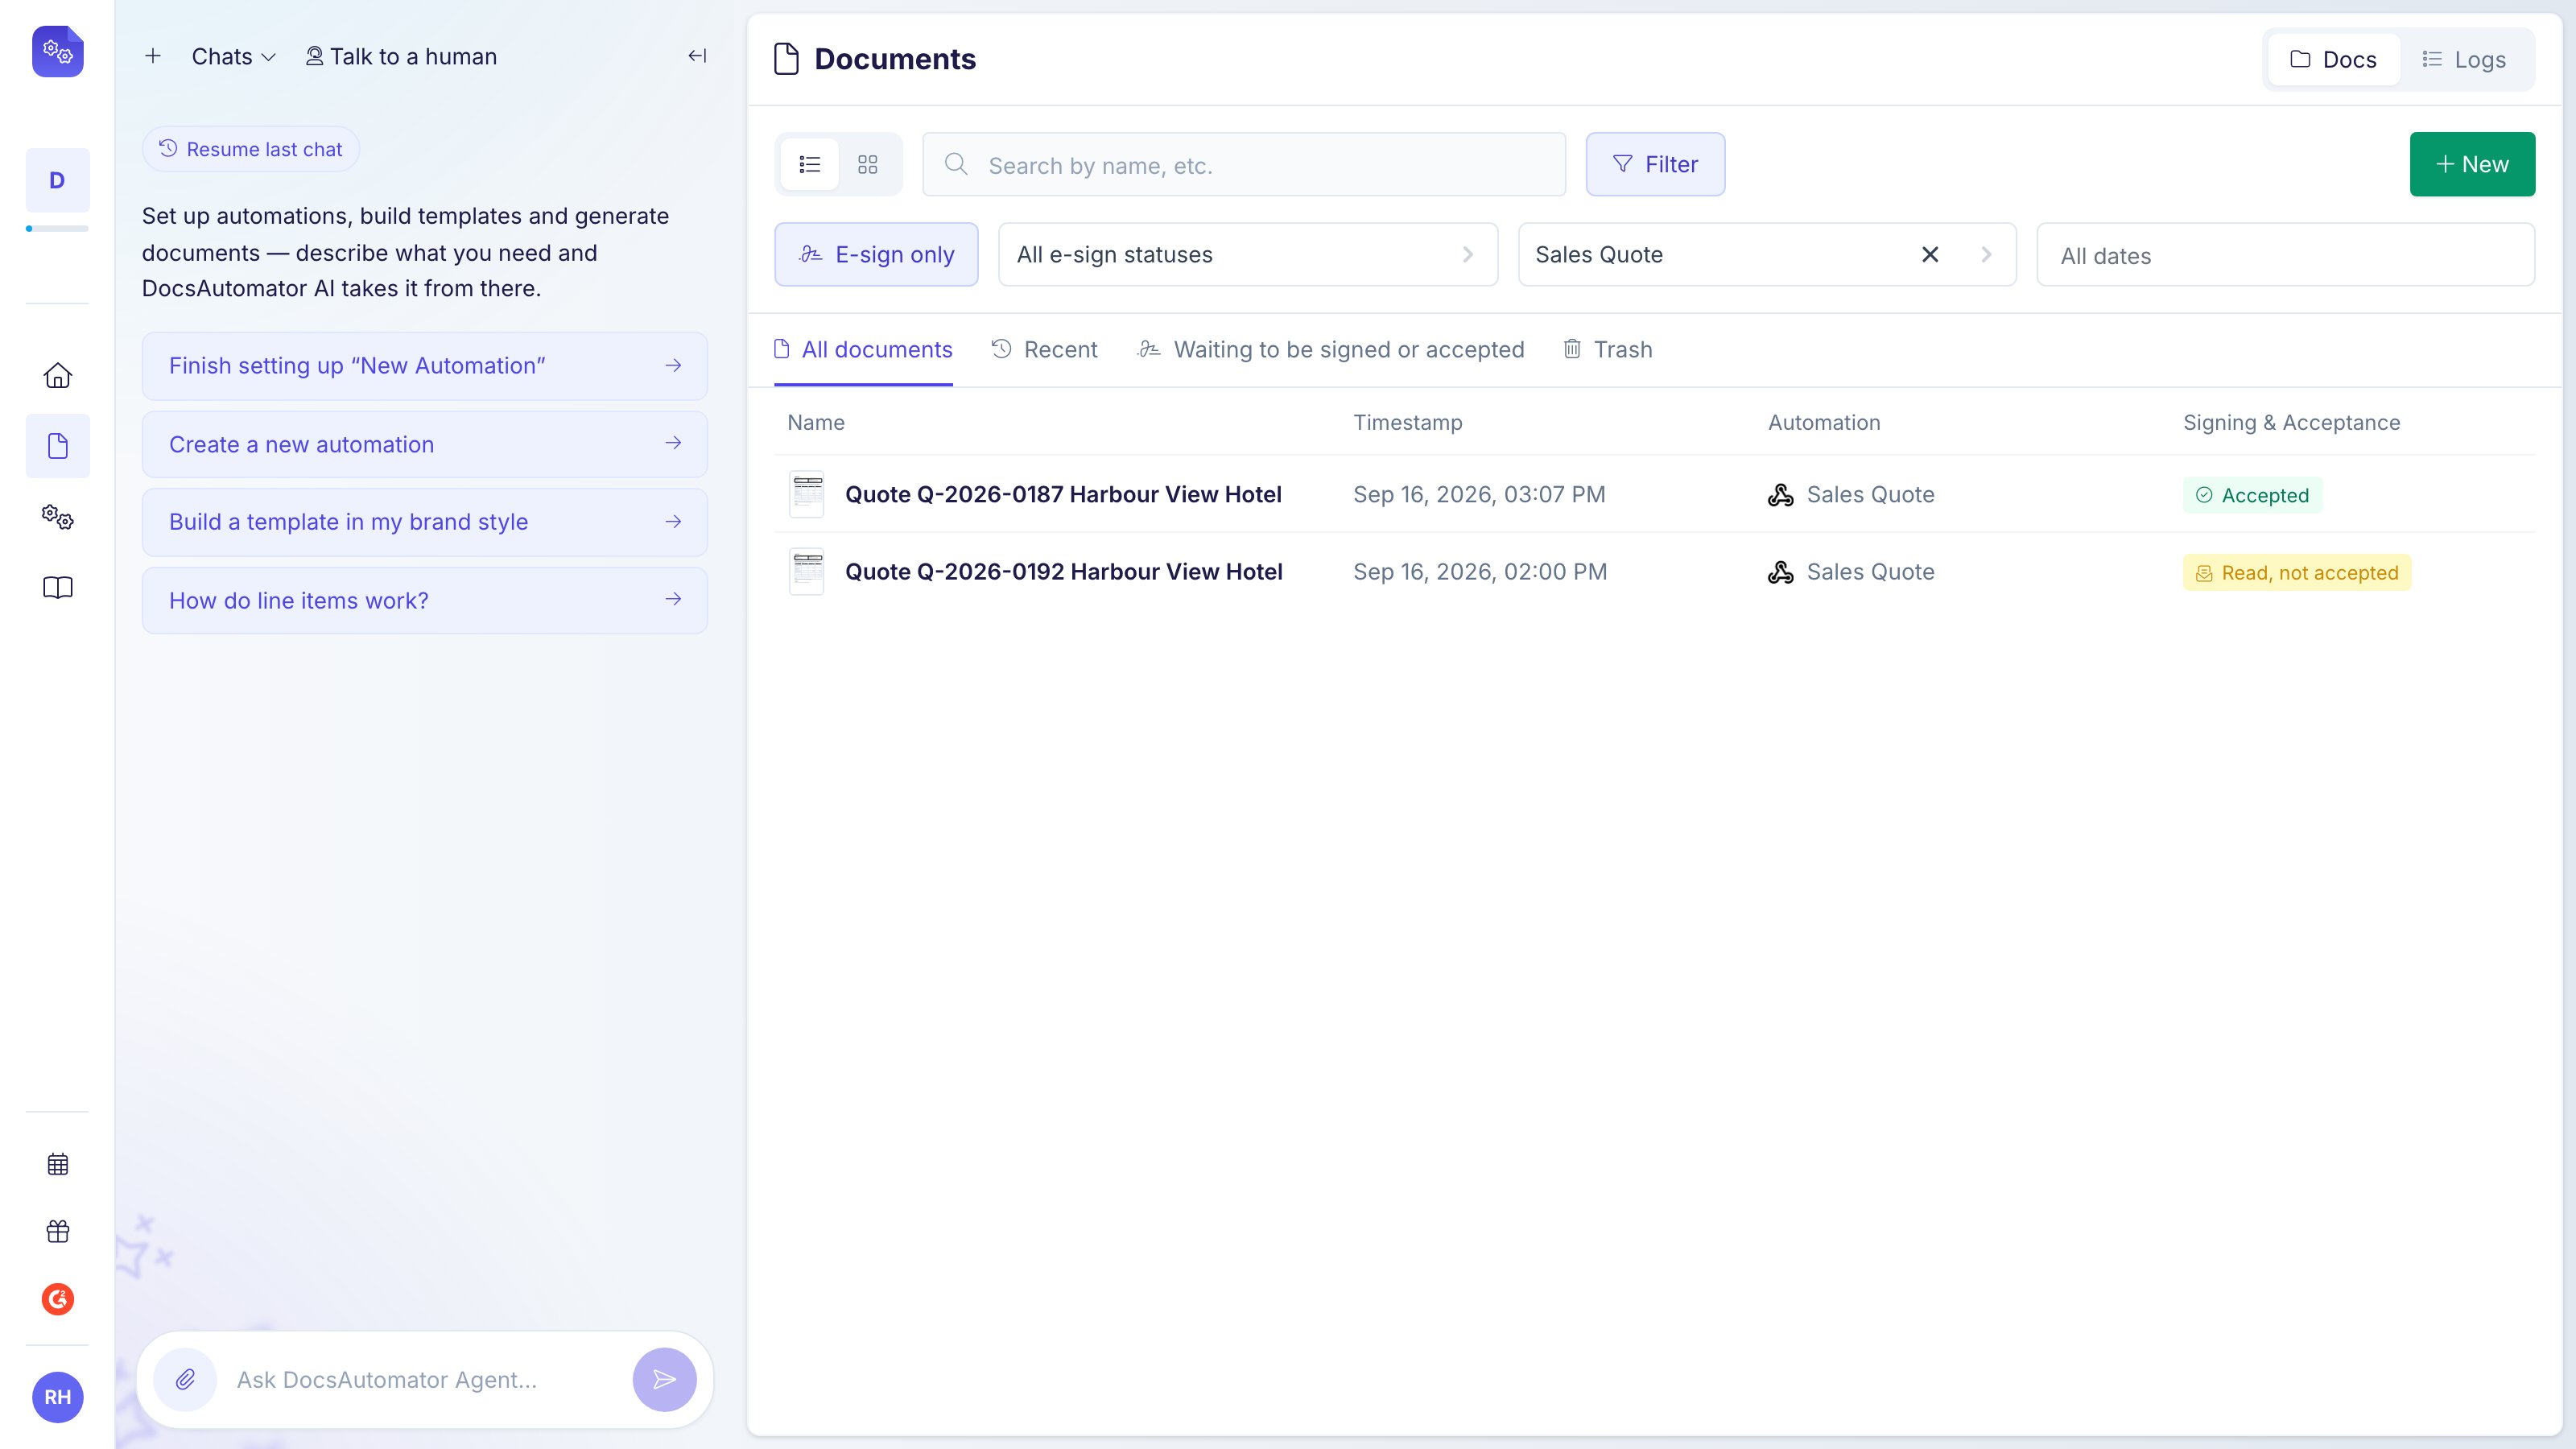
The Documents page with the E-sign only filter on. The Signing & Acceptance column shows badges such as Read, not accepted, Not opened yet, 1 of 1 accepted, and Expired. A tab reads Waiting to be signed or accepted.

The Documents page, filtered to signing and acceptance requests, with Read, not accepted, Not opened yet, accepted, and Expired documents

Write-back of the accepted PDF

The accepted PDF goes where your signed PDFs go. Set this under After acceptance in the Signing & Acceptance card. The unsigned document that the Actions card saves at generation time is a separate file. The accepted PDF, with the certificate, is saved only after every recipient has accepted. See Signed PDF Delivery. Webhooks fire as they do for signing. The payload carries closeType: "acceptance", so one endpoint can tell signed and accepted documents apart. See Webhook Integration.

Billing

Signing and acceptance cost **0.50perdocument∗∗.Thatisoneflatcharge,howevermanyrecipientsthedocumentgoesto.Thechargehappenswhentherecipientfirstopensthedocument.Arequestthatnobodyopenscostsnothing.Arequestthatarecipientopensbutdoesnotfinishstillcounts,alsowhenitlaterexpiresorisdeclined.Above500documentsinabillingmonth,eachdocumentcosts0.50 per document**. That is one flat charge, however many recipients the document goes to. The charge happens when the recipient first opens the document. A request that nobody opens costs nothing. A request that a recipient opens but does not finish still counts, also when it later expires or is declined. Above 500 documents in a billing month, each document costs 0.35. Test and preview requests are never charged. See How e-signing and acceptance are billed.

Reading acceptances through the API

Acceptance requests are signing sessions with closeType: "acceptance". They use the same endpoints, the same session statuses, and the same signer statuses. A recipient who accepted has the signer status signed, and the signer object carries typedName when a name was typed. The audit trail has one extra event type, document_accepted. See the API reference.

Is acceptance legally binding?

What the law says about a click, and when you need a signature instead

Signing & Acceptance overview

Signers, emails, reminders, delivery, and webhooks
This is not legal advice.
Last modified on September 22, 2026