> ## Documentation Index
> Fetch the complete documentation index at: https://docsautomator.co/docs/llms.txt
> Use this file to discover all available pages before exploring further.
# Notion
> Generate PDFs and Google Docs from Notion databases, with optional e-signing
The DocsAutomator-Notion integration turns Notion database pages into PDFs and Google Docs. Each automation is connected to one Notion database; documents are generated from the pages in that database, line items are pulled from related pages, and finished PDFs can be saved back to the same page — or sent out for e-signing.
Generated PDFs can be uploaded straight to a **file property** on the Notion page, and the PDF or Google Doc URL can be written to a **URL** or **text** property.
## Step-by-Step Setup
Start a new automation in your DocsAutomator account.
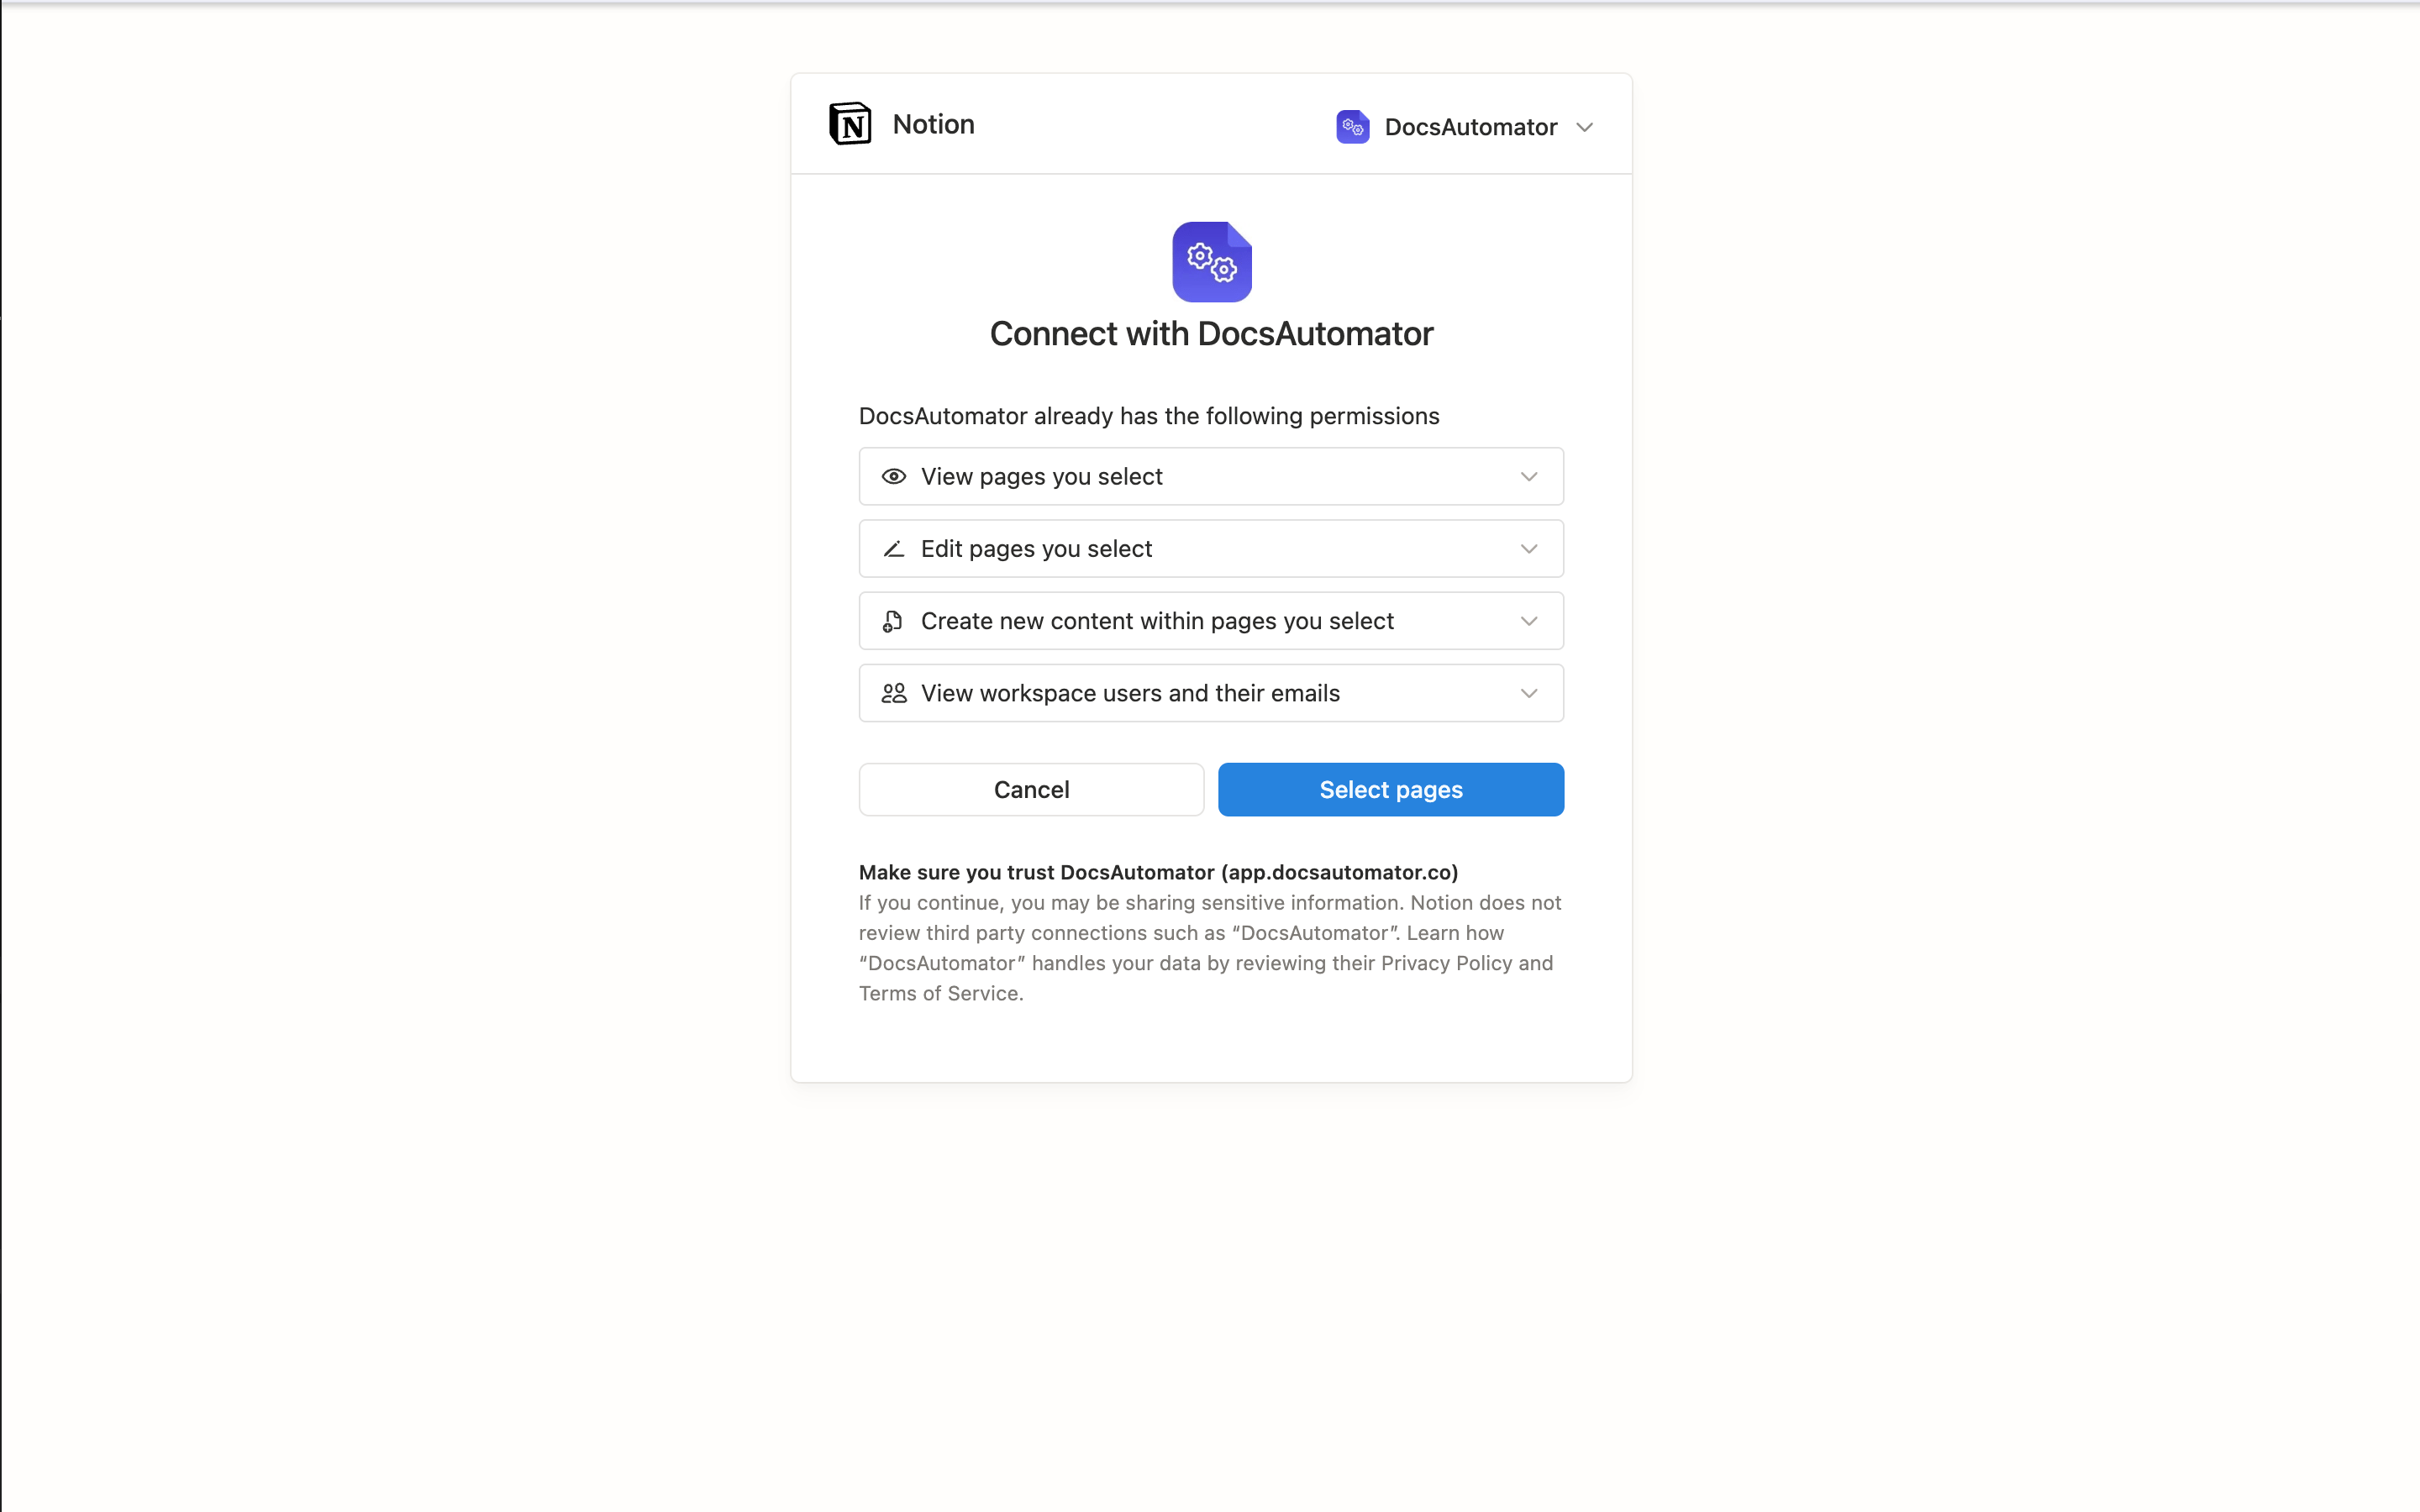
Choose Notion as your data source and authorize the connection. You'll be redirected to Notion, where you can:
1. Pick the workspace you want to connect.
2. **Select the databases you want DocsAutomator to access** right on the authorization screen.
Only the databases you tick here will be visible to DocsAutomator, so make sure to include every database you plan to generate documents from.
If a database lives inside a page you've selected, it's shared automatically — no need to tick it separately.
Every automation needs a template. Follow the [Google Doc Template Guide](/docsautomator-basics/google-doc-template-guide) or [PDF Template Guide](/docsautomator-basics/pdf-template-guide), or start from the Playground Template.
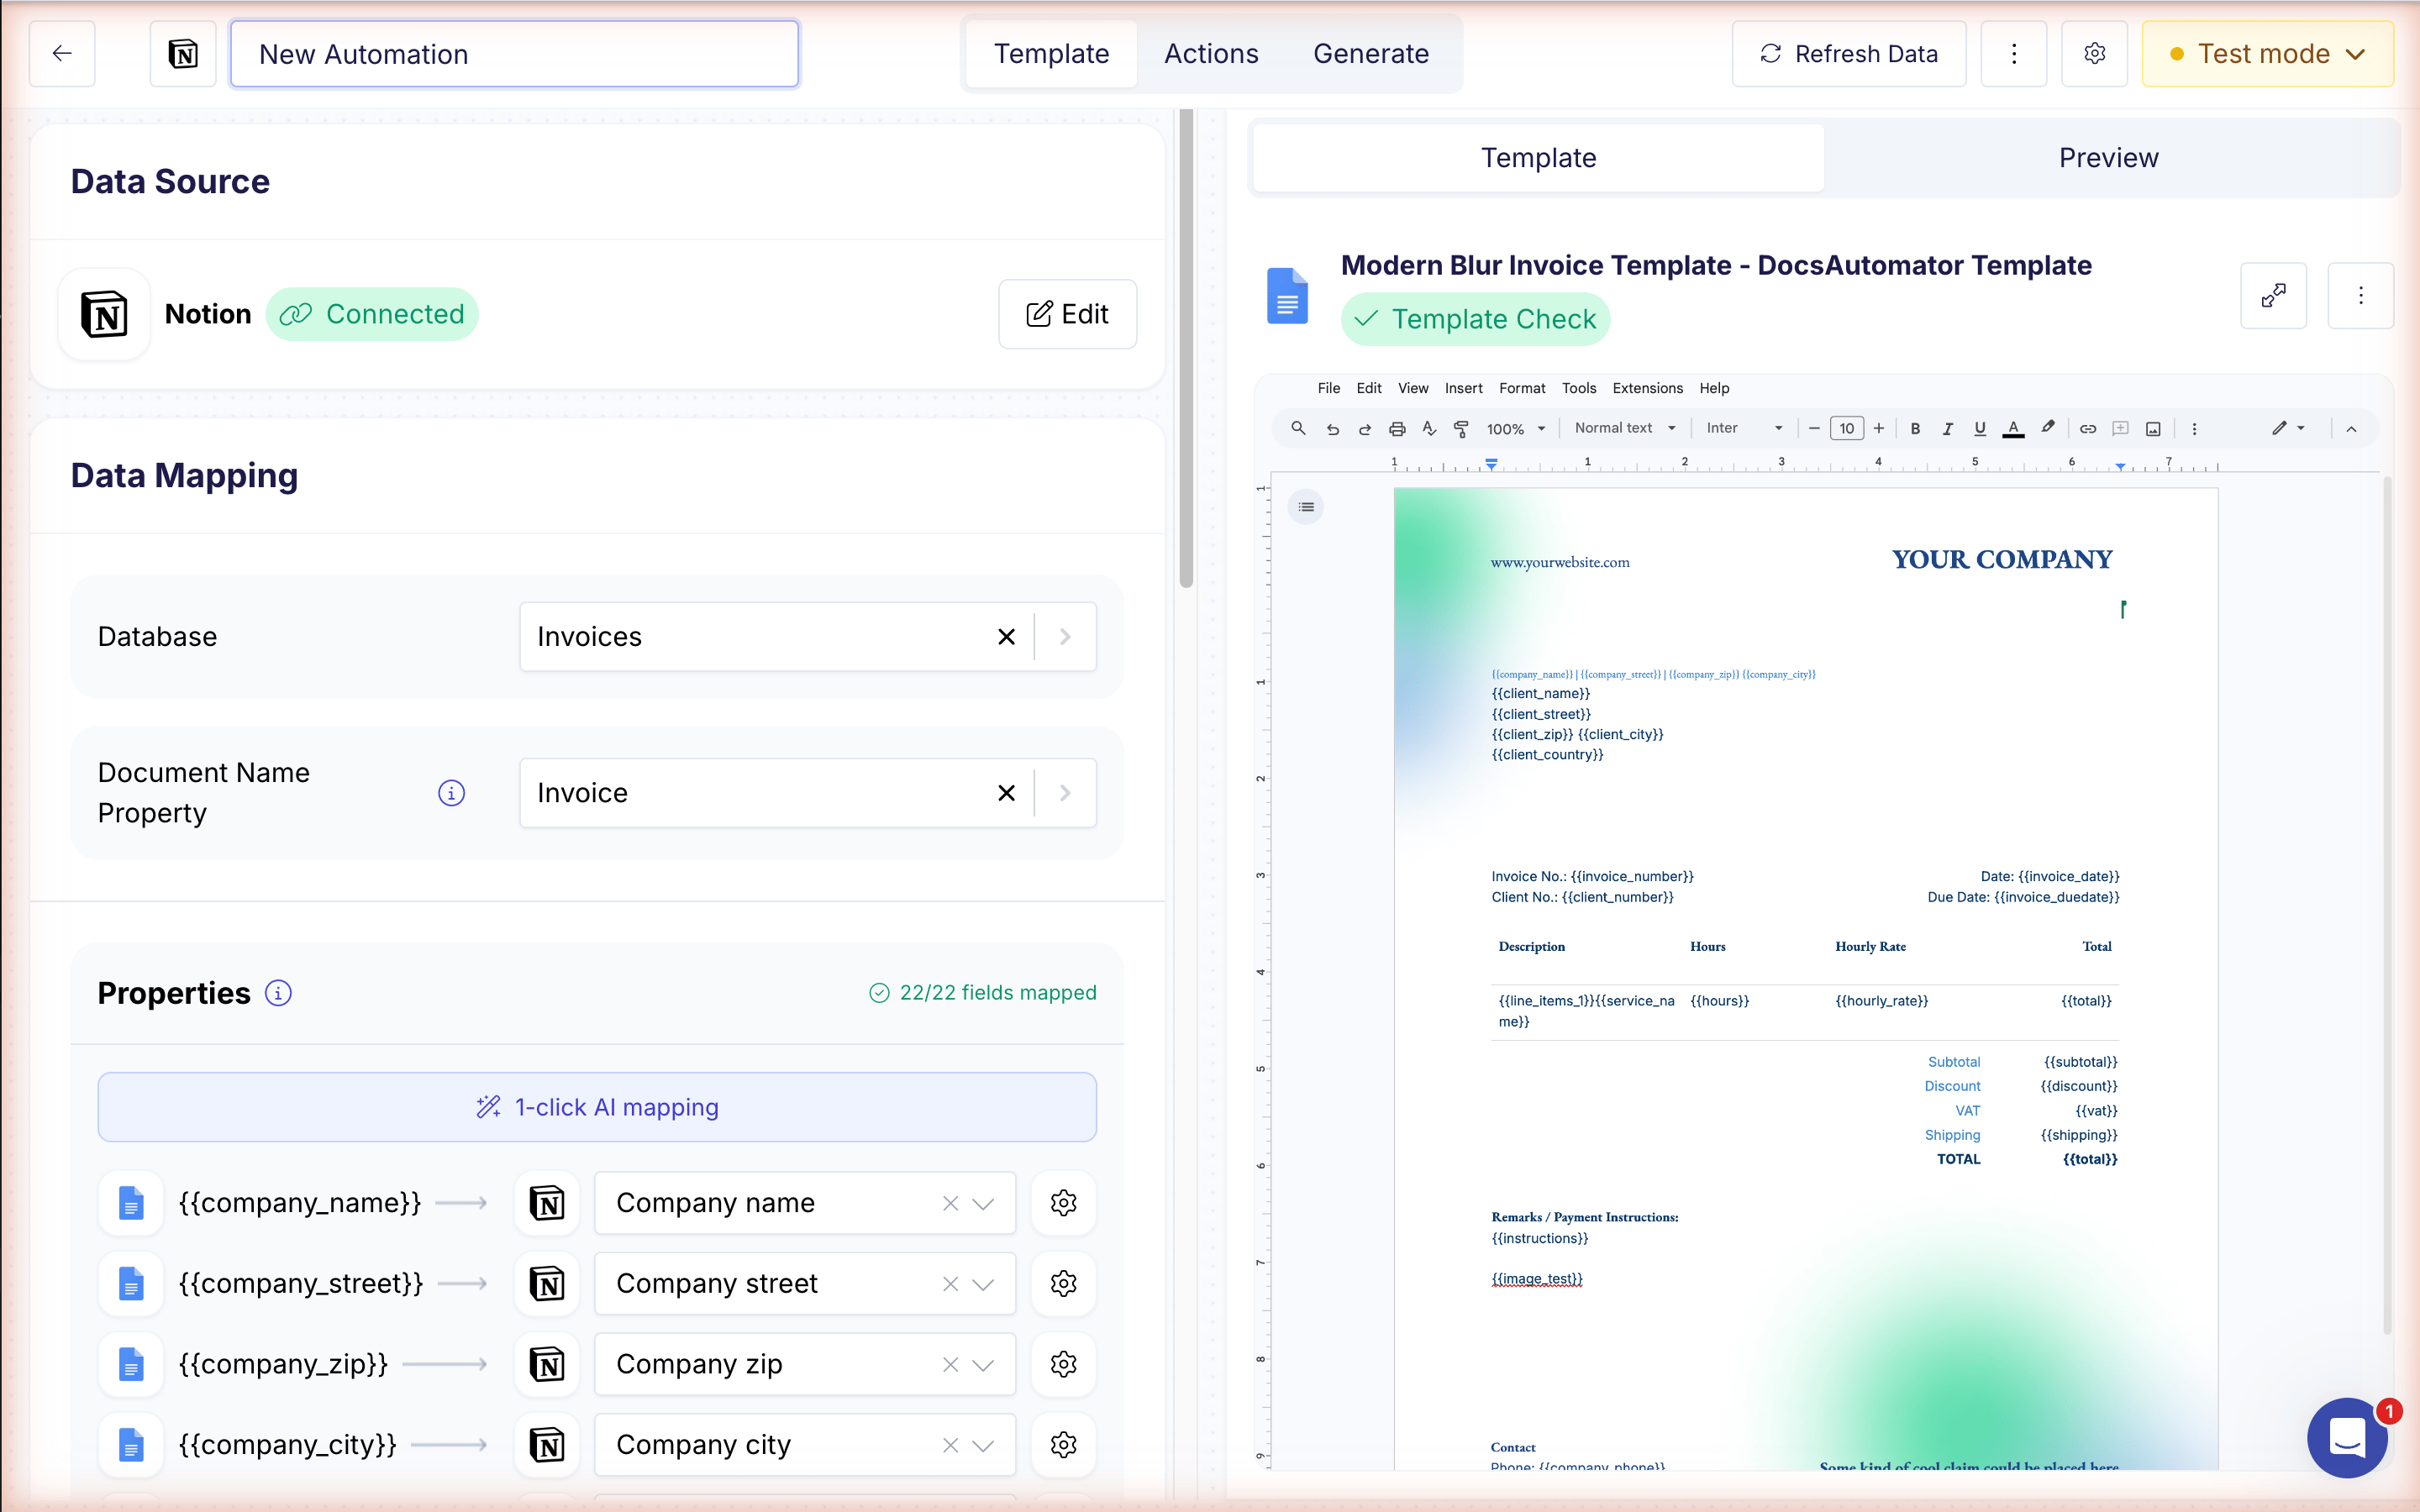
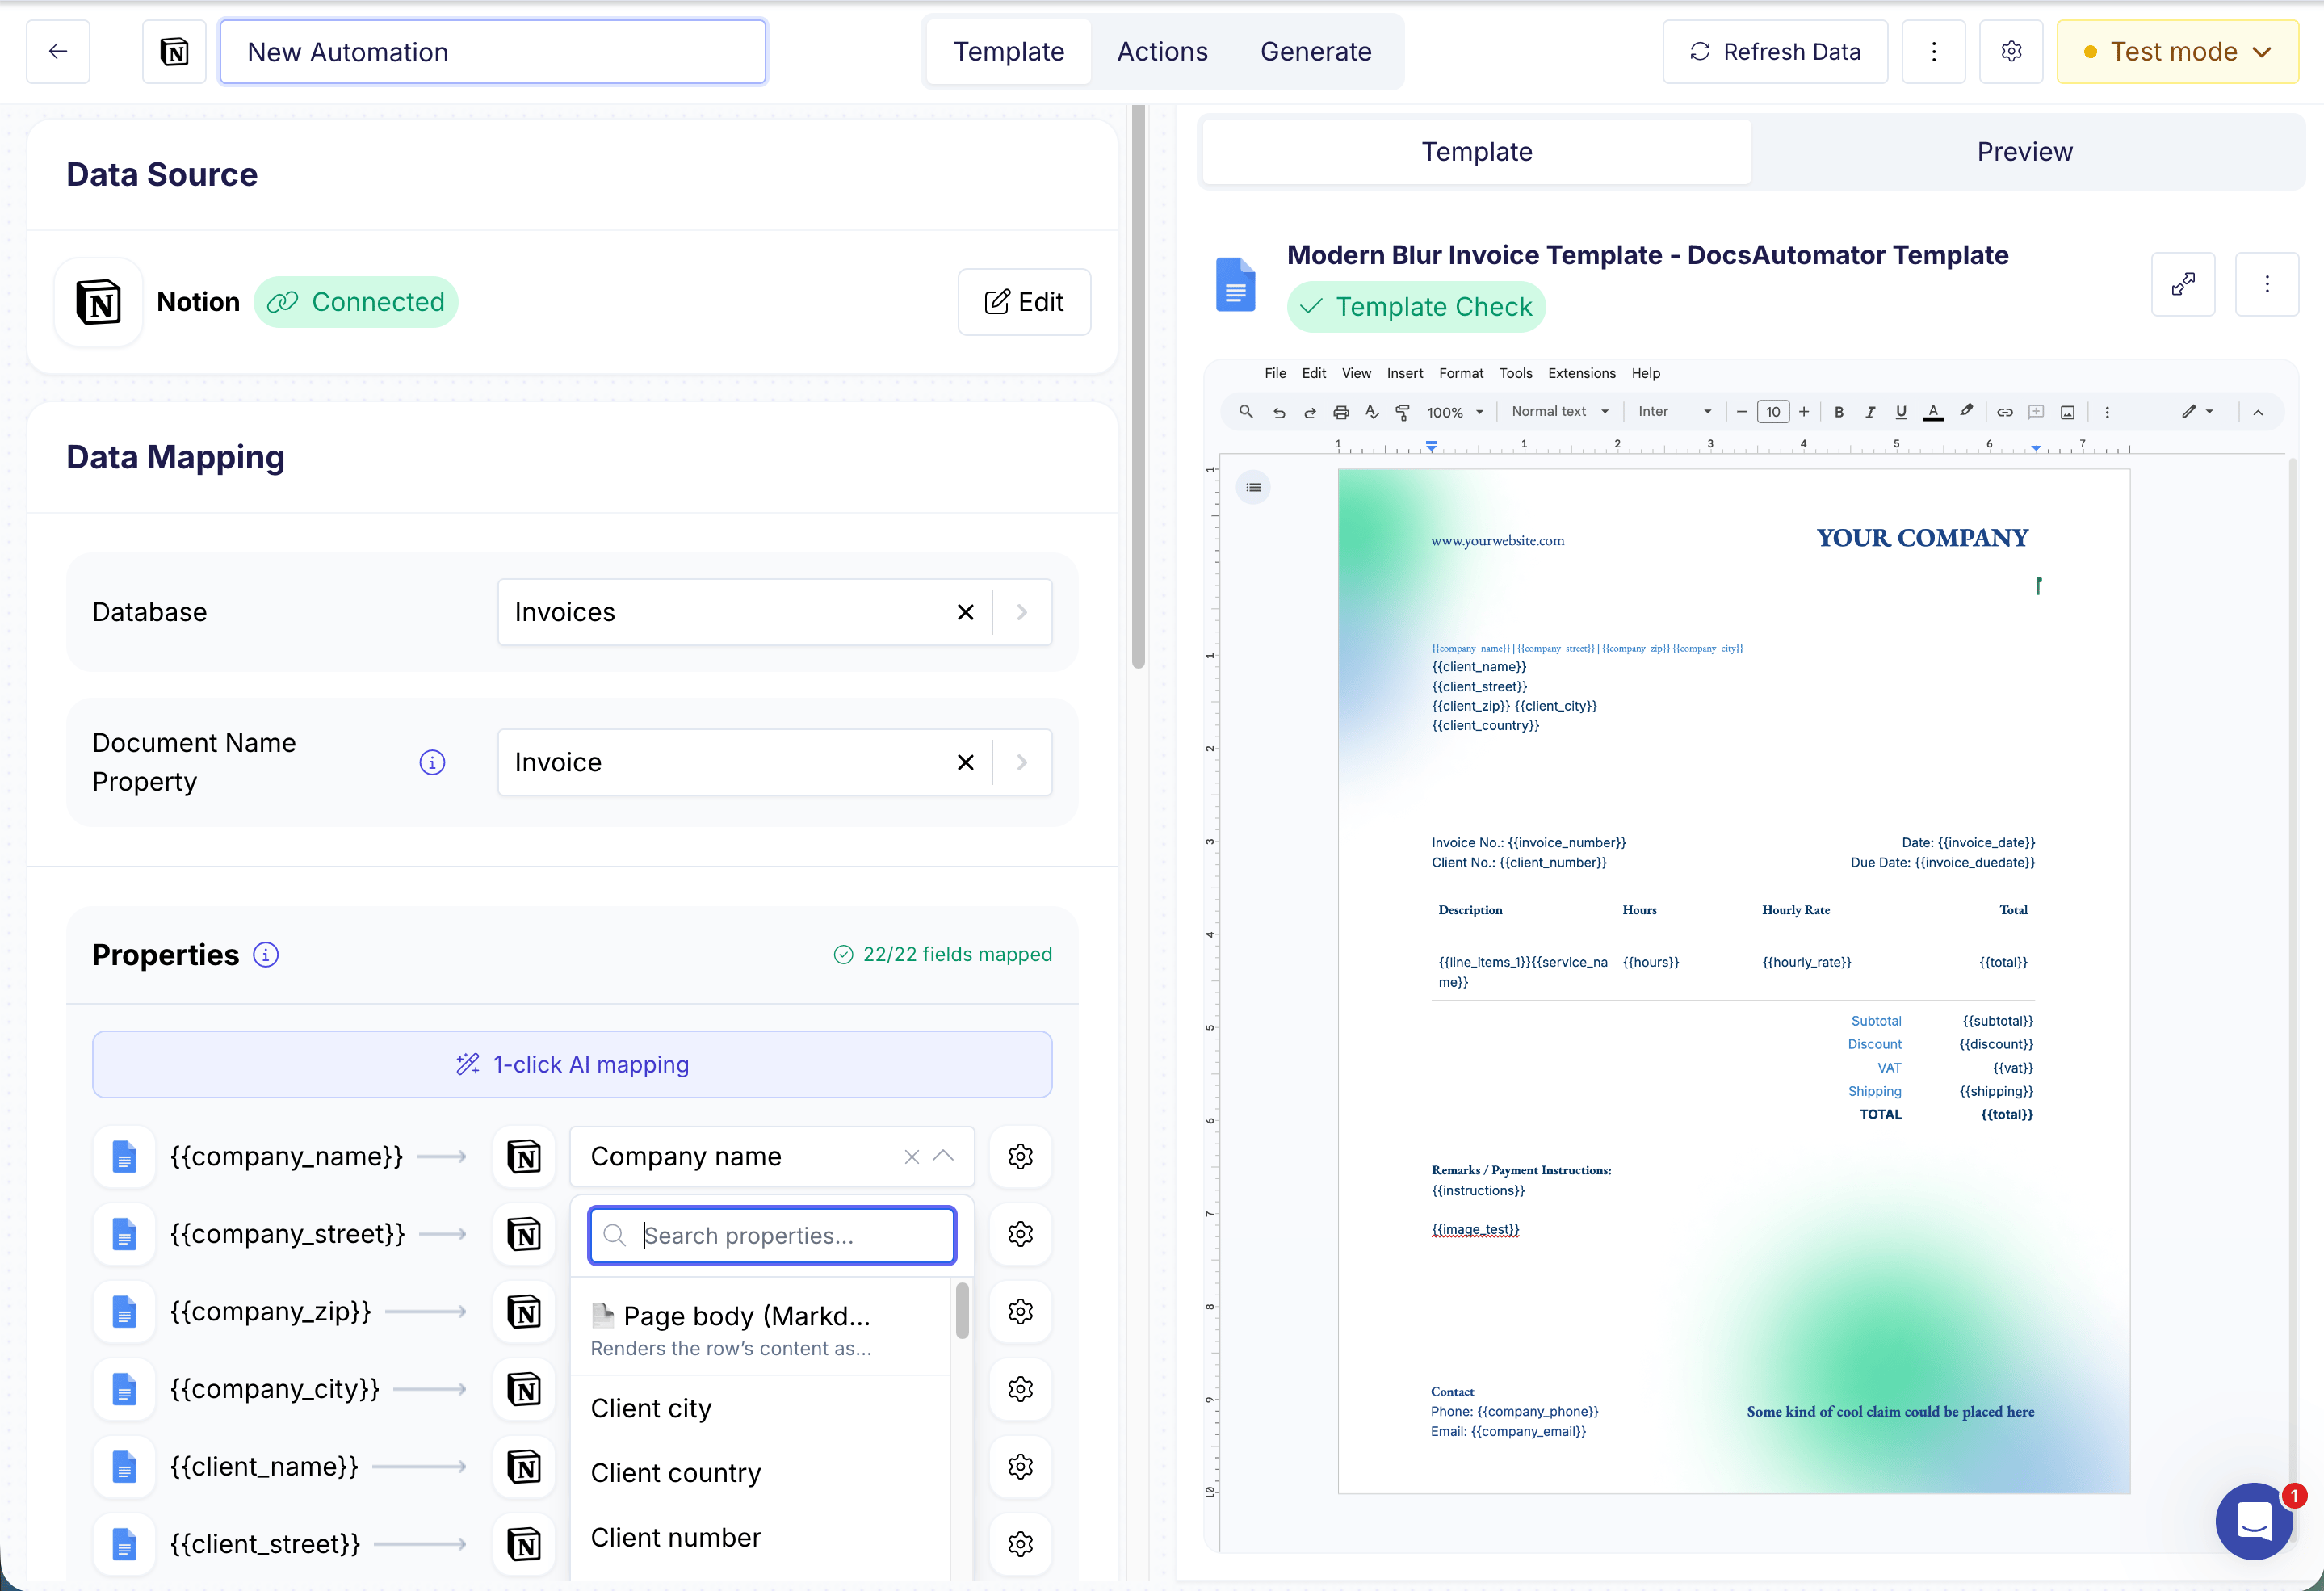
Pick the Notion database you want to generate documents from. DocsAutomator lists every database you've shared with the integration.
Pick which Notion property to use for naming the generated document — typically your **Title** property. Text and string-formula properties also work.
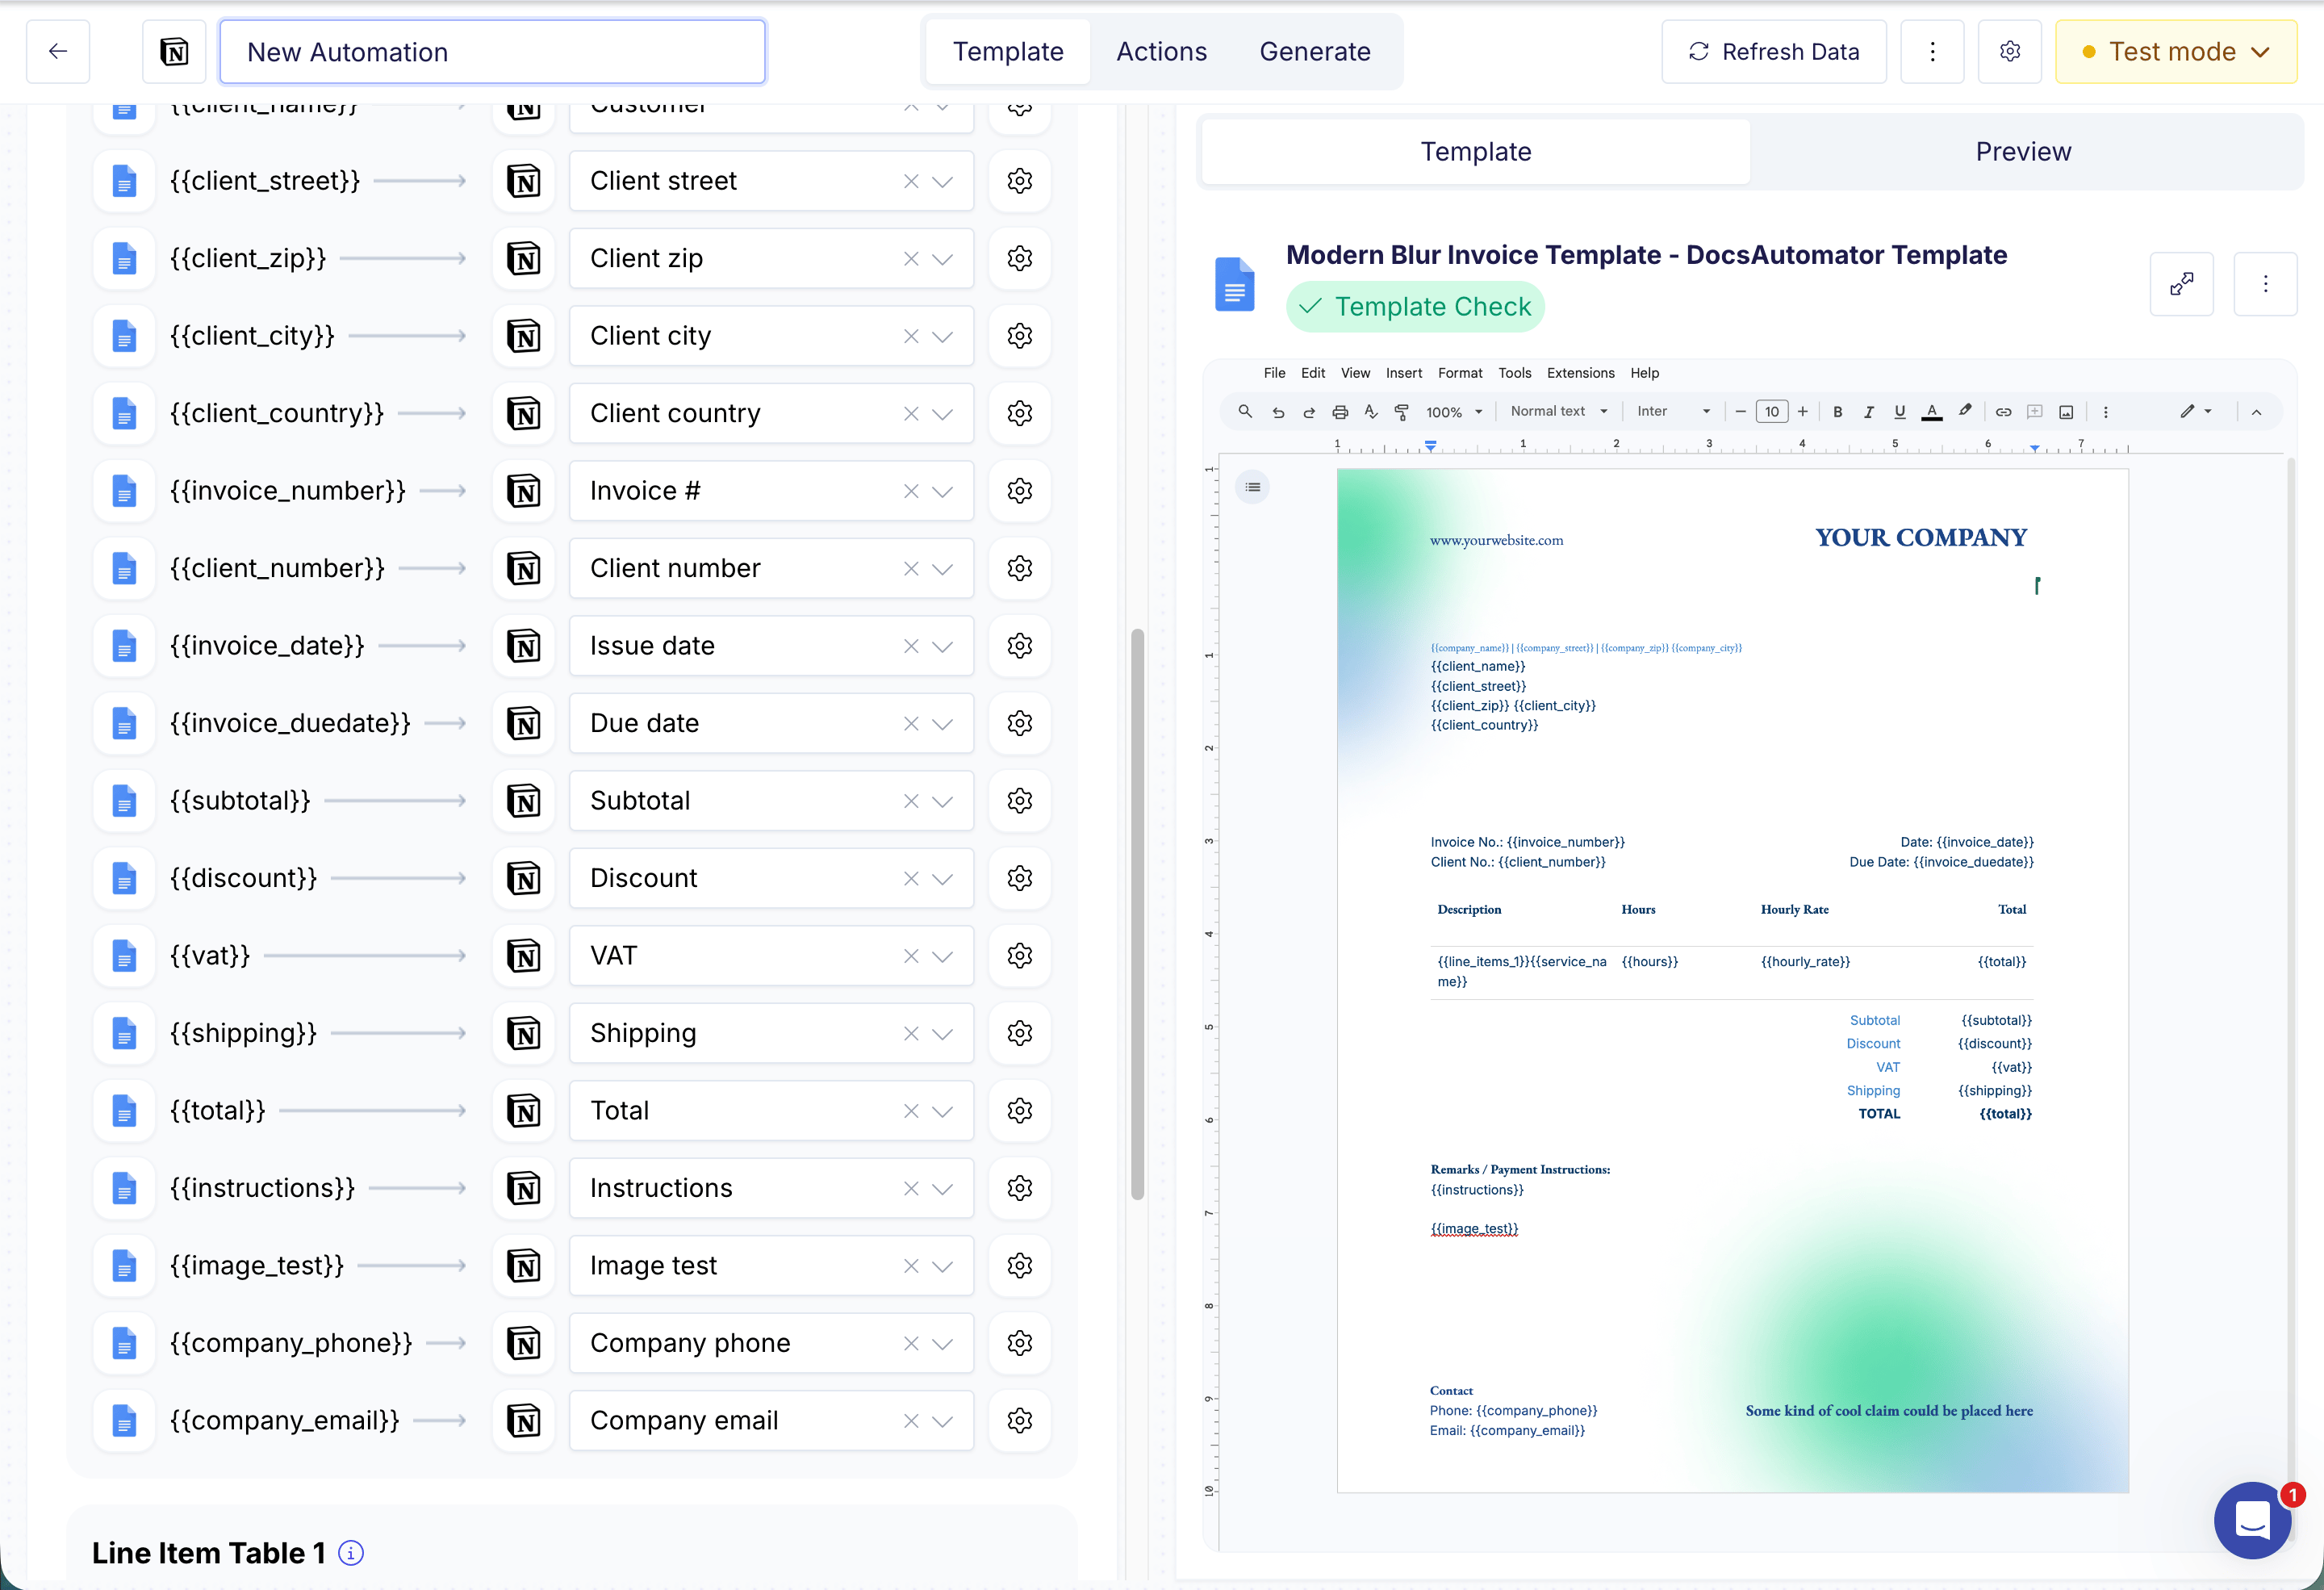
Match every template placeholder to a Notion property. Renaming a property in Notion later won't break the mapping — DocsAutomator tracks properties even when you rename them.
Use **AI Field Mapping** to fill the table in automatically by matching placeholder names to property names.
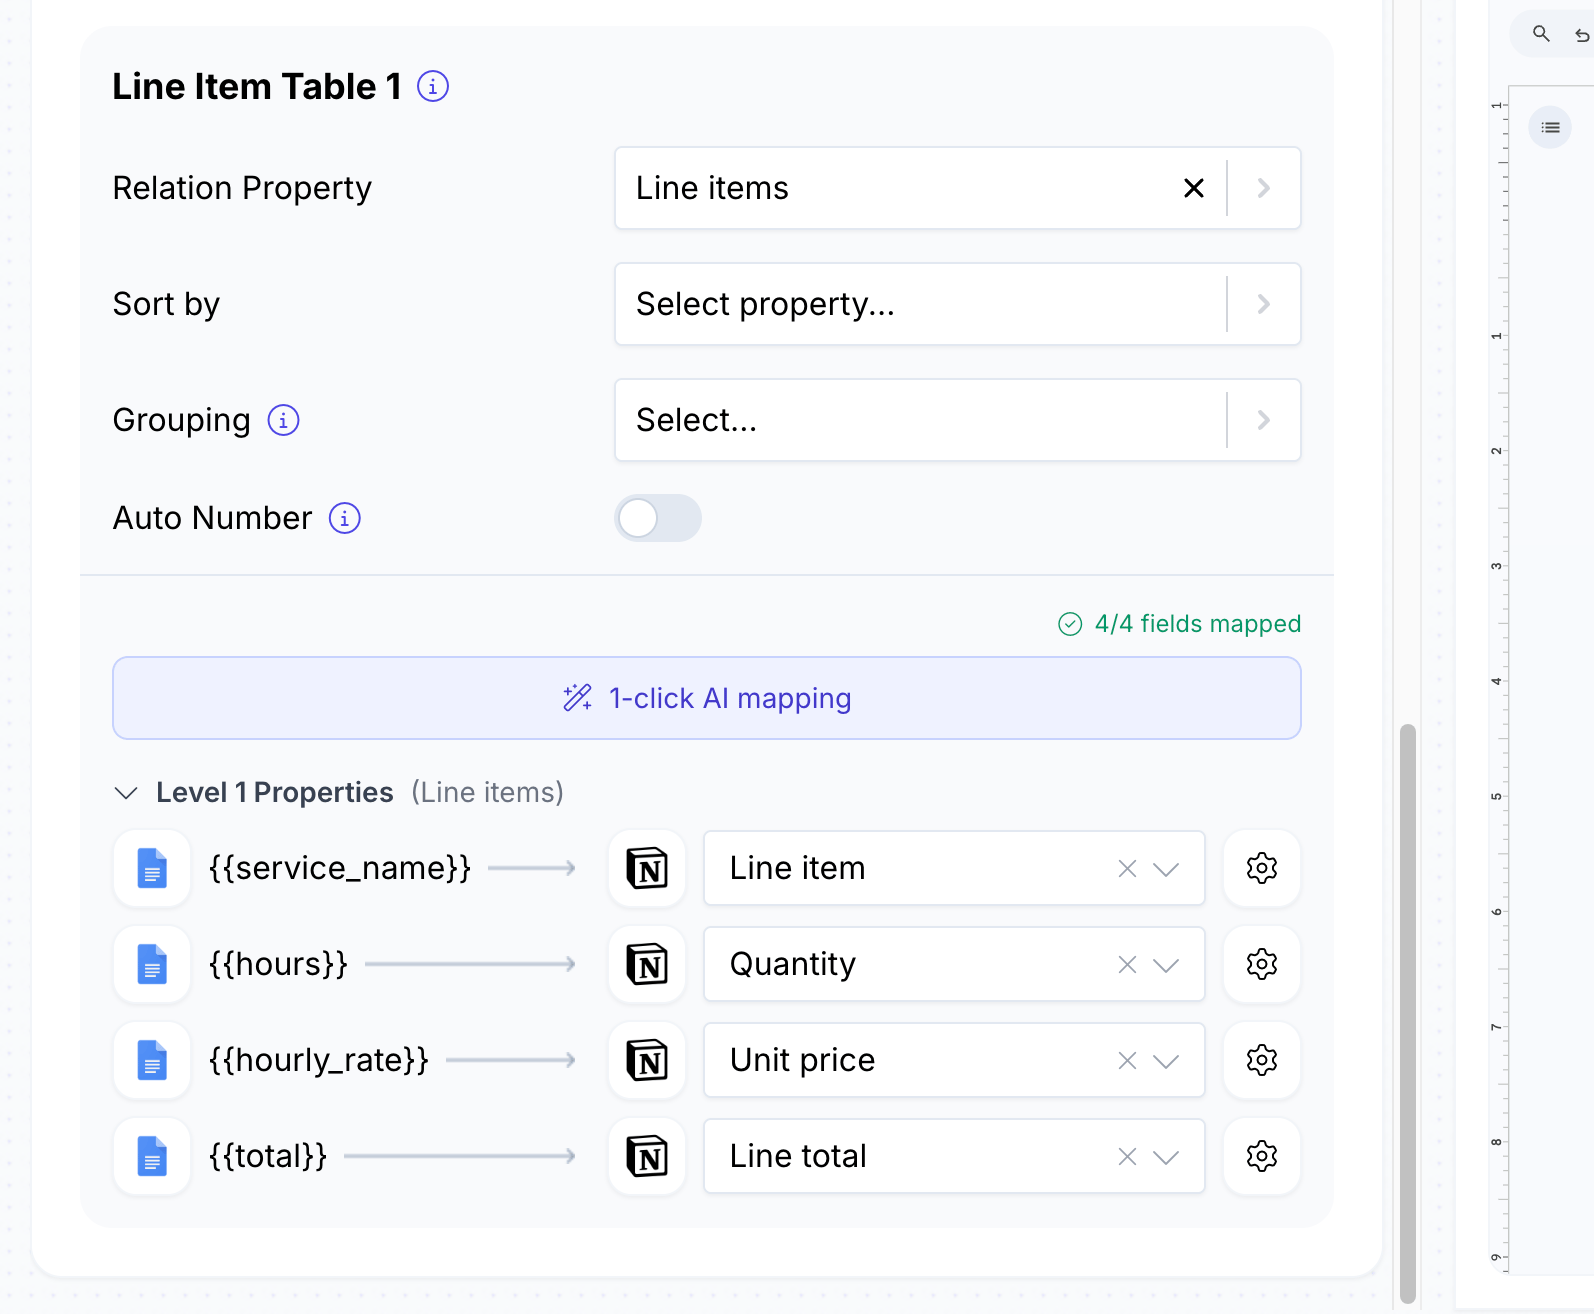
If your template includes `{{line_items_1}}` markers, pick a **Relation** property on your database, then map the fields on the related pages to the line-item placeholders. You can nest line items up to three levels deep.
Generate a preview to make sure everything looks right. You can search for any page in your database to preview from.
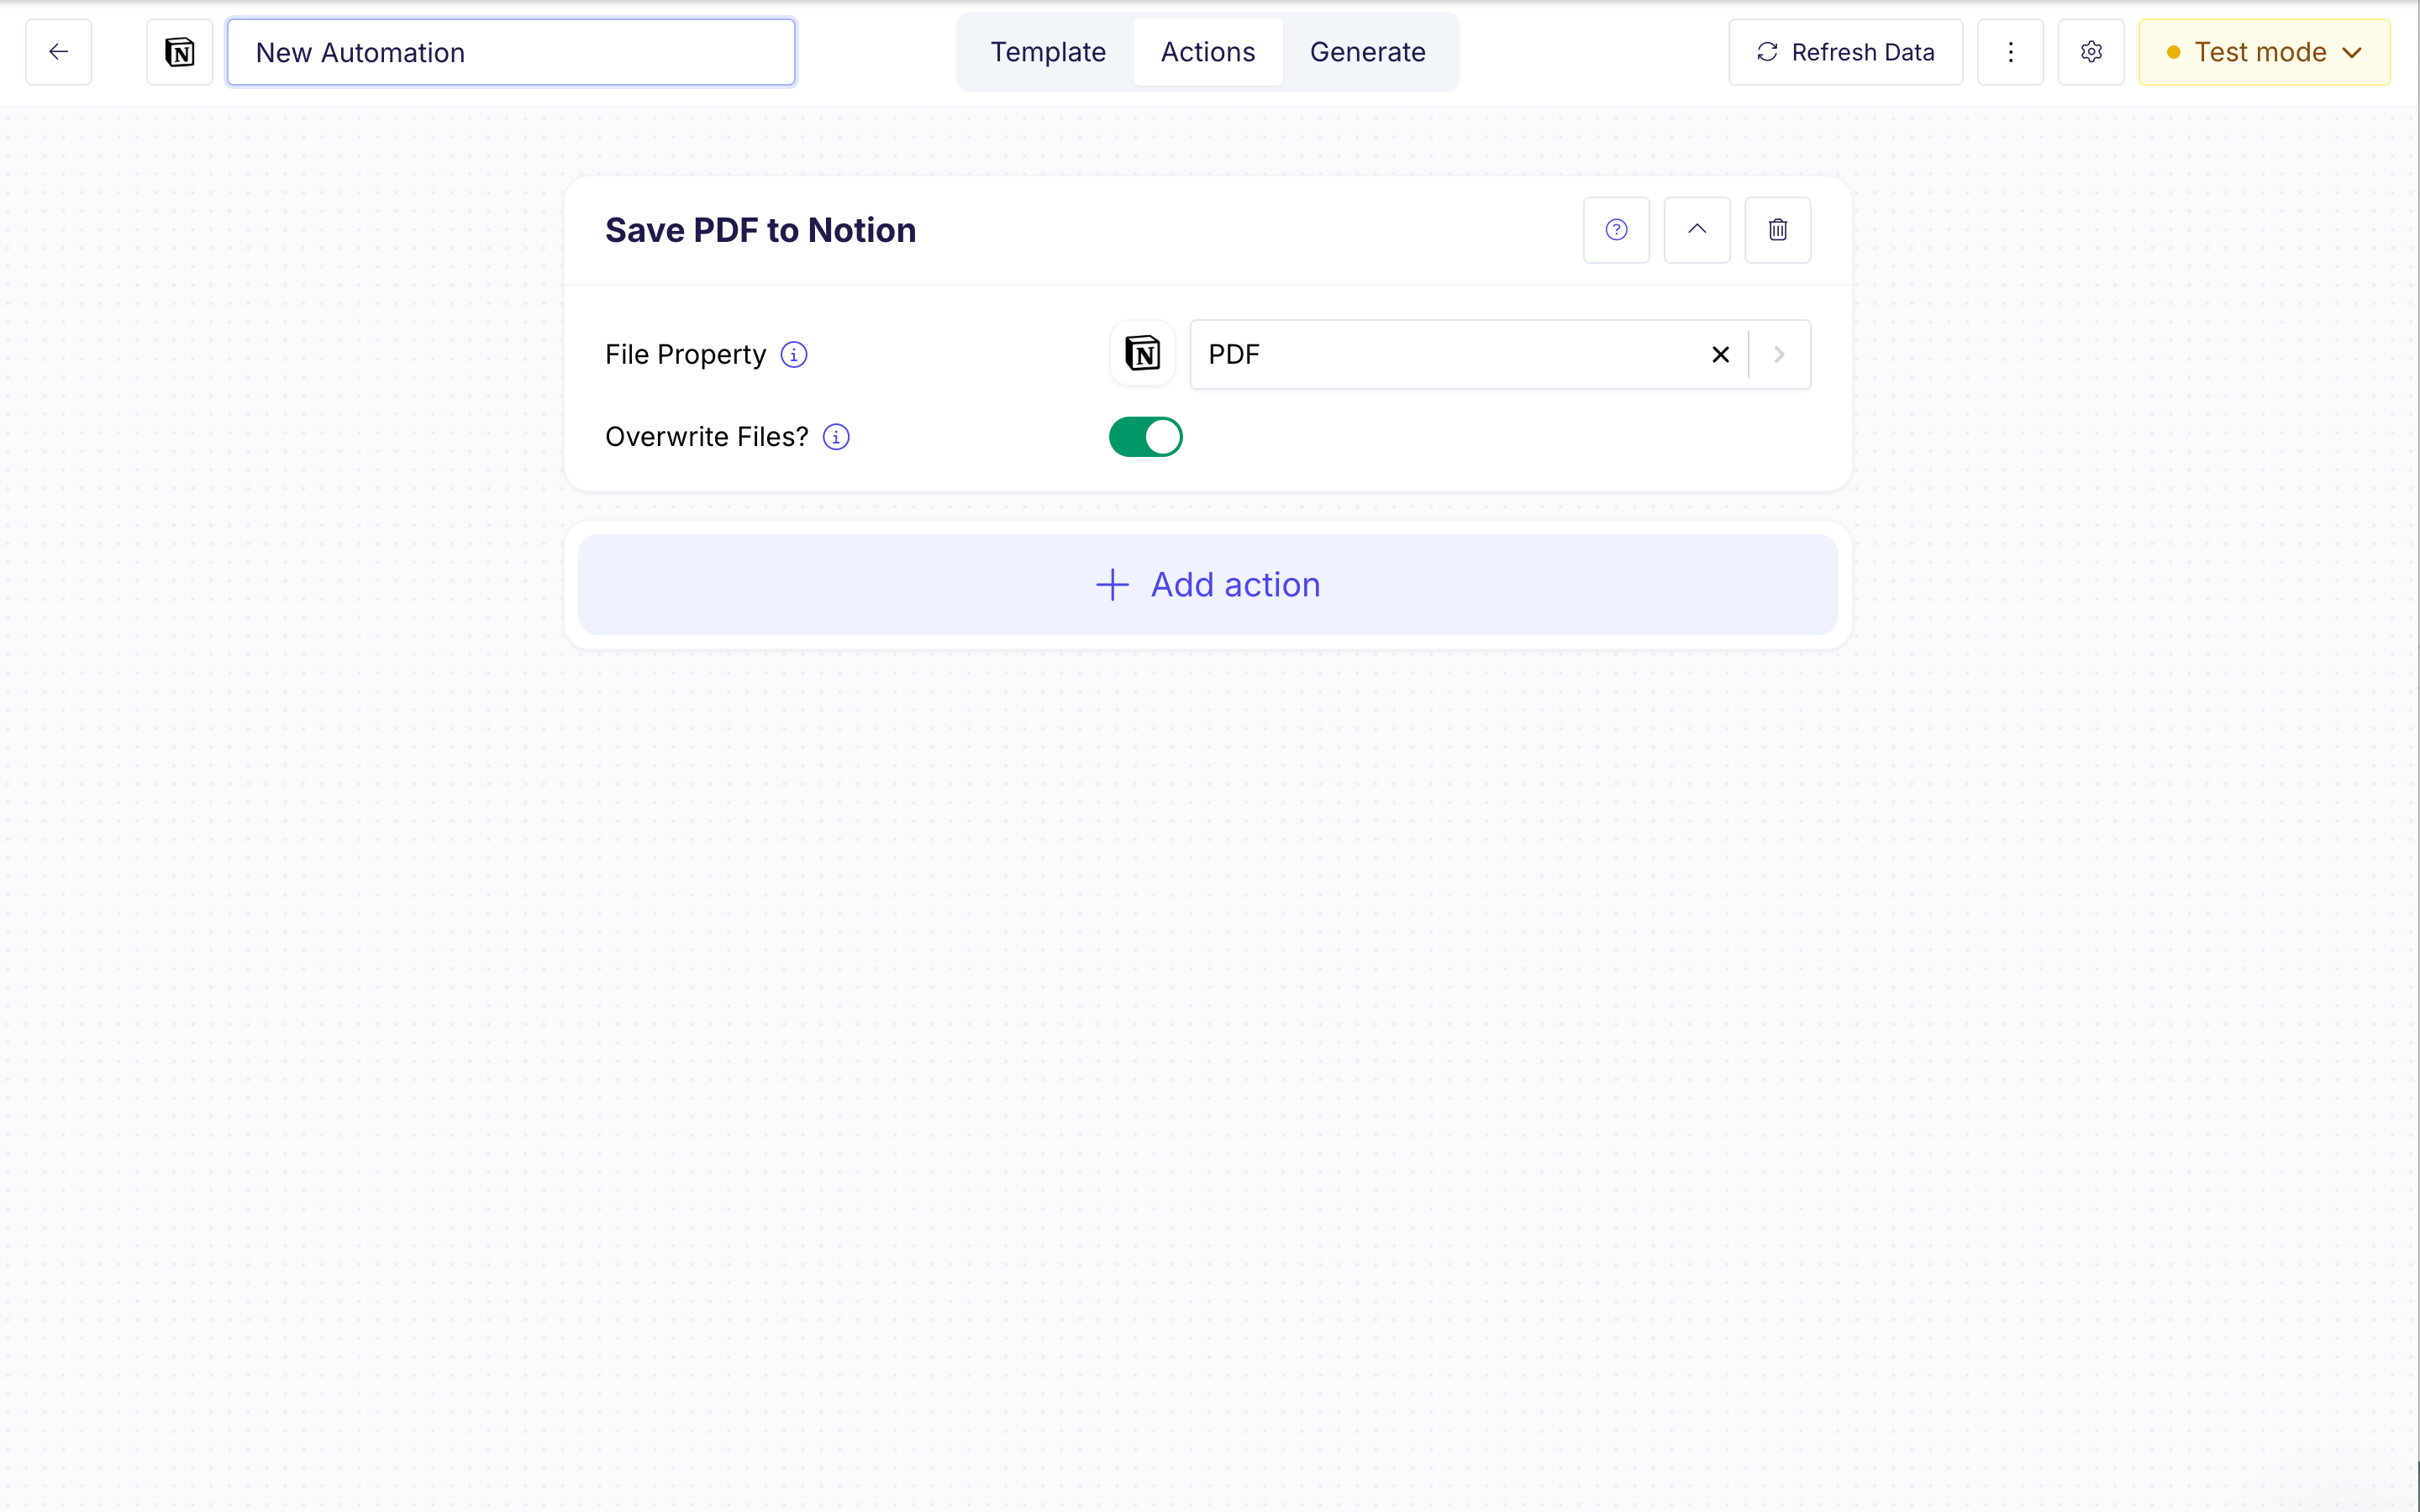
Open the **Actions** tab to control what happens after a document is generated. For Notion, you can:
* Upload the generated PDF to a **file property** on the page (with overwrite or append).
* Write the **PDF URL** or **Google Doc URL** into a URL or text property.
* Send the PDF by email, save it to Google Drive, merge it with an existing PDF, or send a webhook notification.
You can generate documents manually from DocsAutomator, automatically when a property changes, or with a button placed on each row in Notion — see the next section.
## Triggering Methods
You can generate documents from Notion three ways: from inside DocsAutomator, automatically when a property changes, or by clicking a button on a row in Notion.
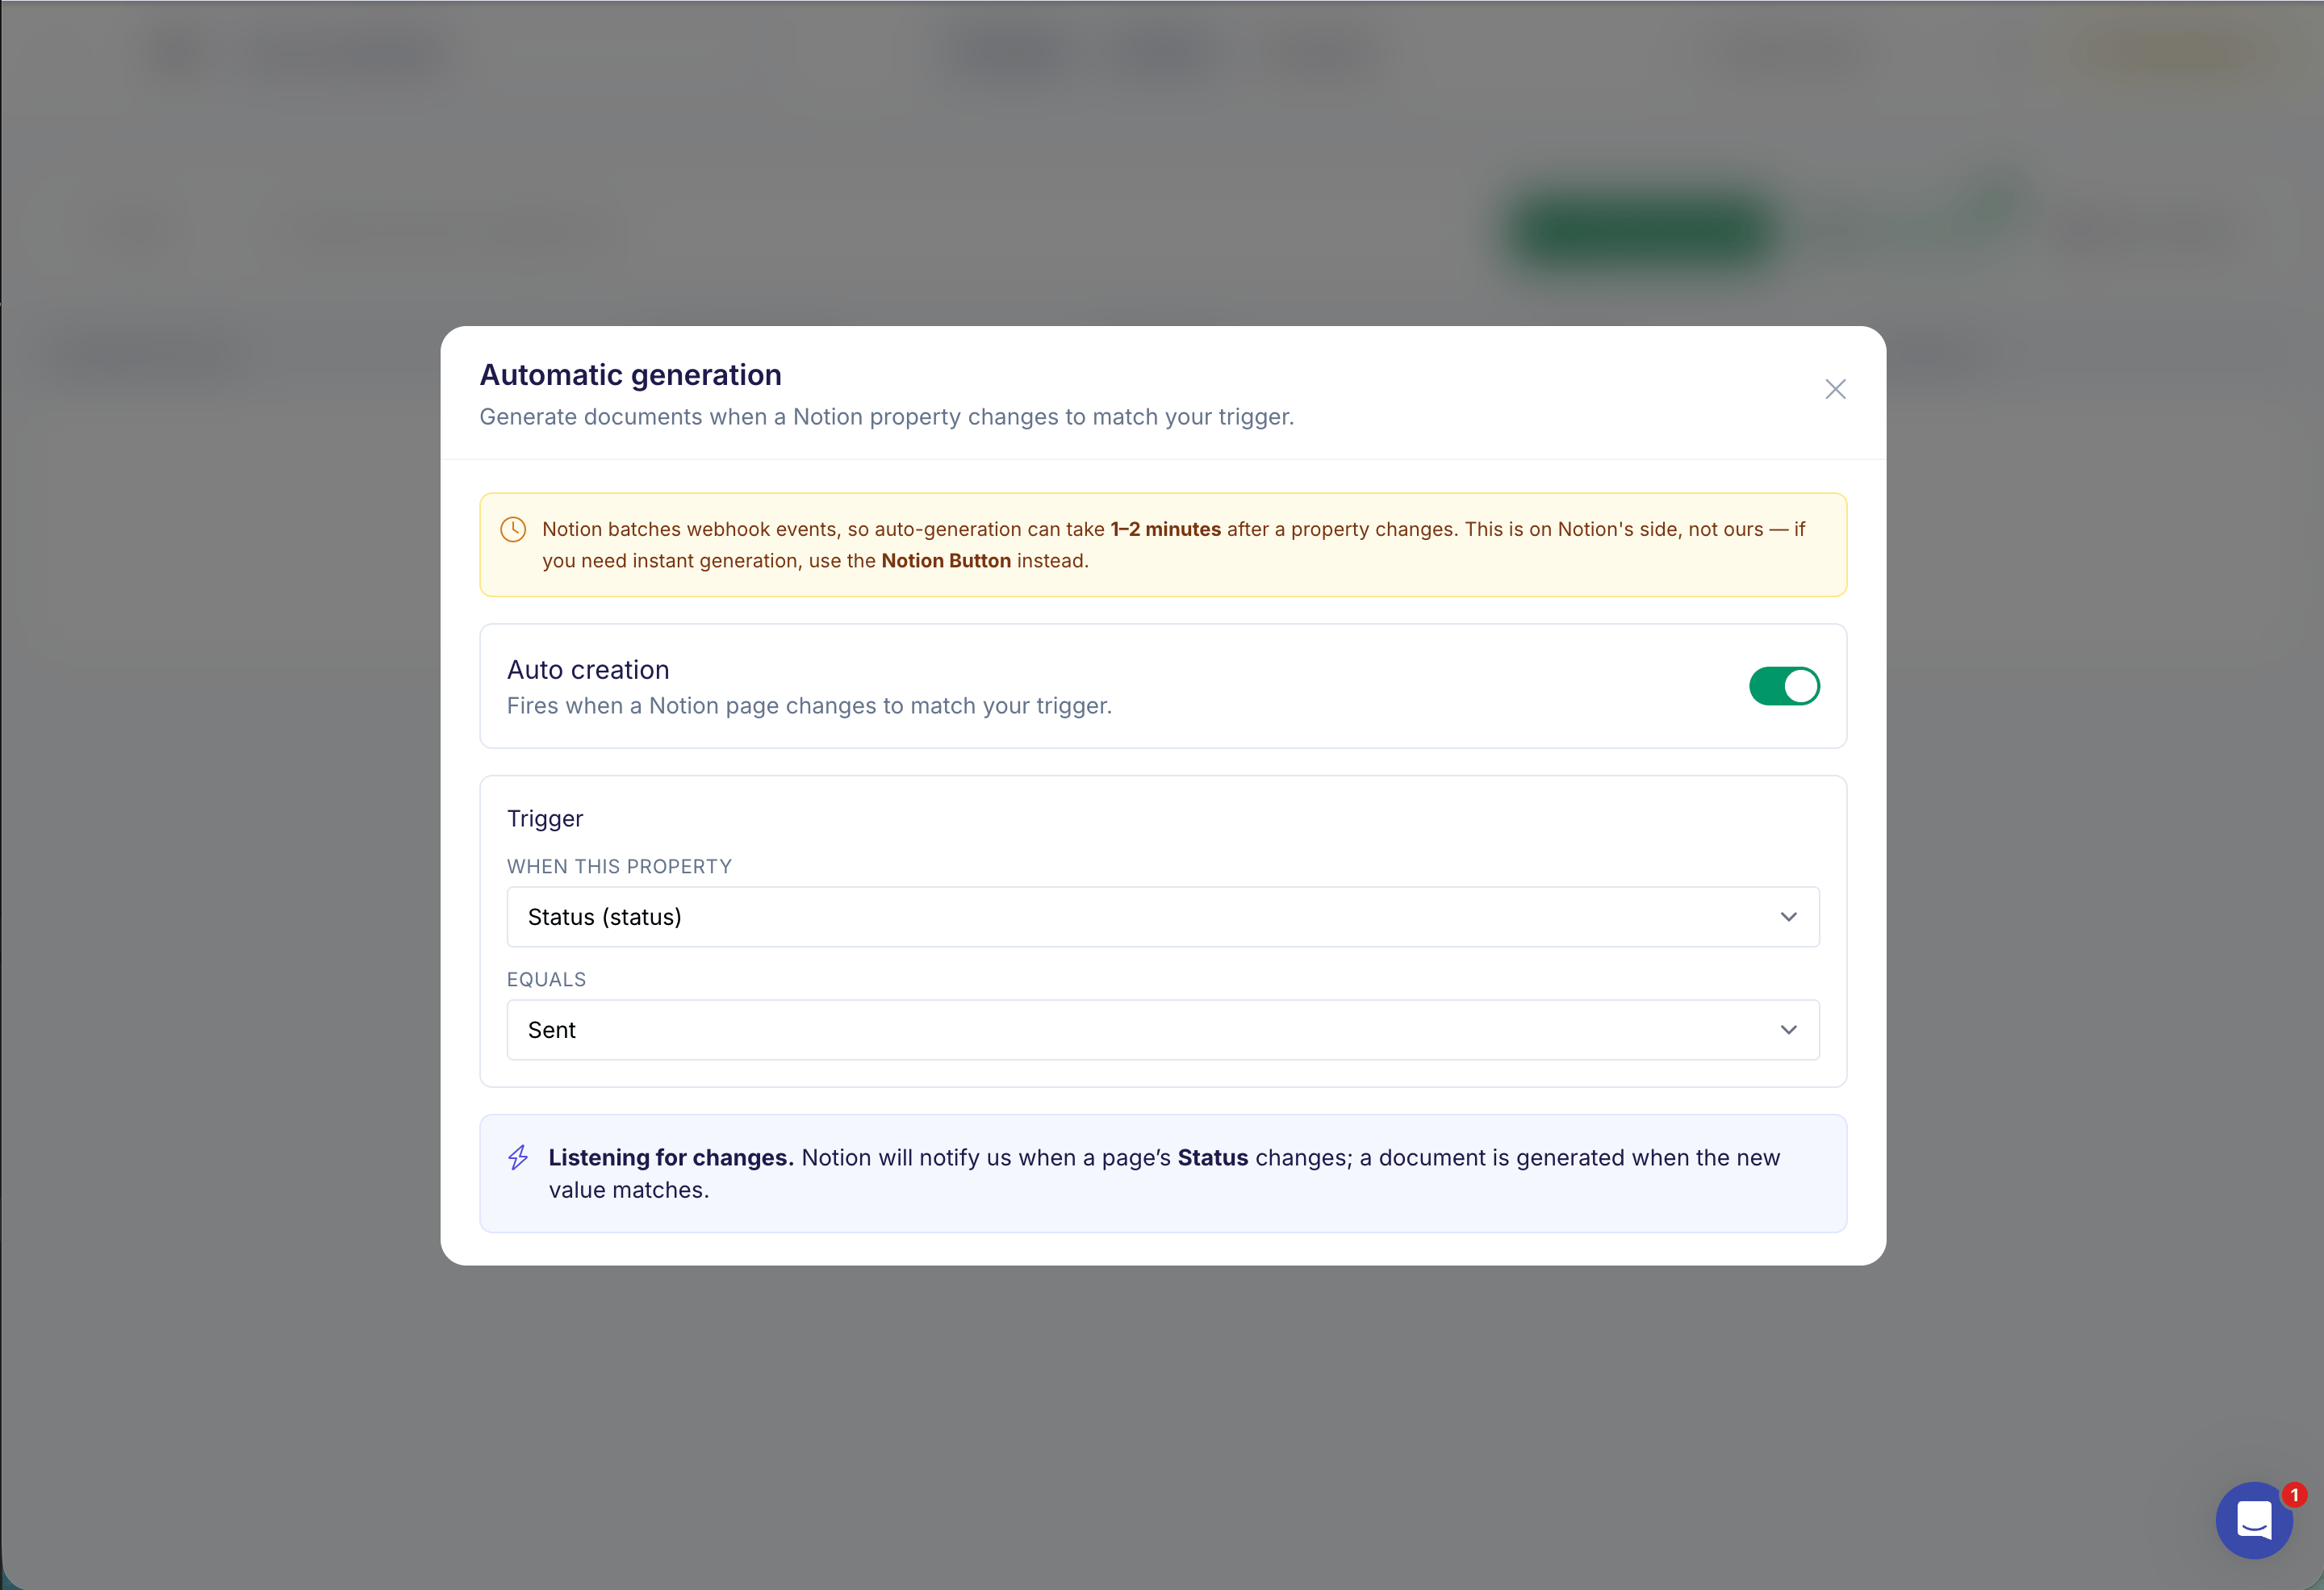
### Automatic — Auto Creation
Pick a property and a value that should fire generation. When a page changes to match (for example, **Status = Ready**), DocsAutomator generates a document for that page.
Trigger property types supported:
* **Status**
* **Select**
* **Multi-select** (fires when the chosen option is among the selected values)
* **Checkbox**
Notion delivers change events in batches, so automatic generation typically takes **1–2 minutes** after the property changes. If you need instant generation, use the Notion Button method below.
### Manual — Notion Button (per-row)
Add a button on your database that generates a document for the clicked row.
Open the database connected to your automation.
Add a new property and choose **Button** as its type.
In the button settings, change the action to **Send webhook**.
Copy the webhook URL shown on the **Notion Button** setup panel inside your automation and paste it into the URL field in Notion.
Click **Add custom header** in Notion and enter:
* **Key**: `Authorization`
* **Value**: copy the value shown on the DocsAutomator setup panel (it starts with `Bearer`)
Scroll to the **Content** section in Notion and check **Select all existing properties** so Notion sends the row's data along with the click.
Clicking the button on any row now generates a document for that row in seconds.
**Requires Notion Plus or higher.** The "Send webhook" button action isn't available on Notion's Free plan.
### Manual — From DocsAutomator
You can always click **Generate** on any page from inside DocsAutomator. This works on every Notion plan, including Free.
## Page Body as Content
DocsAutomator can drop the entire **body of a Notion page** — everything you write below the property panel — into your document. In the property picker, choose **📄 Page body** for any placeholder, and the page's content appears at that spot in the document.
Supported content includes:
* Headings, paragraphs, and lists (bulleted, numbered, to-do, nested)
* Toggles, quotes, callouts, dividers
* Code blocks, equations
* Images, videos, files, PDFs, and audio
* Bookmarks, embeds, link previews
* Columns, synced blocks, child pages, child databases
Inline formatting like **bold**, *italic*, links, `code`, and ~~strikethrough~~ is preserved.
## Property Type Reference
| Property Type | Output | Notes |
| ------------------------------- | --------------------------- | ------------------------------------------------------------------------------------------------------------ |
| Title | Plain text | The page's title |
| Text (Rich text) | Plain text | Can be flagged as Markdown to preserve inline formatting |
| Number | `299.99` | Respects your column's Notion format (currency, percent, number with commas) |
| Currency (number format) | `$299.99` / `€299.99` | Symbol matches the currency you picked in Notion |
| Percent (number format) | `50%` | Renders as Notion displays it |
| Number with commas | `1,299.99` | Thousands separators per your automation locale |
| Select | Option name | |
| Multi-select | `Option 1, Option 2` | Comma-separated |
| Status | Status name | |
| Date | `21/05/2024` | Honors your automation's date format. Date ranges render as `start – end`. Times included when set in Notion |
| Created time / Last edited time | `21/05/2024` | Per automation date format |
| People | `Ada Lovelace, Alan Turing` | Comma-separated |
| Created by / Last edited by | Name | |
| Files & media | Image(s) or URLs | Map to image placeholders (`{{image_*}}`) to embed images; other files appear as URLs |
| Checkbox | ✅ or ❌ | |
| URL | `https://example.com` | Unmodified |
| Email | `name@example.com` | Unmodified |
| Phone | `+1 234 567 890` | Unmodified |
| Formula | Varies | Matches the formula's result type (text, number, date, or yes/no) |
| Rollup | Varies | Matches the rolled-up property's type. Multi-value rollups join with `, ` |
| Relation | Comma-joined IDs | Use **line items** for full expansion into rows |
| Unique ID | `INV-42` | Includes the prefix when one is set |
| Verification | `verified` / `unverified` | |
| Button | *(none)* | Button properties have no value |
| Place | *(none)* | Not currently supplied by Notion |
Need a different format? Open the **Format** popover on any placeholder to override the default — currency code, date format, decimals, and more. See [Format Values](/features/advanced-placeholder-options/format-values).
## Line Items from Relations
DocsAutomator turns a **Relation** property on your database into a `{{line_items_N}}` row in the template — one row per related page.
* Pick the relation on your primary database.
* Map fields on the related pages to the line-item placeholders (`{{line_items_1_qty}}`, `{{line_items_1_name}}`, …).
* Sort by any property on the related pages, ascending or descending. With no sort set, line items follow the order you've arranged them in on the parent page.
* Nest up to three levels — `{{line_items_1_1_*}}` pulls from a relation on the related page, `{{line_items_1_2_*}}` adds another level beneath that.
See [Line Items](/features/line-items) and [Nested Line Items](/features/line-items/nested-line-items) for the full template syntax.
## E-Signatures
DocsAutomator can collect legally binding e-signatures on documents generated from Notion pages. After a document is generated, it's routed automatically to one or more signers.
In your automation's output settings, toggle on e-signatures and map each signer's email and name to a Notion property — for example, map "Client Email" to the first signer's email and "Client Name" to their name. Multi-signer documents support both **sequential** (signers sign in order) and **parallel** (all signers receive the request at the same time) signing.
Place e-signature placeholders such as `{{esign.signature_1}}` and `{{esign.date_1}}` in your template wherever signatures and dates should appear. Once all signers have completed the document, the signed PDF can be written back to a Notion file property automatically.
E-signatures work with both Google Doc templates and [PDF templates](/docsautomator-basics/pdf-template-guide). See the [E-Signature Guide](/features/docsautomator-esign) for full configuration details and the placeholder reference.
## Frequently Asked Questions
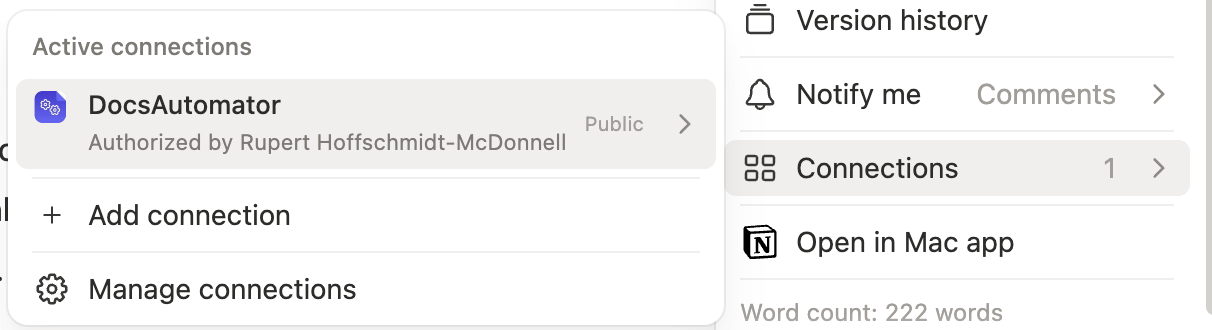
No need to reconnect. In Notion, open the database, click the `•••` menu in the top-right, choose **Connections** → **DocsAutomator**, then come back to DocsAutomator and click **Refresh**.
The most likely reason is that no databases were ticked on the authorization screen. Reconnect Notion from your DocsAutomator settings and make sure to select your databases — or share them after the fact using the Connections menu (see above).
Notion delivers change events to integrations in batches, so the delay is usually 1–2 minutes. If you need instant generation, use the **Notion Button** trigger instead.
The "Send webhook" action on database buttons is a paid Notion feature (Notion Plus and higher). On the Free plan, you can still generate manually from DocsAutomator or use the Auto Creation trigger.
Nothing breaks. DocsAutomator keeps tracking the property after a rename.
Yes. In the property picker, choose **📄 Page body** for any placeholder and the page's content — headings, lists, tables, images, callouts, code, and so on — appears in your document at that spot.
Yes. In the output settings, pick a file property on the database. The generated PDF is uploaded to that property on the page, and you can choose whether to overwrite existing files or add alongside them.
## Next Steps
Learn the template syntax
Add tables and repeating rows
Collect signatures on generated documents
Embed images from Notion file properties
 Supported content includes:
* Headings, paragraphs, and lists (bulleted, numbered, to-do, nested)
* Toggles, quotes, callouts, dividers
* Code blocks, equations
* Images, videos, files, PDFs, and audio
* Bookmarks, embeds, link previews
* Columns, synced blocks, child pages, child databases
Inline formatting like **bold**, *italic*, links, `code`, and ~~strikethrough~~ is preserved.
## Property Type Reference
| Property Type | Output | Notes |
| ------------------------------- | --------------------------- | ------------------------------------------------------------------------------------------------------------ |
| Title | Plain text | The page's title |
| Text (Rich text) | Plain text | Can be flagged as Markdown to preserve inline formatting |
| Number | `299.99` | Respects your column's Notion format (currency, percent, number with commas) |
| Currency (number format) | `$299.99` / `€299.99` | Symbol matches the currency you picked in Notion |
| Percent (number format) | `50%` | Renders as Notion displays it |
| Number with commas | `1,299.99` | Thousands separators per your automation locale |
| Select | Option name | |
| Multi-select | `Option 1, Option 2` | Comma-separated |
| Status | Status name | |
| Date | `21/05/2024` | Honors your automation's date format. Date ranges render as `start – end`. Times included when set in Notion |
| Created time / Last edited time | `21/05/2024` | Per automation date format |
| People | `Ada Lovelace, Alan Turing` | Comma-separated |
| Created by / Last edited by | Name | |
| Files & media | Image(s) or URLs | Map to image placeholders (`{{image_*}}`) to embed images; other files appear as URLs |
| Checkbox | ✅ or ❌ | |
| URL | `https://example.com` | Unmodified |
| Email | `name@example.com` | Unmodified |
| Phone | `+1 234 567 890` | Unmodified |
| Formula | Varies | Matches the formula's result type (text, number, date, or yes/no) |
| Rollup | Varies | Matches the rolled-up property's type. Multi-value rollups join with `, ` |
| Relation | Comma-joined IDs | Use **line items** for full expansion into rows |
| Unique ID | `INV-42` | Includes the prefix when one is set |
| Verification | `verified` / `unverified` | |
| Button | *(none)* | Button properties have no value |
| Place | *(none)* | Not currently supplied by Notion |
Supported content includes:
* Headings, paragraphs, and lists (bulleted, numbered, to-do, nested)
* Toggles, quotes, callouts, dividers
* Code blocks, equations
* Images, videos, files, PDFs, and audio
* Bookmarks, embeds, link previews
* Columns, synced blocks, child pages, child databases
Inline formatting like **bold**, *italic*, links, `code`, and ~~strikethrough~~ is preserved.
## Property Type Reference
| Property Type | Output | Notes |
| ------------------------------- | --------------------------- | ------------------------------------------------------------------------------------------------------------ |
| Title | Plain text | The page's title |
| Text (Rich text) | Plain text | Can be flagged as Markdown to preserve inline formatting |
| Number | `299.99` | Respects your column's Notion format (currency, percent, number with commas) |
| Currency (number format) | `$299.99` / `€299.99` | Symbol matches the currency you picked in Notion |
| Percent (number format) | `50%` | Renders as Notion displays it |
| Number with commas | `1,299.99` | Thousands separators per your automation locale |
| Select | Option name | |
| Multi-select | `Option 1, Option 2` | Comma-separated |
| Status | Status name | |
| Date | `21/05/2024` | Honors your automation's date format. Date ranges render as `start – end`. Times included when set in Notion |
| Created time / Last edited time | `21/05/2024` | Per automation date format |
| People | `Ada Lovelace, Alan Turing` | Comma-separated |
| Created by / Last edited by | Name | |
| Files & media | Image(s) or URLs | Map to image placeholders (`{{image_*}}`) to embed images; other files appear as URLs |
| Checkbox | ✅ or ❌ | |
| URL | `https://example.com` | Unmodified |
| Email | `name@example.com` | Unmodified |
| Phone | `+1 234 567 890` | Unmodified |
| Formula | Varies | Matches the formula's result type (text, number, date, or yes/no) |
| Rollup | Varies | Matches the rolled-up property's type. Multi-value rollups join with `, ` |
| Relation | Comma-joined IDs | Use **line items** for full expansion into rows |
| Unique ID | `INV-42` | Includes the prefix when one is set |
| Verification | `verified` / `unverified` | |
| Button | *(none)* | Button properties have no value |
| Place | *(none)* | Not currently supplied by Notion |