> ## Documentation Index
> Fetch the complete documentation index at: https://docsautomator.co/docs/llms.txt
> Use this file to discover all available pages before exploring further.
# PDF Template Guide
> Upload existing PDFs and overlay data fields for pixel-perfect document generation
PDF templates let you use an existing PDF as the base for document generation. Upload any PDF and use the visual editor to define where data fields should be overlaid. At generation time, DocsAutomator fills in those fields on top of your original PDF — the underlying PDF is never modified.
The visual editor positions data fields **on top of** your PDF. It does not edit the PDF itself. If you need to change the underlying layout, update the source PDF in your design tool and re-upload it.
**Don't type `{{placeholders}}` into your PDF.** The double-curly-bracket syntax only works in [Google Doc templates](/docsautomator-basics/google-doc-template-guide), where DocsAutomator finds and replaces the text for you. In a PDF, that text is part of the page itself, so it prints **literally** in your generated document (you would see `{{invoice_number}}` instead of the value, with no error to warn you). Upload your PDF unchanged, then add fields with the visual editor described below.
Looking for Google Doc templates instead? See the [Google Doc Template Guide](/docsautomator-basics/google-doc-template-guide).
## When to Use PDF Templates
* You already have a PDF (tax forms, government docs, branded designs)
* Exact layout must stay unchanged
* Filling in specific fields on an existing document
* Working with PDFs from a designer or external tool
* Dynamic content with variable-length sections
* Line items and repeating rows
* Easier editing and iteration
* Rich text formatting and conditional content
***
## Uploading a PDF Template
Navigate to the automation where you want to use a PDF template.
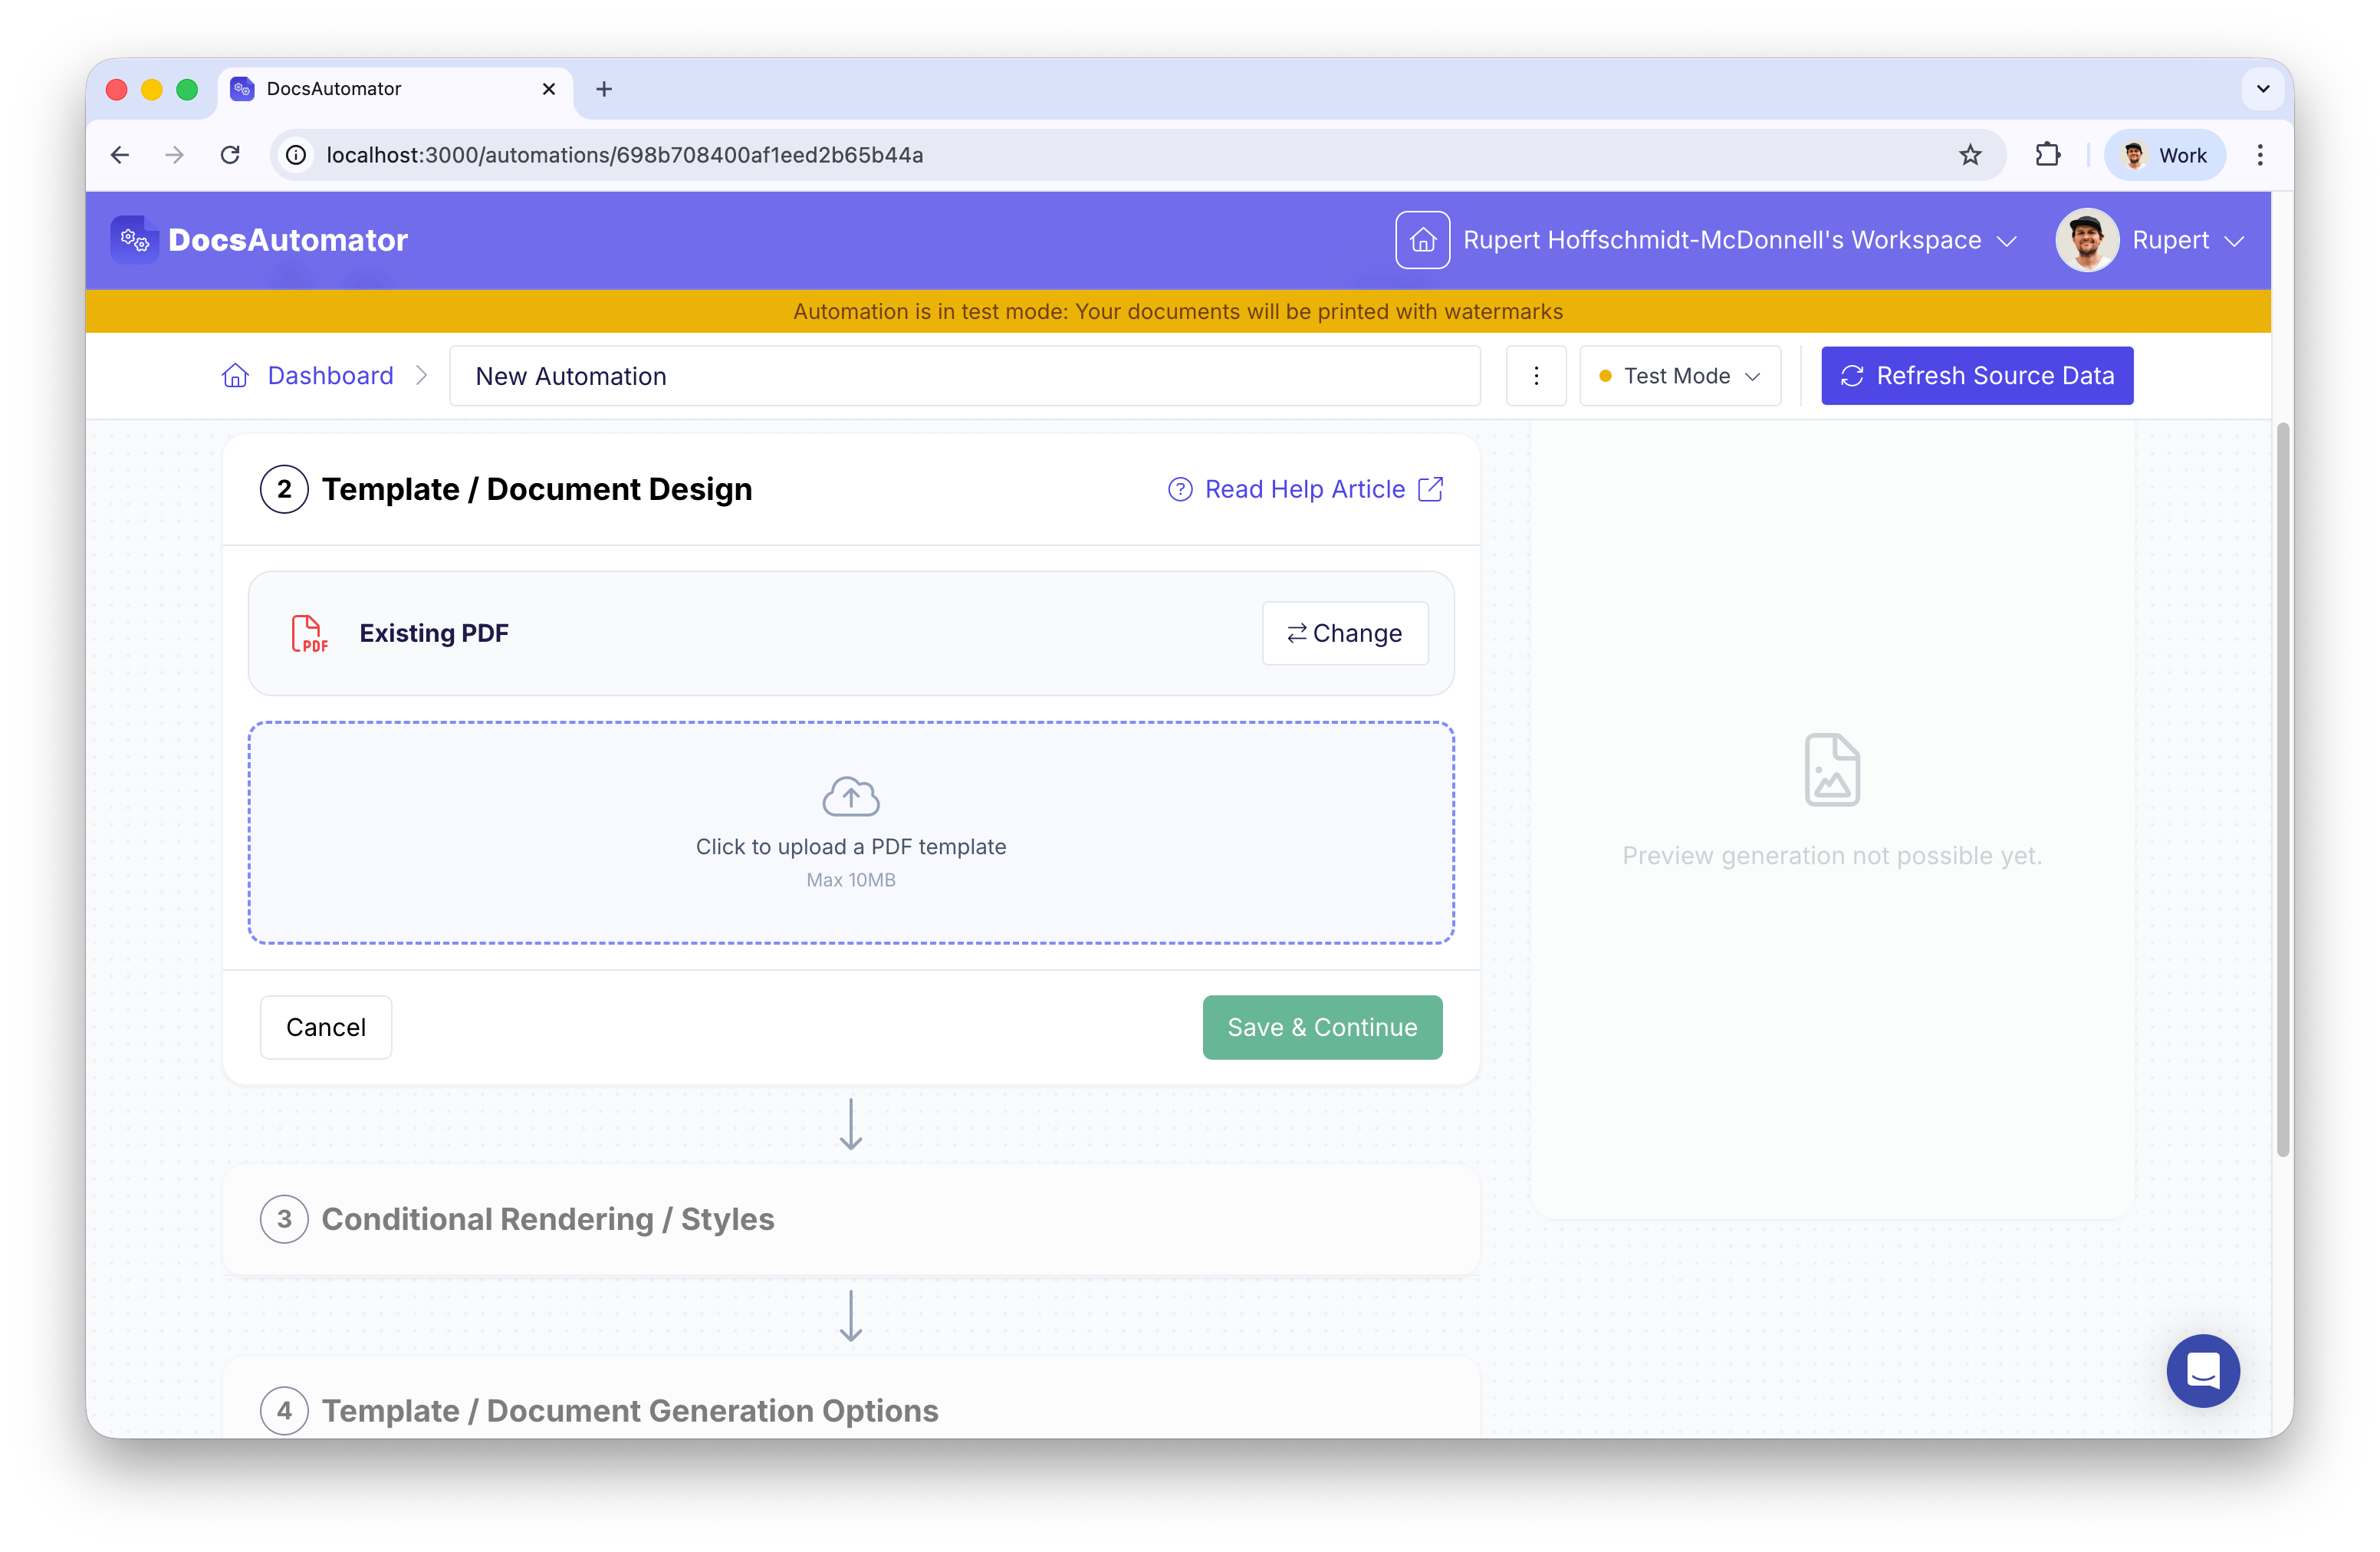
In the Template section, choose **Existing PDF** as the template type.
 Click the upload area or drag and drop your PDF file. The file must be under 10MB.
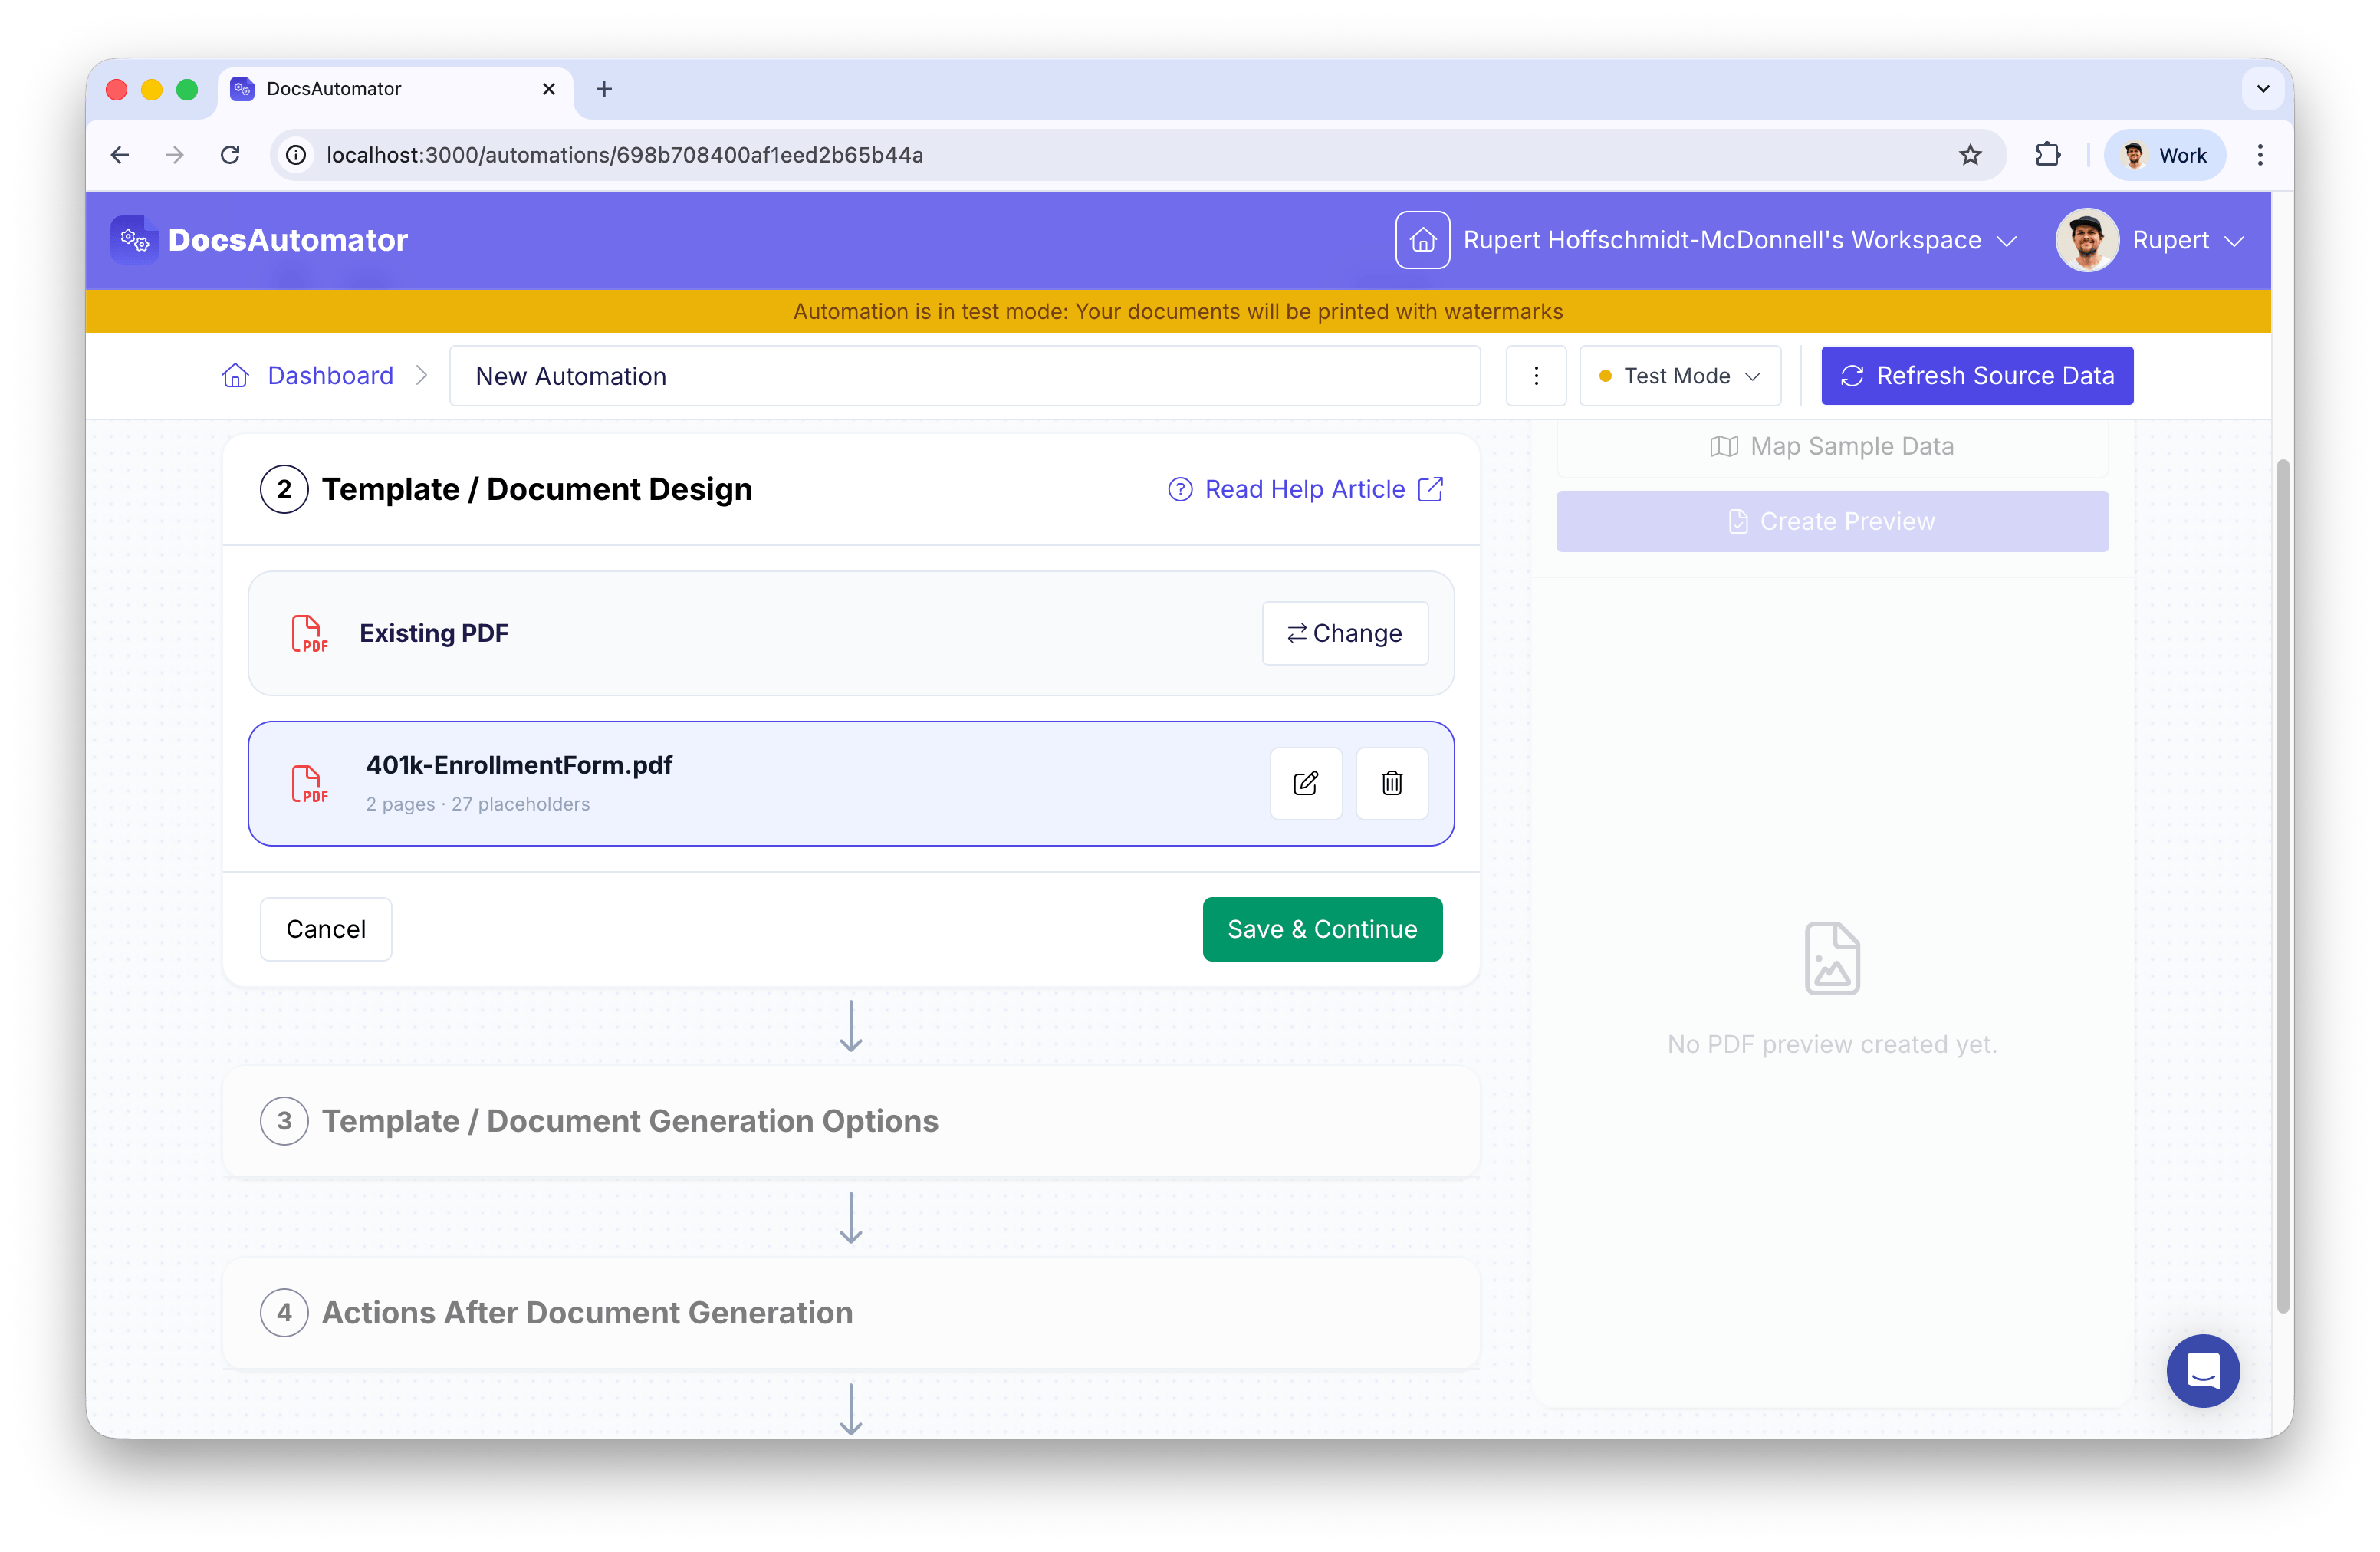
 Once uploaded, you will see a summary of your PDF including the filename, page count, and number of detected placeholders.
 The maximum file size for PDF templates is **10MB**. Ensure your PDF does not exceed this limit before uploading.
### AcroForm Field Detection
When you upload a PDF that contains interactive form fields (created in tools like Adobe Acrobat), DocsAutomator automatically converts them into placeholders:
| PDF Field Type | Placeholder Type |
| --------------------- | ---------------- |
| Text field / Dropdown | Text |
| Checkbox | Checkbox |
| Signature | E-Signature |
Button and radio group fields are not supported and will be skipped.
***
## Replacing or Updating Your PDF
Once a PDF template is uploaded, you have two options for changing it, depending on whether you want to keep your placeholders:
| Action | When to use | What happens to placeholders |
| -------------------------- | ------------------------------------------------------------------------------------------------ | ------------------------------------------------------------------------------ |
| **Replace PDF file** | The new PDF is the same template with minor changes (updated logo, revised copy, branding tweak) | Kept. Positions, sample data, and field properties carry over to the new file. |
| **Switch template format** | You want to start over with a different template, or switch to Google Docs / Word | Deleted along with the PDF. You'll be returned to the template-format picker. |
### Replace PDF file (keep placeholders)
Use this when you receive a revised version of the same document and want to swap the file without rebuilding your placeholder layout.
You can trigger it from two places:
* **Three-dots menu** on the minimized template row → **Replace PDF file**
* **Upload icon** between the Edit and Delete buttons on the PDF template card
The maximum file size for PDF templates is **10MB**. Ensure your PDF does not exceed this limit before uploading.
### AcroForm Field Detection
When you upload a PDF that contains interactive form fields (created in tools like Adobe Acrobat), DocsAutomator automatically converts them into placeholders:
| PDF Field Type | Placeholder Type |
| --------------------- | ---------------- |
| Text field / Dropdown | Text |
| Checkbox | Checkbox |
| Signature | E-Signature |
Button and radio group fields are not supported and will be skipped.
***
## Replacing or Updating Your PDF
Once a PDF template is uploaded, you have two options for changing it, depending on whether you want to keep your placeholders:
| Action | When to use | What happens to placeholders |
| -------------------------- | ------------------------------------------------------------------------------------------------ | ------------------------------------------------------------------------------ |
| **Replace PDF file** | The new PDF is the same template with minor changes (updated logo, revised copy, branding tweak) | Kept. Positions, sample data, and field properties carry over to the new file. |
| **Switch template format** | You want to start over with a different template, or switch to Google Docs / Word | Deleted along with the PDF. You'll be returned to the template-format picker. |
### Replace PDF file (keep placeholders)
Use this when you receive a revised version of the same document and want to swap the file without rebuilding your placeholder layout.
You can trigger it from two places:
* **Three-dots menu** on the minimized template row → **Replace PDF file**
* **Upload icon** between the Edit and Delete buttons on the PDF template card
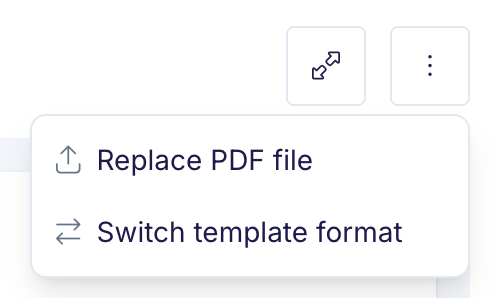 Pick the new PDF and DocsAutomator updates the file binary in place. AcroForm field detection is **not** re-run — your existing placeholders are reused as-is.
If the new PDF has different page dimensions, fewer pages, or content has reflowed, some placeholders may end up in the wrong position or point at a page that no longer exists. Open the editor after replacing the file and review each placeholder.
### Switch template format
Use the **Switch template format** option in the three-dots menu (or the **Change** button in the format picker) when you want to discard the current PDF entirely — for example, to move to a Google Docs template instead. This removes the PDF file from DocsAutomator's storage and clears all placeholders.
***
## The Visual Placeholder Editor
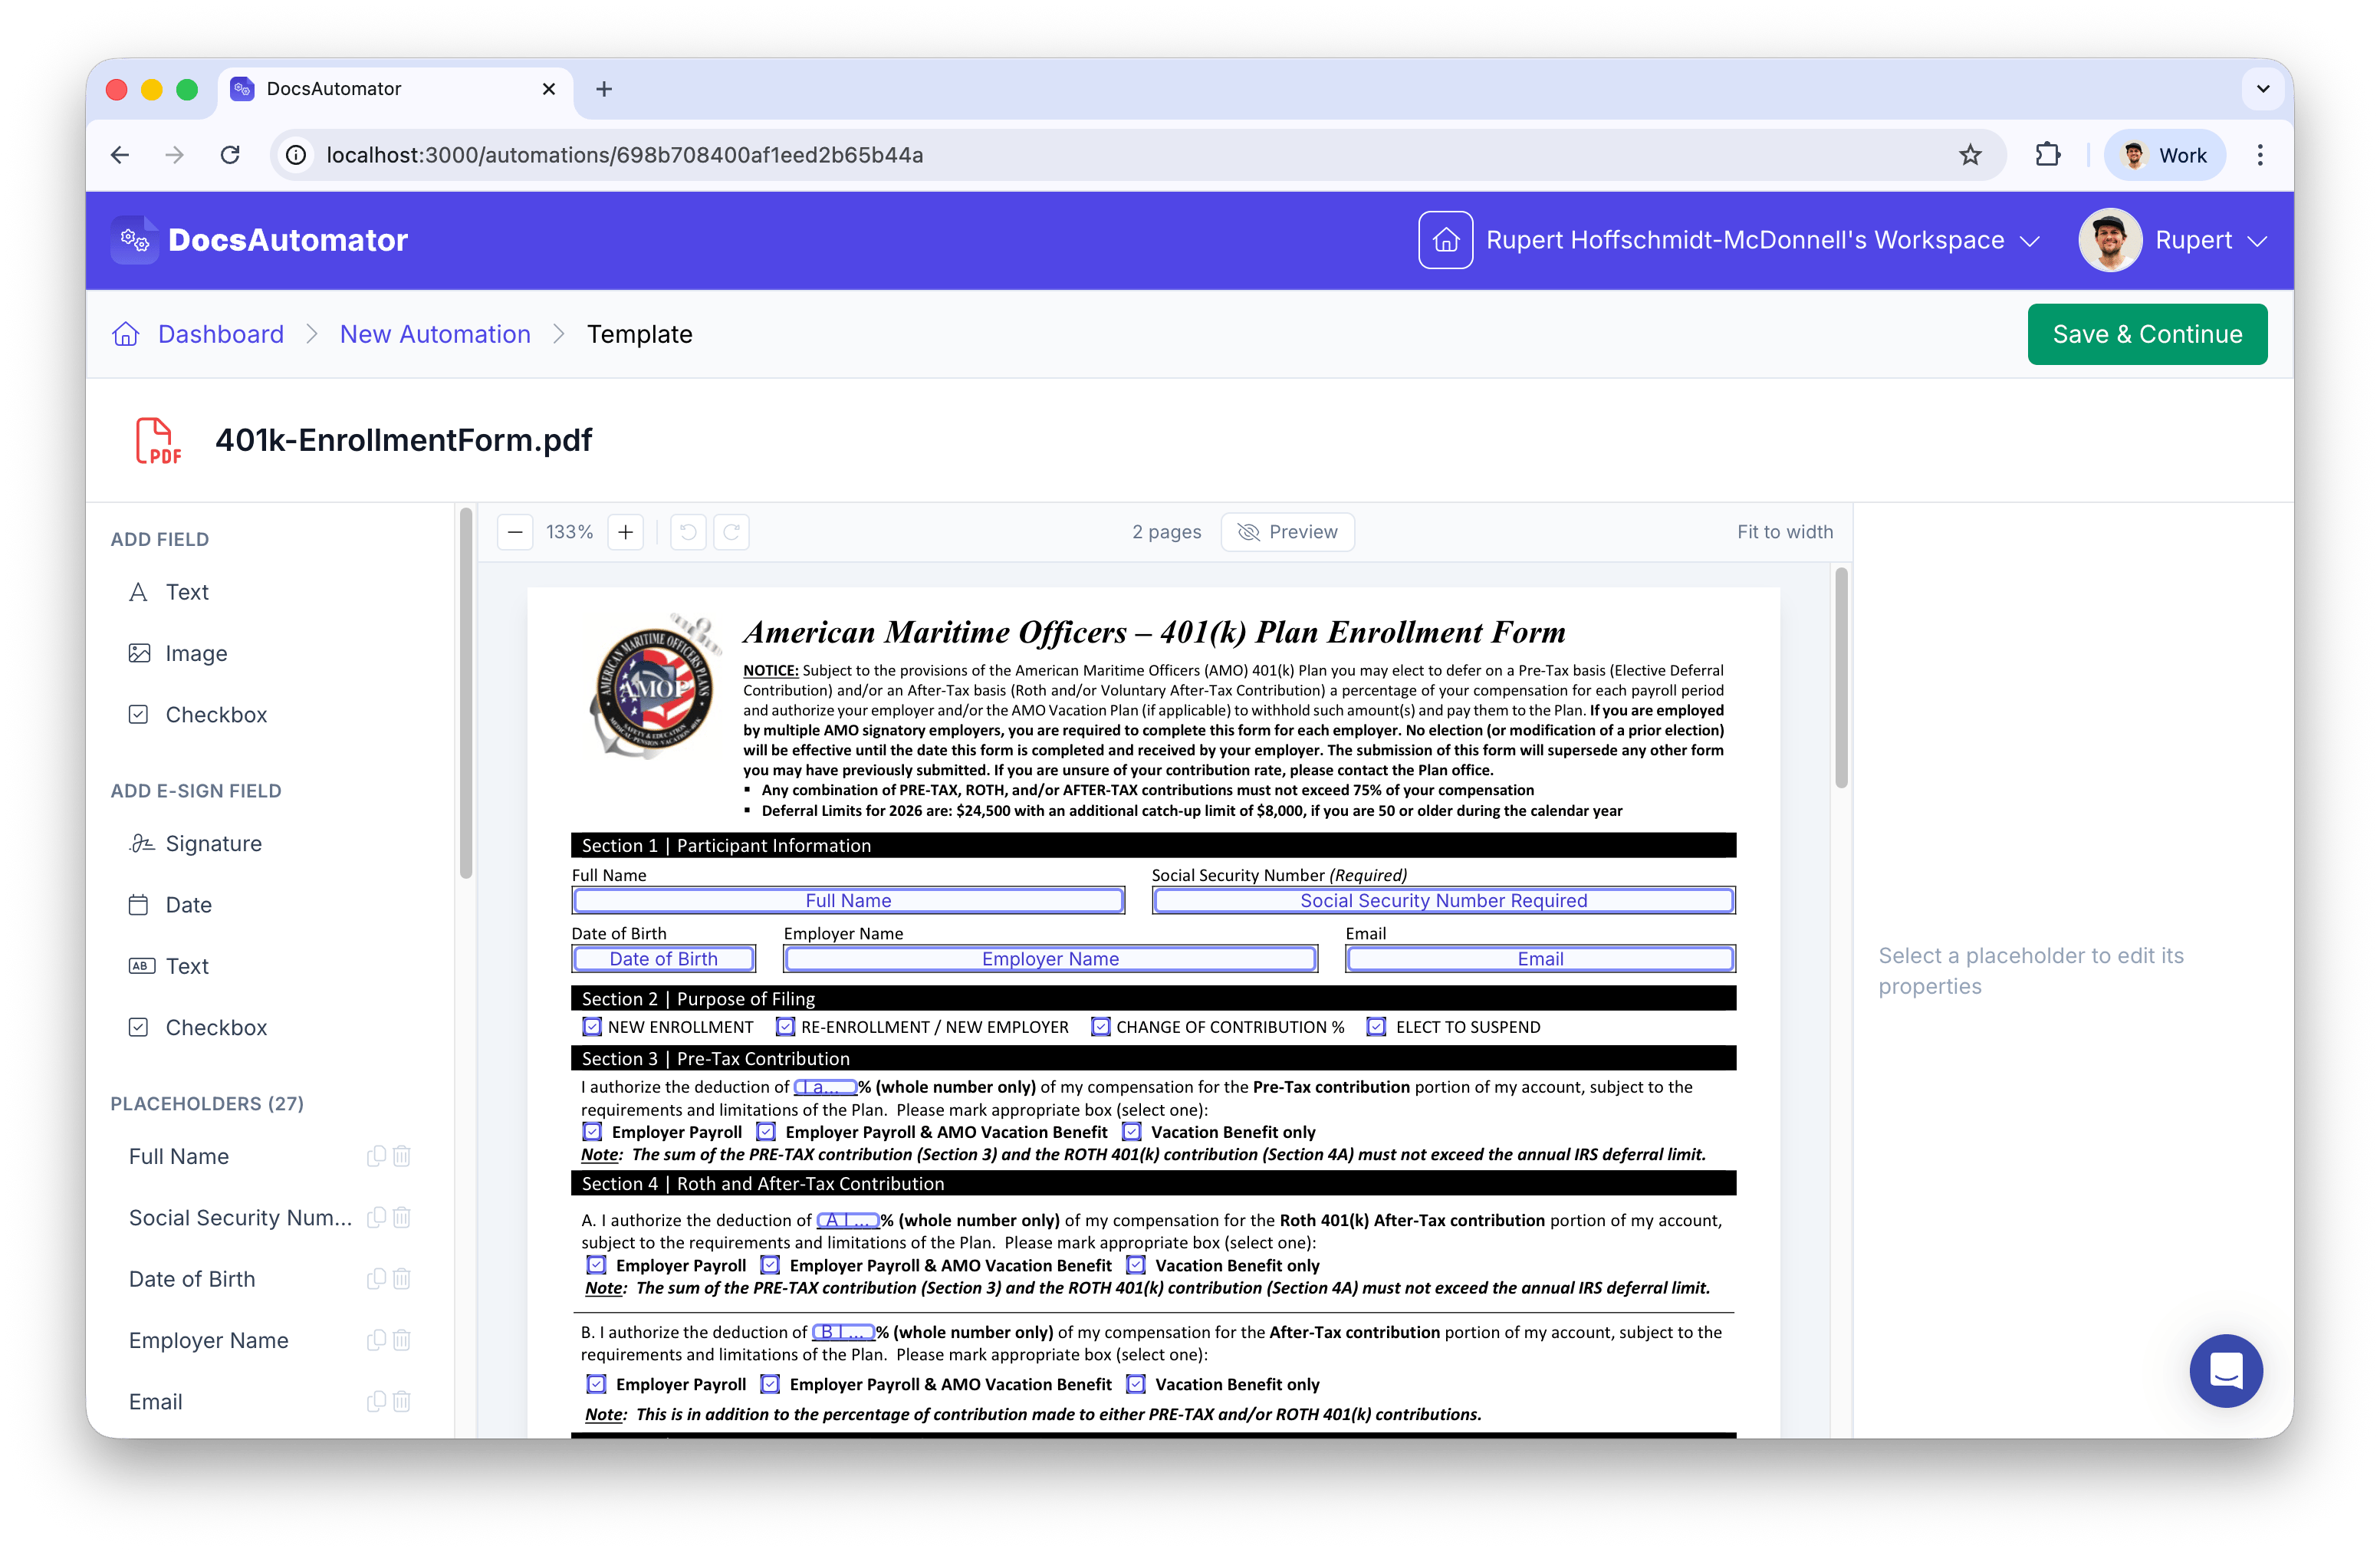
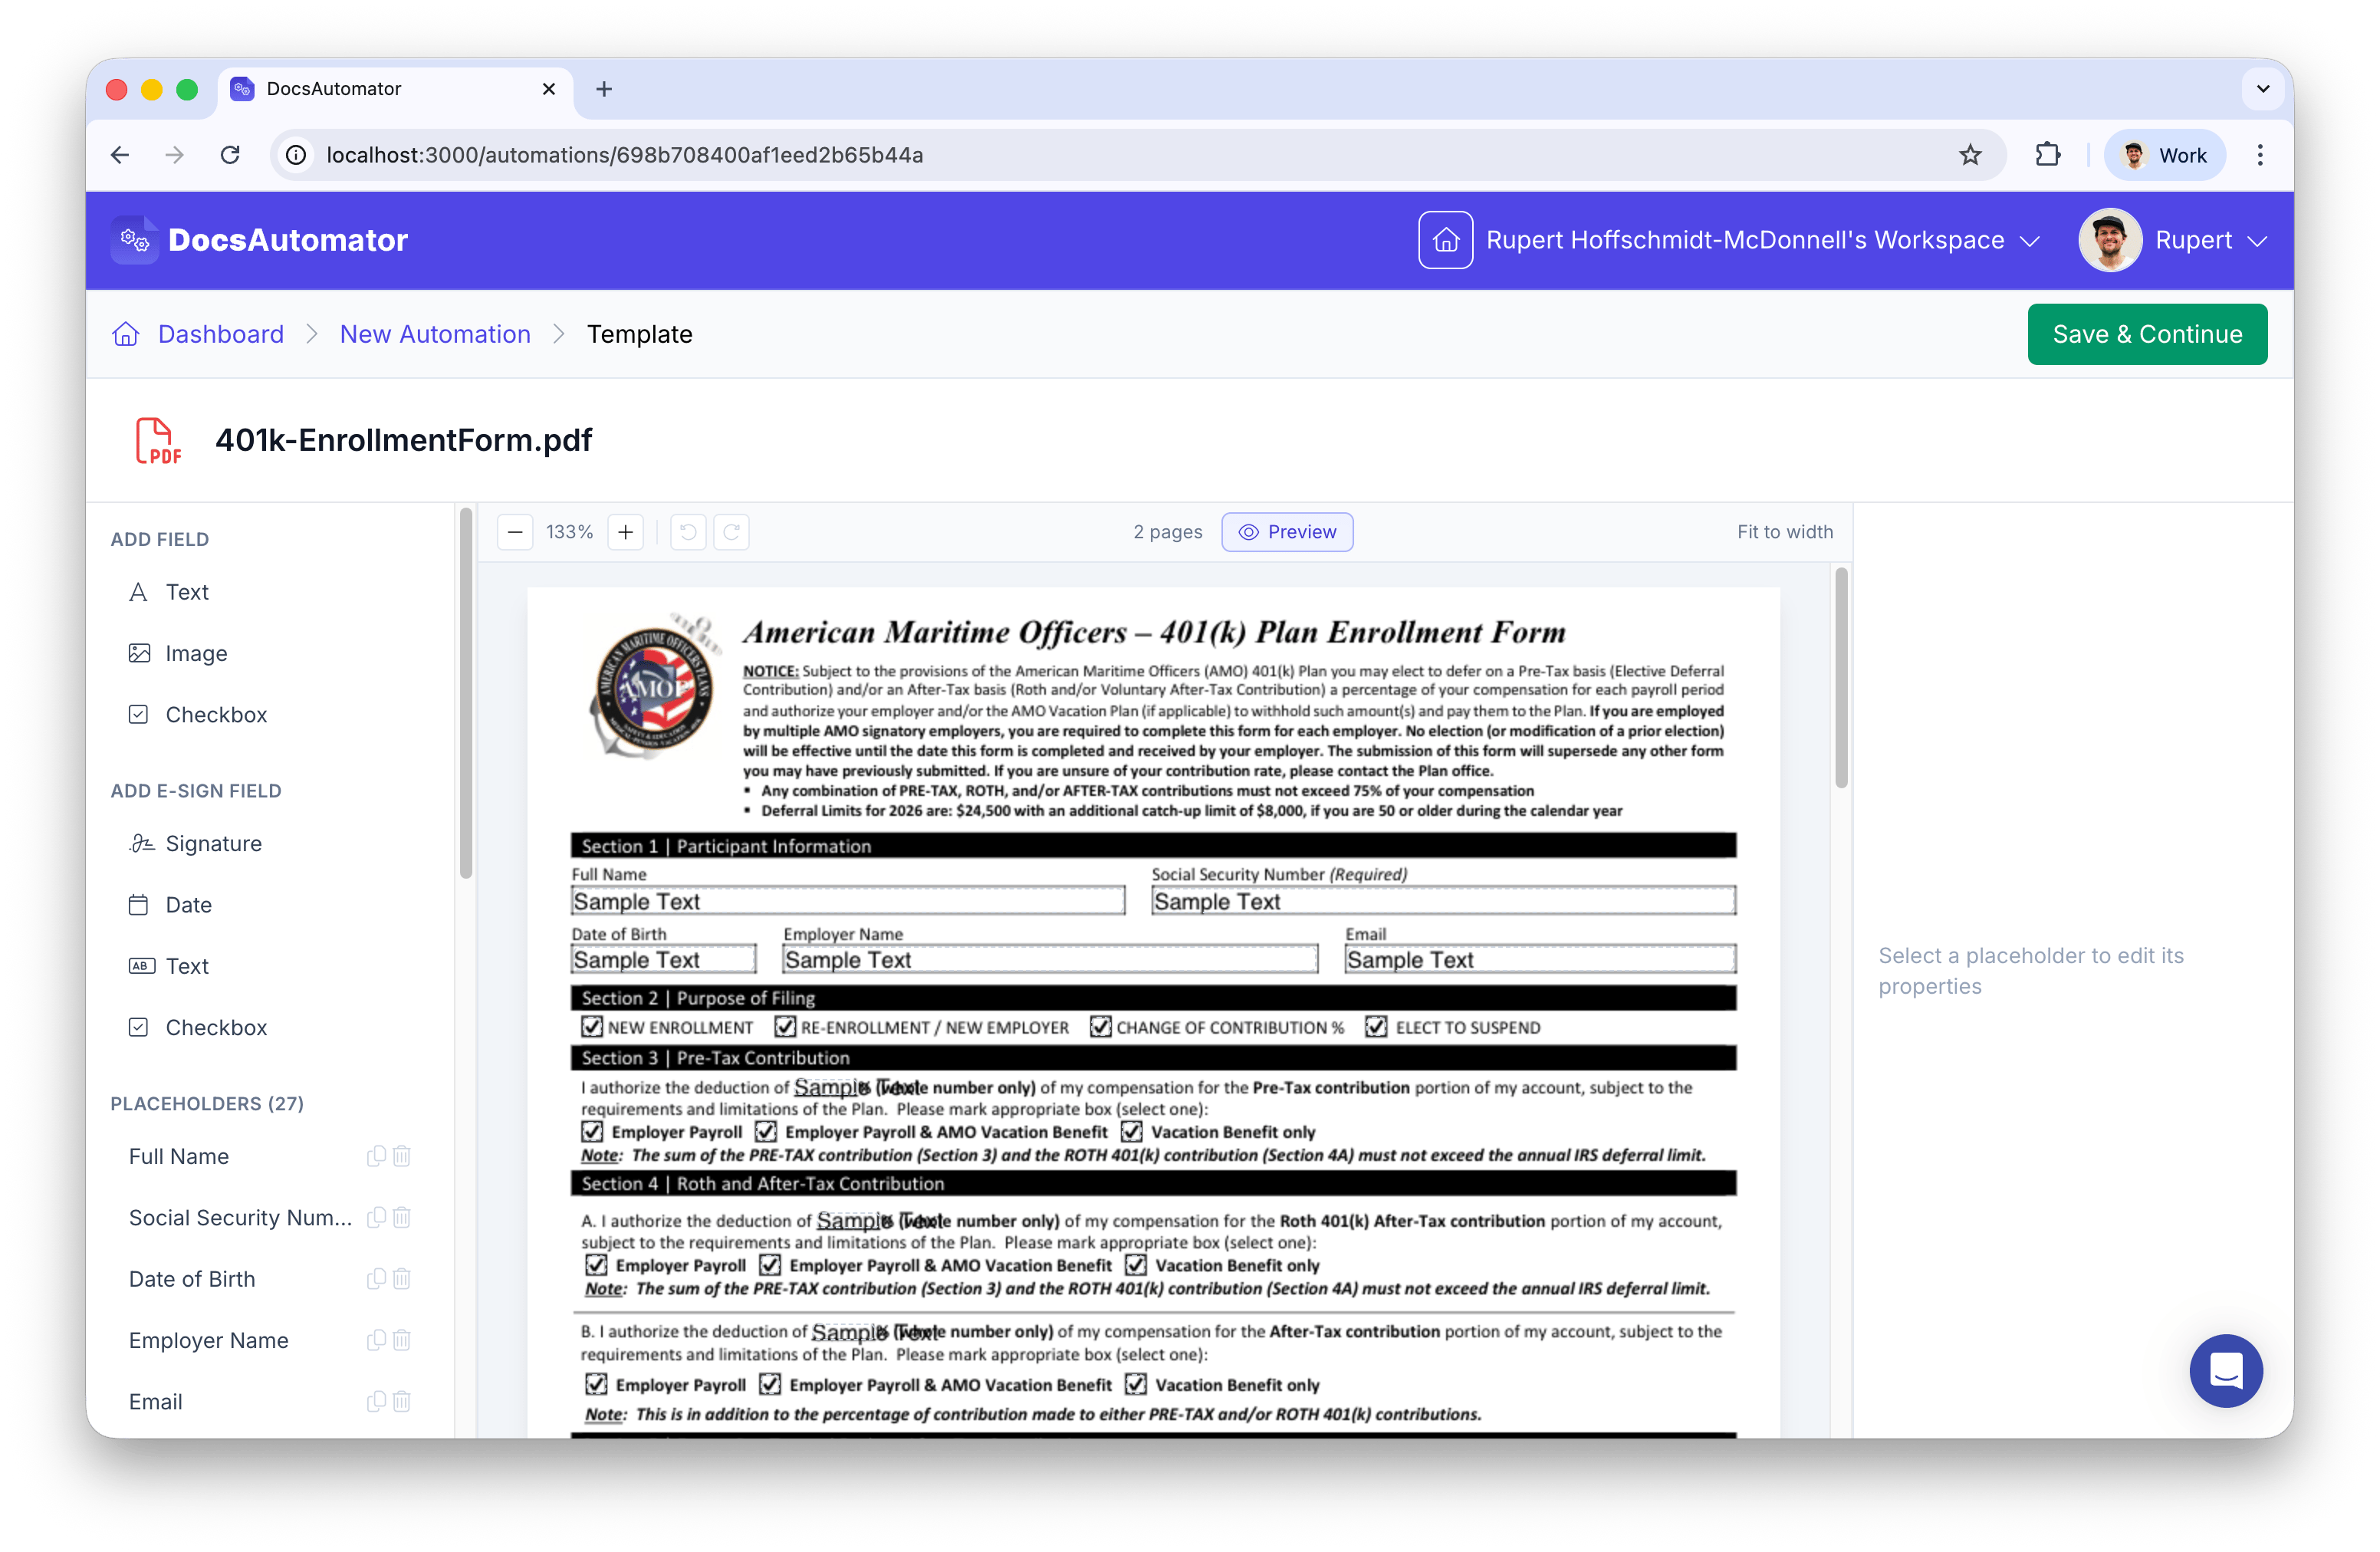
After uploading a PDF, click the edit button to open the full-screen placeholder editor. This editor lets you define **where** data fields appear on top of your PDF — it does not modify the PDF content itself. The editor has three panels:
* **Left sidebar** -- Add new fields and manage existing placeholders
* **Center** -- The PDF viewer with draggable placeholder overlays
* **Right sidebar** -- Properties panel for the selected placeholder
Pick the new PDF and DocsAutomator updates the file binary in place. AcroForm field detection is **not** re-run — your existing placeholders are reused as-is.
If the new PDF has different page dimensions, fewer pages, or content has reflowed, some placeholders may end up in the wrong position or point at a page that no longer exists. Open the editor after replacing the file and review each placeholder.
### Switch template format
Use the **Switch template format** option in the three-dots menu (or the **Change** button in the format picker) when you want to discard the current PDF entirely — for example, to move to a Google Docs template instead. This removes the PDF file from DocsAutomator's storage and clears all placeholders.
***
## The Visual Placeholder Editor
After uploading a PDF, click the edit button to open the full-screen placeholder editor. This editor lets you define **where** data fields appear on top of your PDF — it does not modify the PDF content itself. The editor has three panels:
* **Left sidebar** -- Add new fields and manage existing placeholders
* **Center** -- The PDF viewer with draggable placeholder overlays
* **Right sidebar** -- Properties panel for the selected placeholder
 ### Adding Placeholders
You can add placeholders in two ways:
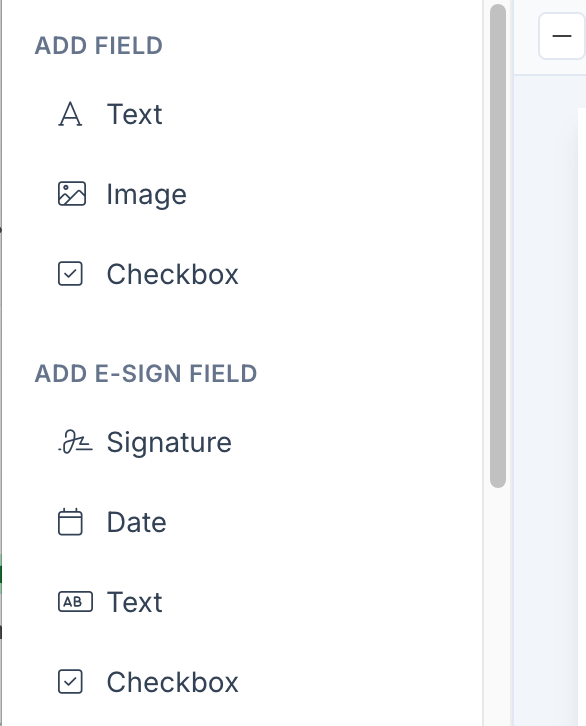
1. **Click** a field type in the left sidebar to add it to the center of the current page
2. **Drag** a field type from the sidebar and drop it at a specific position on any page
Available field types:
| Type | Description |
| ------------ | ------------------------------------------------------------------------ |
| Text | Replaced with text data from your data source |
| Image | Replaced with an image from your data source (auto-scaled to fit bounds) |
| Checkbox | Shows a checkmark when the value is truthy |
| Static Text | Fixed text baked into every document (not mapped to a data source) |
| Static Image | Fixed image (logo, stamp, watermark) baked into every document |
### Adding Placeholders
You can add placeholders in two ways:
1. **Click** a field type in the left sidebar to add it to the center of the current page
2. **Drag** a field type from the sidebar and drop it at a specific position on any page
Available field types:
| Type | Description |
| ------------ | ------------------------------------------------------------------------ |
| Text | Replaced with text data from your data source |
| Image | Replaced with an image from your data source (auto-scaled to fit bounds) |
| Checkbox | Shows a checkmark when the value is truthy |
| Static Text | Fixed text baked into every document (not mapped to a data source) |
| Static Image | Fixed image (logo, stamp, watermark) baked into every document |
 ### Positioning and Resizing
* **Drag** a placeholder to move it to the desired position on the page
* **Resize** by dragging the handle in the bottom-right corner of a selected placeholder
* **Nudge** with arrow keys for fine adjustments (1 point per press, hold Shift for 10 points)
* **Set exact values** in the Properties panel on the right (X, Y, Width, Height)
### Positioning and Resizing
* **Drag** a placeholder to move it to the desired position on the page
* **Resize** by dragging the handle in the bottom-right corner of a selected placeholder
* **Nudge** with arrow keys for fine adjustments (1 point per press, hold Shift for 10 points)
* **Set exact values** in the Properties panel on the right (X, Y, Width, Height)
 ### Multi-Page Support
The editor displays all pages of your PDF in a scrollable view. Each placeholder is assigned to a specific page. When you drag a field from the sidebar onto a page, it is placed on that page.
### Keyboard Shortcuts
| Shortcut | Action |
| -------------------- | ------------------------------------------------------ |
| Arrow keys | Nudge selected placeholder by 1pt |
| Shift + Arrow keys | Nudge by 10pt |
| Backspace / Delete | Delete selected placeholder |
| Ctrl/Cmd + Z | Undo |
| Ctrl/Cmd + Shift + Z | Redo |
| Ctrl/Cmd + C | Copy selected placeholder |
| Ctrl/Cmd + X | Cut selected placeholder |
| Ctrl/Cmd + V | Paste copied placeholder (on the last interacted page) |
| Escape | Deselect (or close editor if nothing selected) |
### Preview Mode
Toggle the **Preview** button in the toolbar to see a live rendering of your template with sample data filled in. The preview uses the same rendering engine as the final document generation, so what you see is what you get.
You can configure sample data for each placeholder in the Properties panel.
### Zoom Controls
Use the **+** and **-** buttons in the toolbar to zoom in and out (50% to 200%). Click **Fit to width** to automatically scale the PDF to fit the available space.
***
## Placeholder Properties
Select a placeholder to configure its properties in the right panel.
### Multi-Page Support
The editor displays all pages of your PDF in a scrollable view. Each placeholder is assigned to a specific page. When you drag a field from the sidebar onto a page, it is placed on that page.
### Keyboard Shortcuts
| Shortcut | Action |
| -------------------- | ------------------------------------------------------ |
| Arrow keys | Nudge selected placeholder by 1pt |
| Shift + Arrow keys | Nudge by 10pt |
| Backspace / Delete | Delete selected placeholder |
| Ctrl/Cmd + Z | Undo |
| Ctrl/Cmd + Shift + Z | Redo |
| Ctrl/Cmd + C | Copy selected placeholder |
| Ctrl/Cmd + X | Cut selected placeholder |
| Ctrl/Cmd + V | Paste copied placeholder (on the last interacted page) |
| Escape | Deselect (or close editor if nothing selected) |
### Preview Mode
Toggle the **Preview** button in the toolbar to see a live rendering of your template with sample data filled in. The preview uses the same rendering engine as the final document generation, so what you see is what you get.
You can configure sample data for each placeholder in the Properties panel.
### Zoom Controls
Use the **+** and **-** buttons in the toolbar to zoom in and out (50% to 200%). Click **Fit to width** to automatically scale the PDF to fit the available space.
***
## Placeholder Properties
Select a placeholder to configure its properties in the right panel.
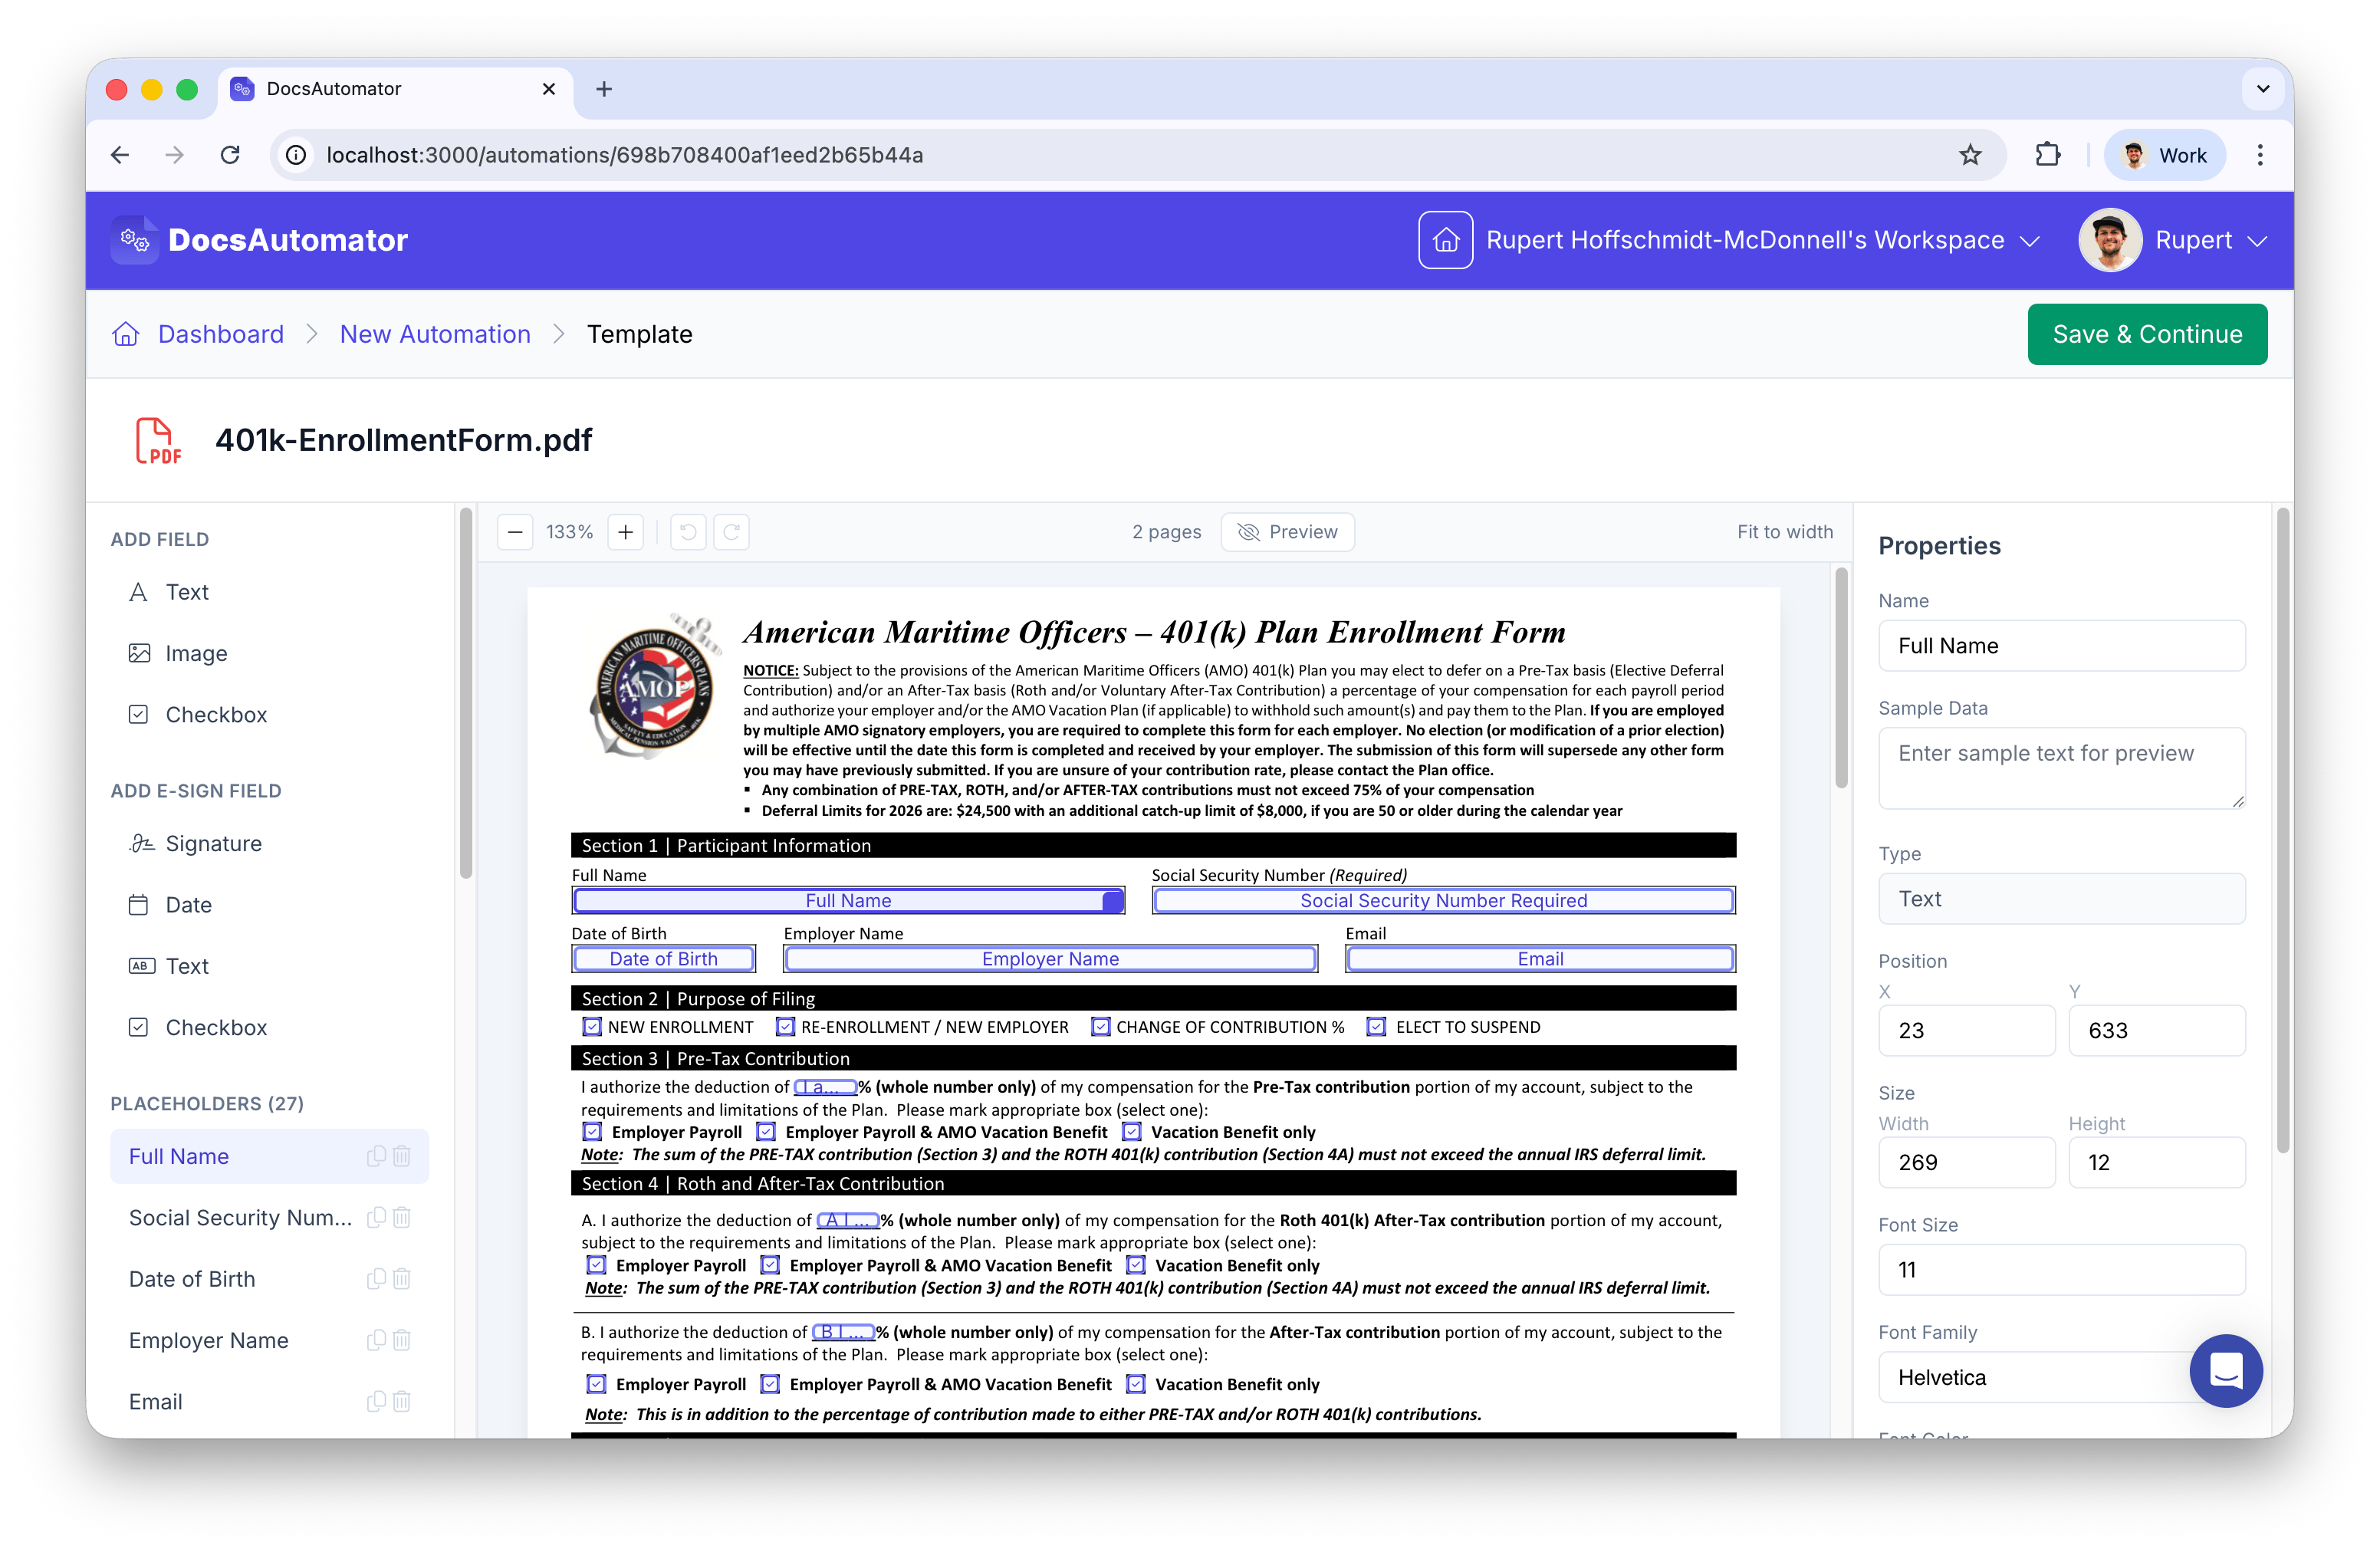 ### Common Properties (All Types)
| Property | Description |
| -------------------- | ------------------------------------------------- |
| Name | The data field name that maps to your data source |
| Position (X, Y) | Coordinates on the page (in PDF points) |
| Size (Width, Height) | Dimensions of the placeholder area |
### Text Properties
| Property | Options | Default |
| ---------------- | -------------------------------------------------------------------------------------- | ------------------- |
| Font Size | 6--72 | 11 |
| Font Family | Helvetica, Times Roman, Courier, Roboto, Open Sans, Lato, Montserrat, Playfair Display | Helvetica |
| Font Color | Any hex color | #000000 |
| Text Style | Bold, Italic, Underline, Strikethrough (combine any) | None |
| Horizontal Align | Left, Center, Right | Left |
| Vertical Align | Top, Middle, Bottom | Middle |
| Text Overflow | Expand horizontally, Expand vertically, Shrink to fit, Truncate | Expand horizontally |
| Sample Data | Text used in preview mode | -- |
The **Text Style** toggles apply bold, italic, underline, and strikethrough to the whole field. They can be combined (e.g. bold + underline), work with every font listed above, and apply across all text overflow modes. Styling is available for dynamic text and static text fields, and the live preview reflects it before you generate.
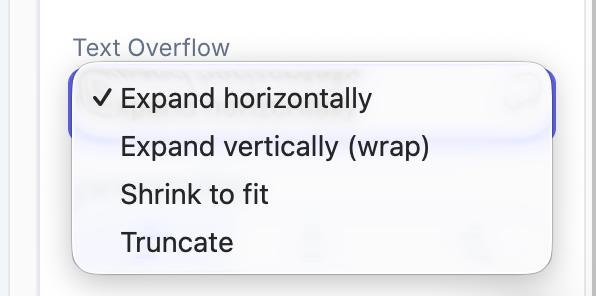
### Text Overflow Modes
| Mode | Behavior |
| ----------------------- | ------------------------------------------------------------------- |
| **Expand horizontally** | Single line, text extends past the box boundary if needed (default) |
| **Expand vertically** | Text wraps at box width and grows downward for multiple lines |
| **Shrink to fit** | Automatically reduces font size until text fits within the box |
| **Truncate** | Clips text at box width and adds an ellipsis (...) |
### Common Properties (All Types)
| Property | Description |
| -------------------- | ------------------------------------------------- |
| Name | The data field name that maps to your data source |
| Position (X, Y) | Coordinates on the page (in PDF points) |
| Size (Width, Height) | Dimensions of the placeholder area |
### Text Properties
| Property | Options | Default |
| ---------------- | -------------------------------------------------------------------------------------- | ------------------- |
| Font Size | 6--72 | 11 |
| Font Family | Helvetica, Times Roman, Courier, Roboto, Open Sans, Lato, Montserrat, Playfair Display | Helvetica |
| Font Color | Any hex color | #000000 |
| Text Style | Bold, Italic, Underline, Strikethrough (combine any) | None |
| Horizontal Align | Left, Center, Right | Left |
| Vertical Align | Top, Middle, Bottom | Middle |
| Text Overflow | Expand horizontally, Expand vertically, Shrink to fit, Truncate | Expand horizontally |
| Sample Data | Text used in preview mode | -- |
The **Text Style** toggles apply bold, italic, underline, and strikethrough to the whole field. They can be combined (e.g. bold + underline), work with every font listed above, and apply across all text overflow modes. Styling is available for dynamic text and static text fields, and the live preview reflects it before you generate.
### Text Overflow Modes
| Mode | Behavior |
| ----------------------- | ------------------------------------------------------------------- |
| **Expand horizontally** | Single line, text extends past the box boundary if needed (default) |
| **Expand vertically** | Text wraps at box width and grows downward for multiple lines |
| **Shrink to fit** | Automatically reduces font size until text fits within the box |
| **Truncate** | Clips text at box width and adds an ellipsis (...) |
 ### Image Properties
Image placeholders automatically scale the source image to fit within the placeholder bounds while maintaining the original aspect ratio. Supports JPG, PNG, and base64-encoded images.
### Static Fields
PDF templates support two static field types that are baked into every generated document, independent of your data source:
* **Static Text** -- Fixed text that appears on every document (e.g. disclaimers, terms, labels). Configure the text value in the properties panel.
* **Static Image** -- Fixed image that appears on every document (e.g. logos, stamps, watermarks). Upload a PNG or JPEG image (up to 5MB) in the properties panel. Images are automatically optimized for fast rendering.
Add static fields from the **Add Static Field** section in the left sidebar. Static fields support the same drag, resize, and positioning controls as regular placeholders.
### Checkbox Properties
| Property | Options | Default |
| --------------- | --------------------------------- | ------------ |
| Unchecked Style | Show empty square, Show nothing | Show nothing |
| Sample State | Checked / Unchecked (for preview) | Checked |
The checkbox accepts various truthy/falsy values from any data source: booleans, strings like "true"/"false", "yes"/"no", and Airtable/SmartSuite emoji values.
***
## E-Signature Fields on PDFs
PDF templates support e-signature fields that integrate with [DocsAutomator eSign](/features/docsautomator-esign). Unlike Google Doc templates which use text-based syntax (`{{esign.signature_1}}`), PDF templates use visually positioned e-sign fields.
### E-Sign Field Types
| Type | Description | Default Size |
| --------- | -------------------------------------- | ------------ |
| Signature | Signature capture area (draw or touch) | 150 x 50 |
| Date | Auto-filled date when signed | 100 x 20 |
| Text | Text input for the signer | 150 x 20 |
| Checkbox | Agreement checkbox | 100 x 20 |
Add e-sign fields from the **Add E-Sign Field** section in the left sidebar, then position them on the PDF just like regular placeholders.
### Signer Assignment
Each e-sign field is assigned to a signer by number. The field name includes the signer number (e.g., `esign_signature_1`, `esign_date_2`). Configure signer details (name, email) in the [e-signature output settings](/features/docsautomator-esign).
At least one **Signature** field is required for e-signing to work. The editor displays a warning if you have other e-sign fields but no signature field.
***
## Data Source Compatibility
PDF templates work with all DocsAutomator data sources:
The placeholder **Name** field is what maps to your data source fields. For example, if your Airtable table has a "Company Name" field, set the placeholder name to match the field name configured in your automation's field mapping.
***
## Saving Your Template
Click **Save** in the top navigation bar to persist your placeholder layout. The placeholders and sample data are saved to the automation and will be used during document generation.
***
## Related Pages
Alternative template approach using Google Docs
Complete reference for all placeholder types
E-signature configuration and workflows
Image insertion and quality settings
### Image Properties
Image placeholders automatically scale the source image to fit within the placeholder bounds while maintaining the original aspect ratio. Supports JPG, PNG, and base64-encoded images.
### Static Fields
PDF templates support two static field types that are baked into every generated document, independent of your data source:
* **Static Text** -- Fixed text that appears on every document (e.g. disclaimers, terms, labels). Configure the text value in the properties panel.
* **Static Image** -- Fixed image that appears on every document (e.g. logos, stamps, watermarks). Upload a PNG or JPEG image (up to 5MB) in the properties panel. Images are automatically optimized for fast rendering.
Add static fields from the **Add Static Field** section in the left sidebar. Static fields support the same drag, resize, and positioning controls as regular placeholders.
### Checkbox Properties
| Property | Options | Default |
| --------------- | --------------------------------- | ------------ |
| Unchecked Style | Show empty square, Show nothing | Show nothing |
| Sample State | Checked / Unchecked (for preview) | Checked |
The checkbox accepts various truthy/falsy values from any data source: booleans, strings like "true"/"false", "yes"/"no", and Airtable/SmartSuite emoji values.
***
## E-Signature Fields on PDFs
PDF templates support e-signature fields that integrate with [DocsAutomator eSign](/features/docsautomator-esign). Unlike Google Doc templates which use text-based syntax (`{{esign.signature_1}}`), PDF templates use visually positioned e-sign fields.
### E-Sign Field Types
| Type | Description | Default Size |
| --------- | -------------------------------------- | ------------ |
| Signature | Signature capture area (draw or touch) | 150 x 50 |
| Date | Auto-filled date when signed | 100 x 20 |
| Text | Text input for the signer | 150 x 20 |
| Checkbox | Agreement checkbox | 100 x 20 |
Add e-sign fields from the **Add E-Sign Field** section in the left sidebar, then position them on the PDF just like regular placeholders.
### Signer Assignment
Each e-sign field is assigned to a signer by number. The field name includes the signer number (e.g., `esign_signature_1`, `esign_date_2`). Configure signer details (name, email) in the [e-signature output settings](/features/docsautomator-esign).
At least one **Signature** field is required for e-signing to work. The editor displays a warning if you have other e-sign fields but no signature field.
***
## Data Source Compatibility
PDF templates work with all DocsAutomator data sources:
The placeholder **Name** field is what maps to your data source fields. For example, if your Airtable table has a "Company Name" field, set the placeholder name to match the field name configured in your automation's field mapping.
***
## Saving Your Template
Click **Save** in the top navigation bar to persist your placeholder layout. The placeholders and sample data are saved to the automation and will be used during document generation.
***
## Related Pages
Alternative template approach using Google Docs
Complete reference for all placeholder types
E-signature configuration and workflows
Image insertion and quality settings